Showing posts with label Italian Renaissance clothing. Show all posts

Tuesday, November 12, 2024

Maroon Balzo

 I recently finished this balzo. It was an easy make, but sewing all the little beads on took quite a long time.


Construction is relatively simple; make a long fabric tube big enough to go around your head and allow ease and add about an inch/2.5cm extra on each end (this is to allow for the end to be turned under).

Stuff the tube with fibrefill or pillow stuffing until it is moderately stiff but still flexible enough to bend around your head.

Turn the end of one end of the tube under and pin it over the other end, creating a donut shape. Pin securely. Try it on to make sure it fits. Adjust if necessary, and hand sew the opening securely closed.

Next, you are going to use the donut as a pattern for the lid. There are hats like this which are just the donut shape, but I prefer the covered sort to protect from scalp sunburn.

Using a large piece of wrapping paper or old sheet etc, cut out the rough shape of the donut leaving about 5cm extra all the way around. We are aiming to cut out a lid shape.

Put the lid shape toile over the donut to make sure it will fit, and that there is enough fabric to turn a hem under. Make any adjustments necessary and then cut out your fashion fabric.

Hand sew the 'lid' onto the donut, turning a hem under as you go. You don't want it drum tight; there should be a little bit of ease as the lid will sit against the back of your head/hair.

Add trims as desired.

This particular balzo was inspired by this portrait below:

'Portrait of a Lady with a G*psy' by the Italian School, 15th C
Image from: ://www.mutualart.com/Artwork/PORTRAIT-OF-A-LADY-WITH-A-GYPSY/05D83263A5F30FD8
Italian School, 15th Century | PORTRAIT OF A LADY WITH A GYPSY | MutualArt

But there are many similar ones to be seen in portraiture from the sixteenth century, including this one: 


Vincenzo Pagani (1490-1568) - Annunciation (1532) - Palazzo Ducale Urbino - Galleria Nazionale delle Marche, image found via: //au.pinterest.com/pin/1337074878802655/

Friday, July 28, 2023

Red Velveteen Tie-On Italian Style Sleeves

Sleeves again this week, and boy! am I happy with these! So rich and soft - I love them. I got the velveteen before the quality of cotton velveteen being offered by my local Spotlight dropped, and the fabric is lush.


These were created in the same way as previous iterations: the pattern is my roomy, self-drafted pattern that is super comfortable and very wearable. The centre back seam of velveteen and stash fabric lining was machine sewn and hand felled. Then the pieces were put together, wrong way around, and machine sewn. The arc at the top of the sleeve was clipped, and then the sleeve turned right way out ("bagged out"). I generally choose to do a small whip stitch around the top of the sleeve to stop the lining rolling out with wear, and I did that with these. I usually embroider an 'L' on the left sleeve lining before hemming also, just to help with speedier dressing on those days when I am in a rush or brain foggy.

I hemmed the outer sleeve first, anchoring it with small stab stitches. Then I hemmed the lining; turning the lining under quite a bit more so that it won't show when I move my arms.

The final step is to slog through one of my hated jobs - eyelets. I am getting faster at them, but they are very hard on my sore hands. I generally use 4 strands of waxed sewing thread, and use an awl to make a hole. I then do a double running stitch around the hole and then cover the edges with what is essentially a satin stitch.

I am super happy with this pair of sleeves; they feel so wonderful to touch.

Thursday, July 20, 2023

Purple Tie-On Italian Style Sleeves

I'm still working on the UFO pile, and this week's completed item is a pair of Italian style tie-on sleeves in linen. 
They are lined in black cotton remnants, with hand worked eyelets. I had to ease in the linen on one of the sleeves, which has led to a small amount of wrinkling around the wrist on one of the sleeves. Hopefully it will settle with wear, or at least not be noticeable, because I don't feel inspired to unpick the sleeve and lining hem and re-sew the inner seam of the lining (especially since the inner seams on sleeve and linings are felled).


Saturday, July 15, 2023

Italian Renaissance Hair Jewellery

Yet another hair band, with pieces from two different filigree bracelets sewn onto a velvet ribbon band and backed with grosgrain ribbon to reduce slippage. I used three wig clips on the back for extra security.


Saturday, July 8, 2023

Italian Renaissance Hair Jewellery

 Another hair band this week, constructed in the same way as the previous ones. This one has necklace components sewn on to the velvet ribbon. Probably too sparkly to really be appropriate for sixteenth century, but I couldn't resist it!

This one has 2mm seed beads sewn along the edges. I recently saw a beading technique demonstrated on Instagram that might be useful for this sort or project - I will let you know how I go.


Friday, June 30, 2023

Italian Renaissance Hair Jewellery

I recently finished another billament/hair accessory. This one has been sitting around in a half-finished state for literally years because I wasn't super happy with how it looked.

The flower shaped findings came to be with a 'patina' that I wasn't delighted about, and when I made the band up, it just seemed to look a bit shabby and be lacking something. So it sat in the UFO pile for a long time.

I resolved to finish it as part of my recent UFO completion drive, and I added matte gold seed beads (4mm) on the joins between the flat findings, to disguise the stitches and give add a bit of textural variety. I then started sewing the grosgrain ribbon on the back, and added white tiny seed beads as I went. When that was complete, I added three wig clips on the back to hold it in my hair.

It is still not my favourite accessory that I have ever made, but I am pleased that it is finished. Hopefully it will look nice when worn.
 
This image (a detail of Sister Minerva from 'Portrait of the family of the artist' by Sofonisba Anguissola) shows how the band will be worn; either in front of dressed hair such as hair taping, or in front of a caul. Image fromSofonisba Anguissola Portrait of the family of the artist. Fragment. Sister minerva, 1568, 122×157 cm: Description of the artwork | Arthive

Here is the full painting:


Sunday, June 25, 2023

Italian Renaissance Hair Jewellery

I'm having a break from boring sleeve sewing and finishing up some headwear that has been sitting around for a long time.

I really like the Italian style of wearing a necklace or decorated band in the hair in front of the braid like in this portrait by Sofonisba Anguissola

Image from: Sofonisba Anguissola - Portrait of the Artist's Sisters Playing Chess - WGA00697 - The Game of Chess (Sofonisba Anguissola) - Wikipedia

Since a lot of our SCA events are outside in public places, I don't feel confident pinning jewellery to my hair, and instead have been sewing jewellery components and beads to velvet bands that are secured into the hair with wig clips.

It is fiddly work, doesn't take up much room to store, and very easy to put off for another day!

I recently finished this one, which has bracelet pieces sewn onto a velvet band and separated with gold coils. The edges have tiny gold seed beads sewn on, and the back is faced with grosgrain ribbon (which helps grip the hair). I use a central wig clip and one at each end to secure.

I got a lot of elements suitable for this type of band from shops like Lovisa, Diva and Collete pre-Covid. I don't really go shopping like I used to, but thrift stores and op shops can be a good place to pick up old bracelets that you can break down to make this style of headwear.


Friday, June 16, 2023

May Day Challenge - Tie-On Italian Style Sleeves #3 (Purple)

 Last year Duchess Constanzia Moralez of Lochac set a Challenge to all those interested -The May Day Challenge (a personal challenge on 'how to improve your SCA in any way by May Day, AS LVII'). 

Image credit: R. Vess

My Challenge was to work on that UnFinished Object pile and get some items finished. My friend won Crown during the Challenge, and so some of my energy was diverted into helping create garb for Them and Their Household, but I did manage to get some items finished before the Challenge ended.

This pair of sleeves had been languishing in the UFO pile, cut out but unsewn. I machine sewed the centre back seam on the lining and outer fabrics, and stab stitched the seams open. Then the sleeves were joined at the shoulder seam and the lining and outer parts were hemmed individually. I then whip stitched around the top of each sleeve to prevent any movement in the lining, and worked five eyelets at the top of each sleeve.


These sleeves look blue in the picture but are actually purple.


Sunday, June 11, 2023

May Day Challenge - Tie-On Italian Style Sleeves #2 (White with gold trim)

 Last year Duchess Constanzia Moralez of Lochac set a Challenge to all those interested -The May Day Challenge (a personal challenge on 'how to improve your SCA in any way by May Day, AS LVII'). 

Image credit: R. Vess

My Challenge was to work on that UnFinished Object pile and get some items finished. My friend won Crown during the Challenge, and so some of my energy was diverted into helping create garb for Them and Their Household, but I did manage to get some items finished before the Challenge ended.

Second is another pair of sleeves that just needed two more eyelets added on each sleeve and the top edge whip- stitched to be wearable.


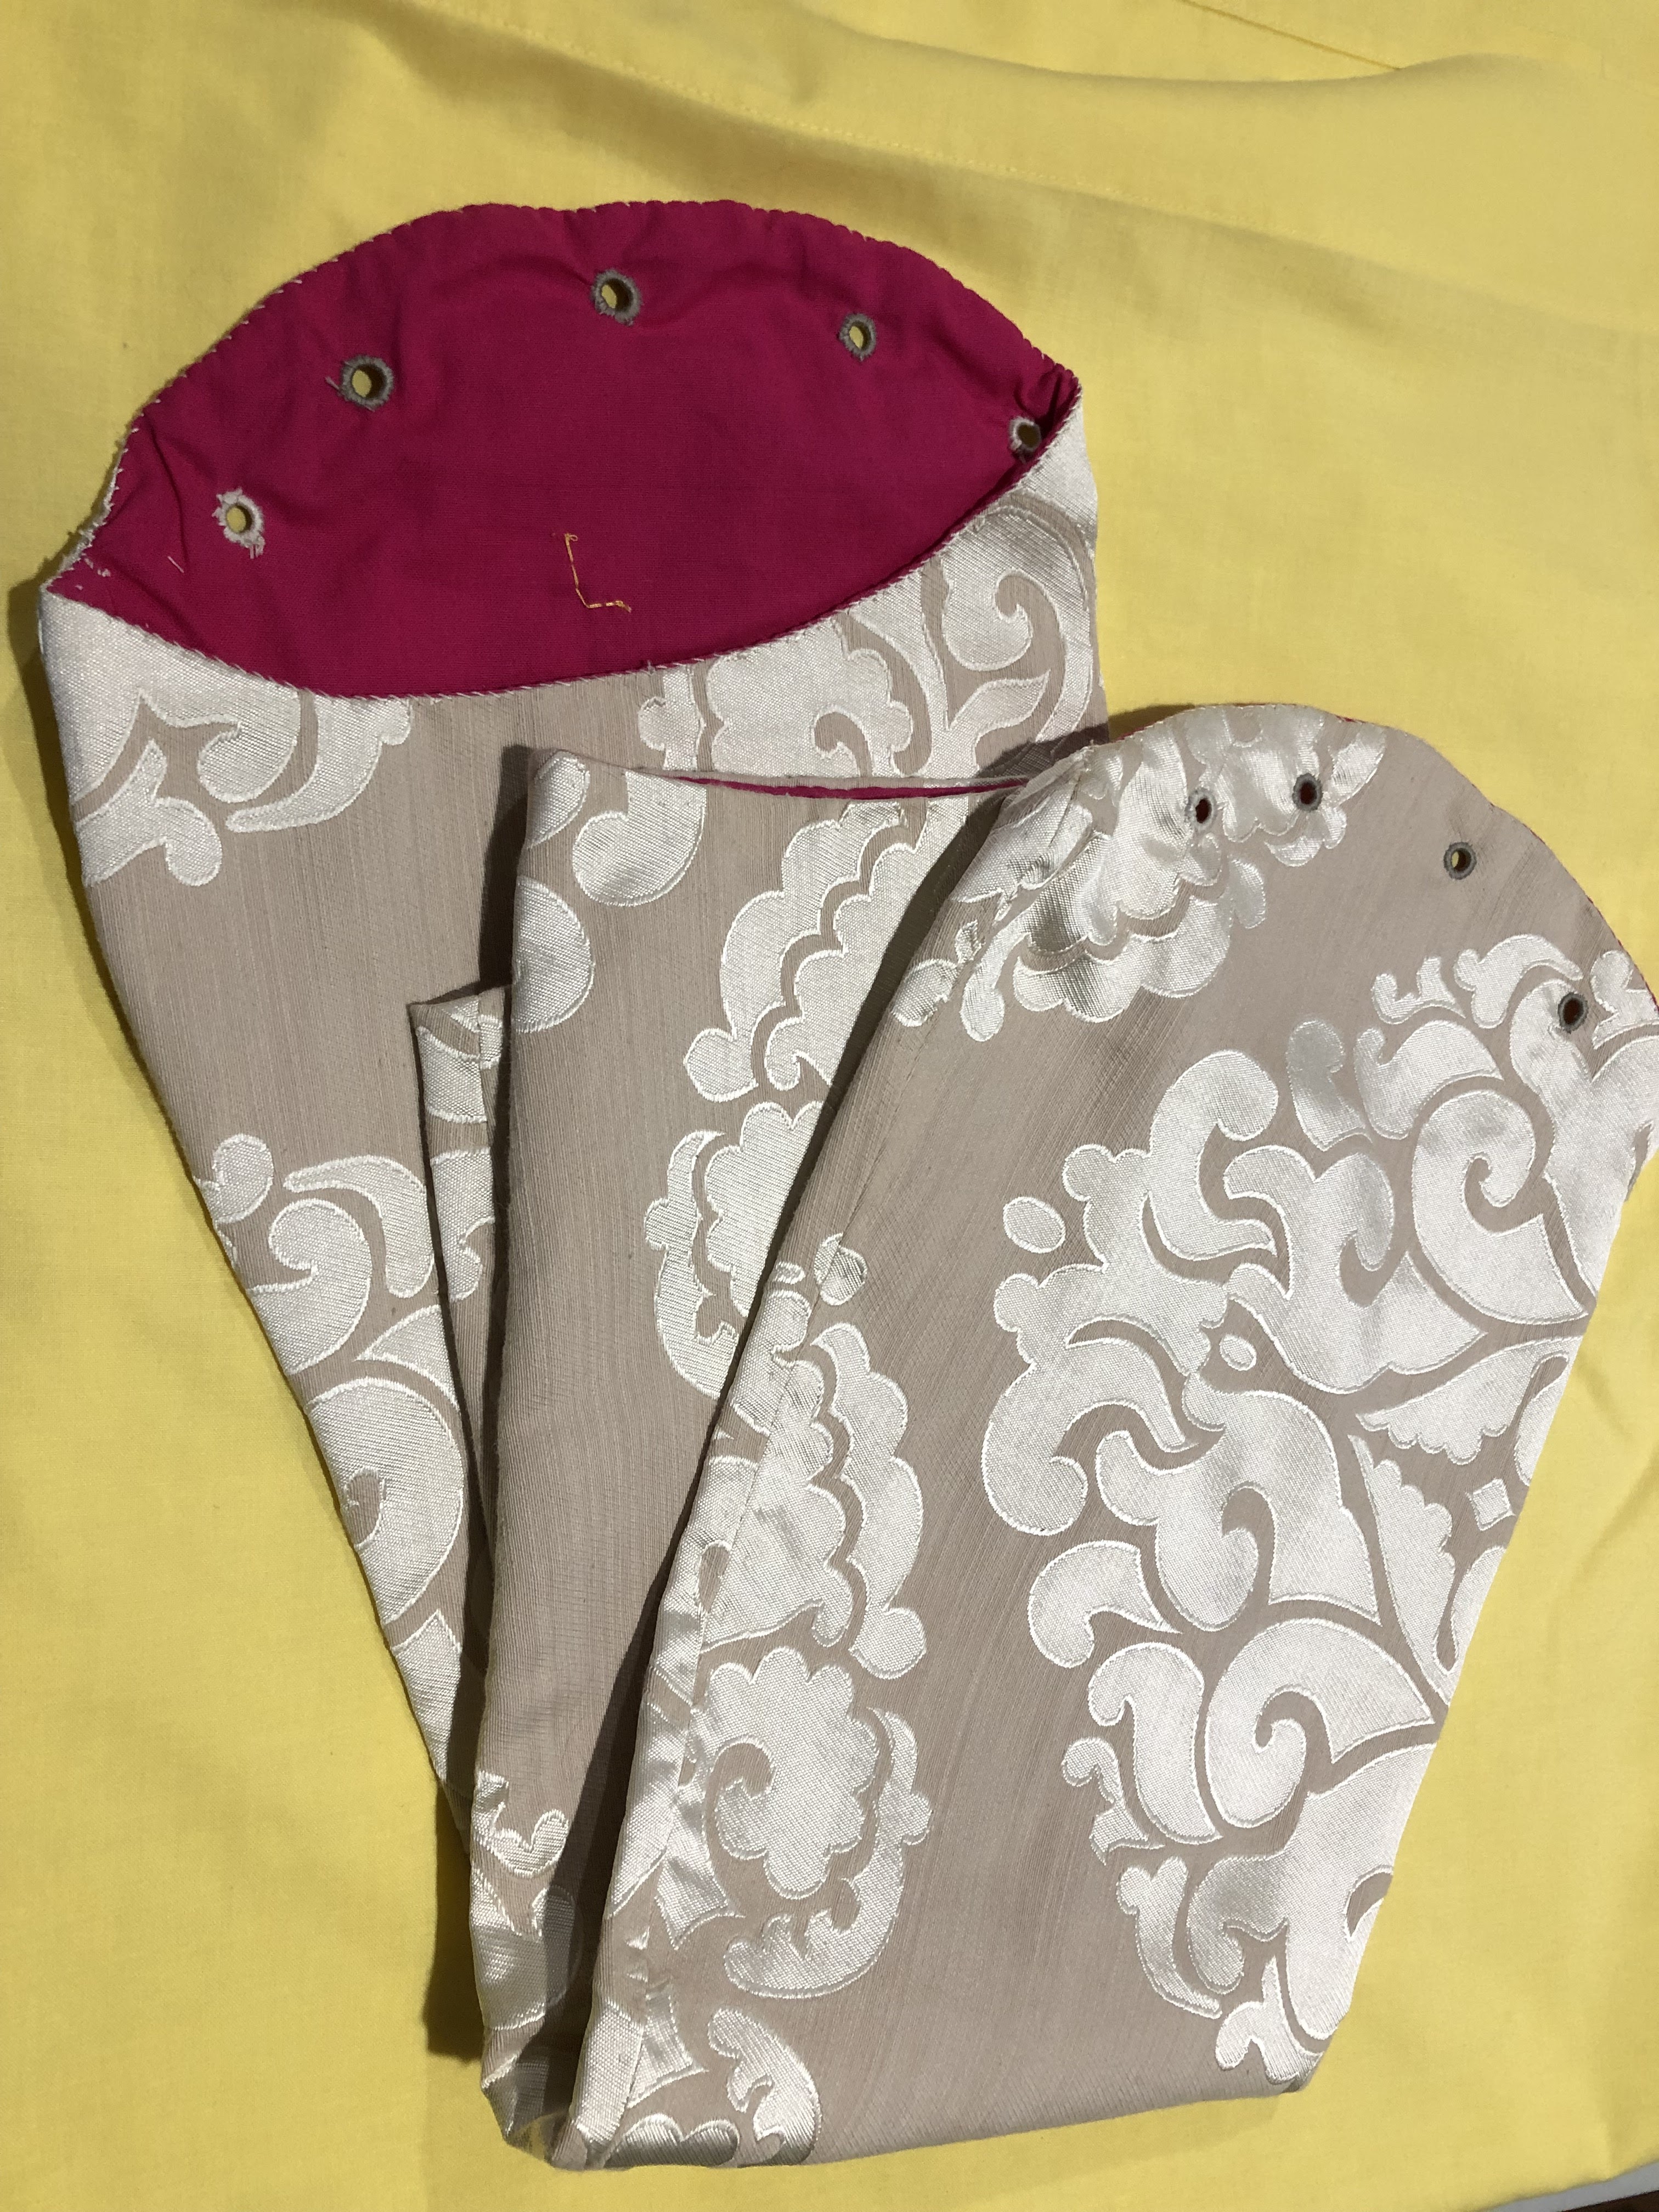
Tuesday, June 6, 2023

May Day Challenge - Italian Style Tie-on Sleeves #1 (Cream damask)

Last year Duchess Constanzia Moralez of Lochac set a Challenge to all those interested -The May Day Challenge (a personal challenge on how to improve your SCA in any way by May Day, AS LVII). 

Image credit: R. Vess

My Challenge was to work on that UnFinished Object pile and get some items finished. My friend won Crown during the Challenge, and so some of my energy was diverted into helping create garb for Them and Their Household, but I did manage to get some items finished before the Challenge ended.

First up is a pair of sleeves that just needed two more eyelets added on each sleeve. (An easy task to put off, because I hate doing eyelets!)


Friday, March 31, 2023

Italian Style Green Gown for a Young Woman

I have been occupied for the last few weeks with a project for a friend. 

Lochac's big SCA event 'Rowany Festival' is coming up, and a young friend wanted to learn how to make an Italian style dress and make a new one in time for Festival. It was a great opportunity to pass on skills, but (as so often happens) there wasn't enough time to get much done during our designated time together. I have been working on the outfit when my health allows, and I can finally see the light at the end of the proverbial tunnel.

The dress is made from a hard wearing and washable cotton drill and lined in drill and calico. The light boning is removable as the wearer is still adjusting to boned garments. There is a pleat at the hem to allow for growth. Three seams are machine sewn, with all other sewing, including seam felling, being done by hand. The dress has commercially made trim applied. The pattern is based on an existing 16thC style dress that is comfortable for the wearer.


Some excellent images of 16th century working class dress can be found here:

Italy: Working Class Dress (1575-1600) - Sophie Stitches (weebly.com)

including this detail from the Nativity of Mary by Pietro Ronzelli which is in the style of the recipient's wardrobe-


Monday, May 9, 2022

Green Linen Tie-On Sleeves In The Italian Style

 Are you getting bored with sleeves yet?!

I recently finished another pair, this time in a pretty green linen.

They are constructed in the same way as the rest. I cut out my favourite roomy sleeve pattern in the lining and fashion fabrics and edged them with zigzag stitch on the  machine. The seams were sewn on machine with straight stitch and opened out and stitched down. 

I sewed the green linen fashion fabric and lining together at the sleeve head (wrong sides out), and clipped the curves to reduce bulk before turning the right way out. 

I hand stitched around the top of the sleeve to stop the lining rolling out. 

I sewed the wrist hem by hand and then whipped the lining in with another row of stitching. This seems like extra work,  but if the lining ever stretches, it means I can re-hem it without affecting the hem on the green fashion fabric.

I worked eyelets around the top of the sleeve for tying on and then put my trusty 'L' on the inside of the left sleeve.


Thursday, April 21, 2022

Khaki Tie-On Sleeves in the Italian Style

 Another pair of sleeves finished!

These are made out of a cotton fabric remnant that I found in an op (thrift) shop.

They are constructed in the same way as all the others; the lining and fashion fabrics were cut out using my favourite sleeve pattern and edged with zigzag stitch. The seams were sewn on machine with straight stitch and opened out and stitched down. Then the fashion fabric and lining were sewn together at the sleeve head (wrong sides out), curves clipped and then turned right way out. The top of the sleeve was top stitched by hand to stop the lining rolling out. The wrist hem was sewn by hand and the lining whipped into place. Eyelets were worked by hand at the top of the sleeve and an 'L' was sewn into the left sleeve to make lacing the sleeves on in a hurry easier.


Wednesday, July 21, 2021

Small Embroidered Pocket

Here is something that I have  been working on, on and off, for a while. It is a small pocket which can be used as part of my group's static A&S display for demos.

The main stitches are chain, split, double running and seeding stitch. All the motifs are taken from sixteenth century modelbuchs.

The next step is to make it up. I have some red bias binding that might be a nice decorative highlight.


Wednesday, June 9, 2021

Embroidered Camicia Sleeves

I recently completed the sleeve panels for a new chemise. The motifs are worked mainly in stem stitch with  some double running stitch for some of the internal details.

The inspiration page from Shorleyker's 'A Sholehouse for the Needle'

The panels with the designs marked out in Frixion marker.

The completed sleeve panels.

I'm currently adding a motif to the front and back panels, and then will do the sleeve gussets.
Then I plan to hem each panel by hand and assemble them with a decorative faggoting stitch.


Friday, January 29, 2021

Calontir Clothing Challenge - January Update (and a new family member)


There are still a few days to go on this Challenge, but I *know* I won't get my projects finished. My plans have been completely derailed this month by the arrival of a new family member. 

This little Bean is the best sort of disruption!

It has been seventeen years since I dealt with a puppy, so I am well out of practice and underestimated the destructive and disruptive impact 😊

I didn't get to finish anything from the Challenge this month, but I did achieve the following overall:
* camicia cut out, embroidery marked out and underway
*coat pattern drafted, cut out and underway
*gown pattern and gown sleeve pattern underway
*linen partlet complete
*patterned partlet mostly complete (just needs a small amount of hemming)
*knotted partlet underway
*jewellery made
*masks made
Not even close to what I had hoped, but not too bad considering the massive amount of administrative work I was doing for the first two months, then Christmas projects, and then.....puppy!

I have also got a lot of ideas and inspiration from the other participants and I am looking forward to seeing the completed entries.

I'd like to thank the admins, judges and entrants for giving so much time and energy to this project to inspire others. I would certainly enter again, and even though I couldn't finish this time, I would definitely recommend it as a great way to focus time and energy for new projects.


Monday, November 30, 2020

Calontir Clothing Challenge - end of Nov 2020 Update

As with last month, most of my time has been taken up with SCA officer commitments, and the Challenge has been temporarily put aside. I have finally decided on a specific mid-sixteenth century Italian noble lady’s gown, and I will now be using blue cotton drill fabric.

Add cPaolo Caliari (Veronese), 1561: Detail from fresco at Villa Barbaroaption

The pale coat I have already cut out will work well with the blue dress that I am planning, especially as white cutwork sleeves and decorative elements on the bodice and sleeve head will work well. I managed to obtain some white cotton to line the coat, and that has been laundered and is waiting to be cut out and sewn.

The collarless white linen partlet that I have already made will go perfectly with the dress I have chosen, but I have also cut out another in white cotton voile with a lozenge pattern. It has been sewn up with enclosed seams and is waiting for hand hemming.

  Cutting out the partlet pieces

The design on the voile fabric

Partlet pieces waiting to be sewn 

The partlet ready to be hand finished and hemmed

 I would also like to make a net partlet out of ribbon, but that is likely to be time-consuming and the voile partlet will be a good stand-in if I don’t get it done in time. I am considering using grey or silver net instead of white (as in the original portrait) because my dress fabric is a darker blue.

 I got an aqua blue underskirt cut out and partially sewn. It has been flat pleated into a band. I wanted volume without too much bulk as sometimes I wear several underskirts at once. The first lot of pleats I used were too big, so I pulled them out and did the pleats half as small again, which looked much better. The skirt is hanging to let the fabric drop, and will be hand finished and hemmed next month. I am considering adding a heraldic element also; possibly seahorses around the hem.

  Underskirt fabric ready to be cut

  Seams ready to be hand sewn 

Marking out the gathering lines 

The first pleats were too big

Smaller gathers made nicer pleats

Pinning pleats into place to check how they look

 I was happy with the pinned pleats