Showing posts with label sixteenth century Italian costume. Show all posts

Thursday, August 3, 2023

'Portrait of a Lady' by Scipione Pulzone

Portrait of a Lady by Scipione Pulzone
(also known as 'Portrait Of A Lady, Half Length, Wearing A Black Velvet And Ermine-Trimmed Dress With A Lace Collar And Head-Shawl' by the Florentine School) - check out that lace veil!
 Image from: WikiGallery.org

Portrait Of A Lady, Half Length, Wearing A Black Velvet And Ermine-Trimmed Dress With A Lace Collar And Head-Shawl by Florentine School Lace veil and the fur trim is tdf


Monday, May 9, 2022

Green Linen Tie-On Sleeves In The Italian Style

 Are you getting bored with sleeves yet?!

I recently finished another pair, this time in a pretty green linen.

They are constructed in the same way as the rest. I cut out my favourite roomy sleeve pattern in the lining and fashion fabrics and edged them with zigzag stitch on the  machine. The seams were sewn on machine with straight stitch and opened out and stitched down. 

I sewed the green linen fashion fabric and lining together at the sleeve head (wrong sides out), and clipped the curves to reduce bulk before turning the right way out. 

I hand stitched around the top of the sleeve to stop the lining rolling out. 

I sewed the wrist hem by hand and then whipped the lining in with another row of stitching. This seems like extra work,  but if the lining ever stretches, it means I can re-hem it without affecting the hem on the green fashion fabric.

I worked eyelets around the top of the sleeve for tying on and then put my trusty 'L' on the inside of the left sleeve.


Friday, February 16, 2018

Red Velveteen Caul with Gold Trim

I was so pleased with the grey velveteen caul that I decided to do another one.

This one is made of a remnant of red cotton velveteen. I cut the basic circle pattern out last year when I cut out all those sleeve pieces. I tend to zig zag the edges of my patttern pieces for stability and protection, especially since it so often takes me a long time to finish these projects.

You may remember that my pattern is traced around the top edge of a bucket to get a nice circle. Another option is to use an oval shape to get more of a German-style caul with a bit more body at the back of the head towards the nape of the neck.
This embroidered caul that I finished in 2017 has an oval shaped bag pattern and is wider at the back of the head

On my circle bag/piece I marked out a grid pattern but only sewed down my ribbon where it intersected. I hoped that this would create a nice visual effect as the ribbon puffed up a bit.


At the intersections of the ribbon I added a glass bead.

I didn't think there was a need to line this caul; I tend to get overheated rather than cold and the velveteen is quite bulky.

I put gathering stitches around the edge of the circle/bag piece. I used to do one unbroken line of gathering stitches, but I now do two lines that each go roughly half way around the circle/bag piece. This allows me to better control the gathers and even up any areas where the gathers look a little bulky.

For the last few cauls I have been leaving an ungathered section across the top of my head. I think it is more flattering and looks more like the portraits from the time.

Once the gathering stitches are in the circle/bag part, I prepare the band. It is a rectangular piece the length around my head plus seam allowance on both ends. I join the short ends so that I have a continuous band. (I also usually stab stitch the seam allowance down flat to reduce bulk, especially when using thick fabrics like velveteen.) I then fold the band in half and iron a crease into it. Then I fold the two outside edges into the centre crease and tack them into place. This gives a narrow band with the raw edges fully enclosed inside the band.


Slide the edge of the circle/bag piece inside the band so that the edge of the circle bag piece butts up against the crease. I usually start by matching the centre top of the circle/bag piece and the centre top of the band and pinning it into place. Do the same at the bottom centre - it will help you to keep the gathers even.

Then start drawing up your gathering threads. I adjust my gathers by eye, and pin them into place as I go. I double check again before stitching to make sure that they look even. 
The next step is to start hand stitching the band into place. Stitch around the band on the outside (the part you will see); I use a small whip stitch.

Now turn the hat inside out and pin the gathers down on the inside of the band and stitch around again, securing the inside of the gathers as you go. Use very small stitches as you don't want any to show on the outside of the hat if you stitch beyond the band.

Your hat is done! At this stage  I add a metal comb in the centre front and a wig clip in the area of the band that sits behind my ear. This is not authentic and simply helps to keep the caul on my head and stop wispy bits of hair escaping as the day wears on.

On the red velveteen caul, I decided to add some commercial trim around the band at the last minute because it looked a bit bare. It is hand-stitched down. You could also add beads or embroider a design onto the band before sewing it to the circle/bag pattern piece.


The inspiration portrait-

Image result for judgment of paris by attributed to antonio da vendri
The Judgement of Paris (detail), Attributed to Antonio da Vendri
Image from https://www.rijksmuseum.nl/en/collection/SK-A-1296

This project has inspired more ideas, including a caul with different coloured panels like the one above, and one decorated with little tufts of thread (inspired by the inside of this caul)-

I'll keep you posted on the results!

Friday, April 22, 2016

Renaissance Tourney Dress- Cartridge Pleated Skirt

I had a small win this week and finally got the skirt cartridge pleated onto the bodice that I started last November. The dress needs a few tweaks, hemming and a set of sleeves, but I can see light at the end of the tunnel and will get this one finished in time as part of my Franchise/Prowess challenge for the Noble Pilgrimage.
I have been slogging along working on so many things and feeling quite disheartened about being sick and getting things finished in time for the challenge, so this is a big win for the week.

The dress is loosely based on Vincenzo Campi's portrait of The Fishmongers, so I will be making a set of red sleeves (and hopefully later down the track, that delightful partlet.)

Image from: http://www.wga.hu/art/c/campi/vincenzo/4fishmon.jpg

Saturday, April 20, 2013

Blue Drill Dress Update

Yesterday, my friend Heather (Queen of Luceters) presented me with the cords to tie on to the sleeve puffs of the blue drill dress. Thank you Heather!


The dress looked so nice with the ties on the sleeves that I was inspired to hand sew the trim onto the hem of the dress. I think it looks very nice, and the trim really stiffens the hem.


Sunday, February 10, 2013

Portrait by Catena


Today I was excited to find this portrait (which I had never seen before) of a very high waisted Italian gown. The 'Portrait of a Young Woman' is by Catena (Vincenzo di Biagio) circa 1505.


from: http://theredlist.fr/wiki-2-351-861-414-398-426-view-cinquecento-profile-catena-vincenzo-di-biagio.html


Friday, November 9, 2012

Daily Inspiration - Anonymous

Anonymous Venetian Portrait of a Woman

Portrait of a Woman - Anonymous Painter
circa 1550
from: http://starlightmasquerade.com/PortraitGallery/Ladder-Laced-Venetian/inspiration-pages/openbodice23.htm


Saturday, September 22, 2012

Blue dress update

The blue dress is getting very close to completion. I have been playing with different sizes and colours of pearls to see how they will look along the front edge of the bodice, and working on the sleeves.


Testing how pearls will look along the front edge of the bodice.


Wednesday, September 19, 2012

Blue dress update


I managed to blunder my way through my first attempt at knife pleating, and I am quite happy with how it turned out. The knife pleats sit much more smoothly than cartridge pleats, and I am now a fan of knife pleating. I had forgotten how much sewing down pleats hurts the fingertips- no difference there between knife and cartridge pleats!


The knife pleats sewn in


I also finished the lacing holes. I am playing with different ways of lacing - here is X lacing. The ladder lacing also looks nice.


I now need to add some hooks and eyes in the gap in the skirt. I am considering adding a modesty placket as well. I will hang the dress for a few more days, then hem it.


I am also pleased to say that the dress fits. I made it a bit looser than I normally make my gowns, mainly because I normally wear a corset which smooths out the lumps and bumps. I won't be wearing a corset with this one, so I think the world doesn't need to see my back fat!

Saturday, September 8, 2012

Portrait of a Lady With A Dog


I'm too tired to do any constructive hand work today so I am indulging in a bit of web-surfing and drooling over sixteenth century portraits. Here is one I have never seen before with an interesting button front closure.


Portrait of a Woman with her Dog by Parrasio Micheli
from  starlightmasquerade.com

Wednesday, August 29, 2012

Blue dress ideas


denverartmuseum.org / wikipaintings.org

I have been looking hard at the two pictures I posted recently which are the inspiration for the new blue dress. It looks to me that, in the St Ursula one at least (left), the large pearls are attached to the underdress or chemise.

I like the decoration, I am just not sure that I want to be restricted to wearing a particular chemise with that specific dress. I think I will have to pull out my stash of pearl beads and see how it will look if I add a line of pearls to the top of the bodice itself. There are lots of examples of similar dresses from similar times in Italy with pearl decoration, so I have a bit of lee-way. (I don't want to make an exact replica of the St Ursula dress.) If you look closely at the two portraits, there are big differences between the way the artists have drawn the layers of clothing.


Here are some more paintings that I have been looking to for inspiration:


Portrait of a Lady by Neroccio de Landi -  http://bertc.com/subfour/g128/neroccio.htm


Carpaccio's 'Meeting of the Betrothed Couple' (1495) - realmofvenus.renaissanceitaly.net


Carpaccio's 'Meeting of the Betrothed Couple' (1495) - oceansbridge.com


Portrait of Catharina Corano, Queen of Cyprus (1500)-  1st-art-gallery.com


It's time to start thinking about sleeves and hair accessories too.

Tuesday, August 28, 2012

Blue dress progress

Well, I tried the bodice on, and it looks like it will do. It is much less structured than I am used to, but should be fine for casual events when I cannot wear a corset.

Next I will hand finish the arm holes and make a decision about pleating the skirt, and the type of lacing I will use.


Monday, August 27, 2012

Blue Dress Progress


I am still plodding along slowly with the front-lacing blue dress.


I have sewn and edge-stitched the front and neck edges of the bodice and tacked the armholes into place. The tiny bones fit in very nicely and I am extremely happy with how that part turned out. I just sewed a small casing between the interlining and base lining and slotted them in.


Next I will dig out a chemise and try it on. That is always the daunting part! Then, I will stab stitch and edge stitch the armholes.

Saturday, August 25, 2012

Blue dress progress

After my last post pondering boning options, I rummaged around in my stash and managed to find two tiny little flat steel bones that should be ideal for strengthening the front panel.


The bodice pieces are cut out now and have been edged. Next will be hand sewing.


I need to decide whether to cartridge pleat or knife pleat the skirt on. Any suggestions from readers who have done this sort of dress would be very welcome!


Thursday, August 23, 2012

Un-corseted dress plans

I have been thinking a lot about that picture of St Ursula from the Denver Art Museum that I posted recently:

http://www.denverartmuseum.org/sites/default/files/slides/Media%20browser/collections_ps_1961_168AT.jpg

and also this, similar one
http://uploads8.wikipaintings.org/images/vittore-carpaccio/portrait-of-a-lady-1.jpg

and I am thinking of making my new un-corseted dress in a similar sort of style. I am so used to the straight up-and-down look of corseted gowns, I think I may be disappointed with how it turns out.

I have chosen a dark blue cotton for this dress because I had it in stash and also because I hope it will minimise my bust a little. If it works out okay, I might add an over-gown as well.

I have adjusted one of my existing bodice patterns to allow for the rounder bustline. I have cut the lining in a medium-heavy canvas and also a cotton lining fabric. I have made it front-lacing so that I can dress alone. I think I will have to add some sort of boning structure beside the lacing holes to give strength and to stop the cords pulling the fabric too much. I am considering light weight flat steel boning or maybe cable ties with an eyelet and ring combination. I have used heavy duty cable ties (in casings) as a light weight structural support next to eyelets before, but never in a dress that is to be worn without a corset or underbodies, so I am not sure how it will hold up.

I haven't even had a chance to edge the cut-out pattern pieces yet, so there is still time to think about it!


Sunday, August 12, 2012

New dress

As many of you may know, I have some health issues that affect my participation in SCA events in different ways. Occasionally, I can't wear a corset/stays/pair of bodies. This week I adapted a bodice to allow for no bodies, just a modern bra. I have a large bust, so this could be a disaster! I will let you know how it goes; I am also busy doing a little bit of mundane sewing which may delay the new dress a little.

Monday, May 28, 2012

Tidying Up


Since I have been sick I have really just been setting myself little tasks to work on. One was to go through a pile of fabric and miscellaneous articles that have been waiting to be dealt with for more years than I would like to admit! And what did I find? Three chemises and two partlets, all at the 'mostly finished' stage! I am so glad that I got on and did that chore now!

An embroidered partlet waiting to be hemmed and have a ruffle added


This partlet was originally inspired by the following portraits:

Paolo Cavazzola's 'Portrait of a Lady' from nga.gov.au 


Ritratto di Gentildonna by Bartolomeo Veneto at oilpaintingonline.com 


File:Veneto, Bartolomeo - Portrait of a Lady in a Green Dress - 1530.jpg
Bartolomeo Veneto's 'Portrait of a Lady in a Green Dress' - 1530 from commons.wikimedia.org 

Thursday, May 10, 2012

Olive pocket


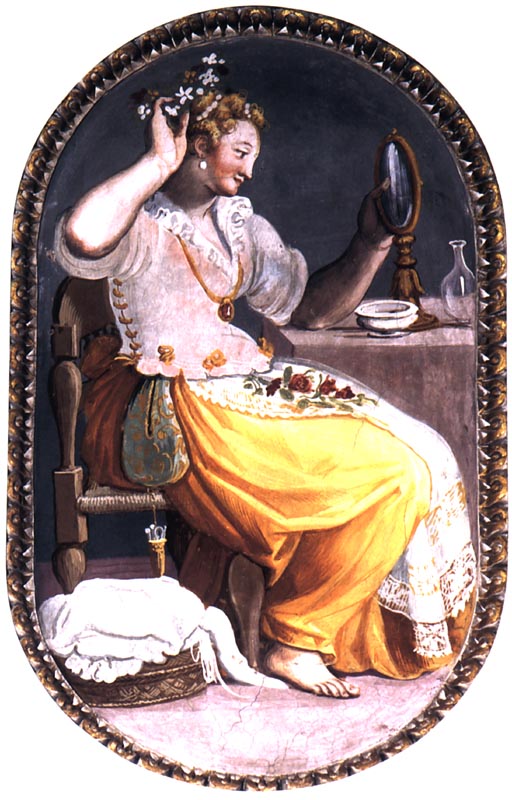
Last week I finished a new pocket (saccoccia) to go under my olive Italian-style tourney dress. I wear pockets in the split where my side-lacing dresses join, over my underskirt(s). I have adapted the style that we see in portraits:

 Woman at her Toilet (Donna alla toeletta), by Alessandro Allori, 1575-78, fresco, Florence, Church of Santa Maria Novella, Gaddi chapel, pg 138, fig. 71 from
http://www.kimiko1.com/research-16th/ModaFirenze/WomanToilet.html


Birth of the Virgin (Natività della Vergine), by Alessandro Allori, detail, 1595, Cortona, Church of Santa maria Nuova. pg 82, fig 71 in Moda a Firenze


My pockets are bigger, mainly because I carry around my money, camera, mobile phone, medication, lip gloss and other modern things as well as a hankie, spare lacing cords and things like that. So they need to be big!

I didn't have a wide enough piece of fabric to make the pocket front in one piece, so I adapted my pattern to allow for a seam in the front. When I make a pocket front from one piece of fabric, I slit the front and bind the opening (usually with a bias strip.)


I put tabs on the back of my pockets so that I can use them with any of my belts or sashes.


The little line of embroidery was sketched on in tailor's chalk and then worked in double running stitch. I will admit that it is probably the worst embroidery that I have done in many years, but I did work it in very low light as a bit of an experiment. I am working on a matching second pocket that has the same design and I am doing that embroidery under natural light. It is much neater and looks better! 


The pockets are made from scraps of fabric left over from the dress and lined in more scrap fabric. I made tassels out of brown crochet cotton. The pocket is machine and hand stitched. I tend to whip stitch the edges of even machine-made items to make them sit better. The tab at the top was far too thick to sew by machine anyway- my machine really doesn't do well with thick fabrics.


I was first introduced to the convenience and practicality of pockets by my friend THL Katerina da Brescia, who gave me my first pocket as a gift. I recommend her interesting website: http://purplefiles.net/katerina/FlorenceFiles/FLAccessoriesSOCCACCIA.html

I also recommend the book Moda a Firenze as an excellent research tool and source of drool-worthy inspiration!