Monday, October 28, 2019

Painted silk banner

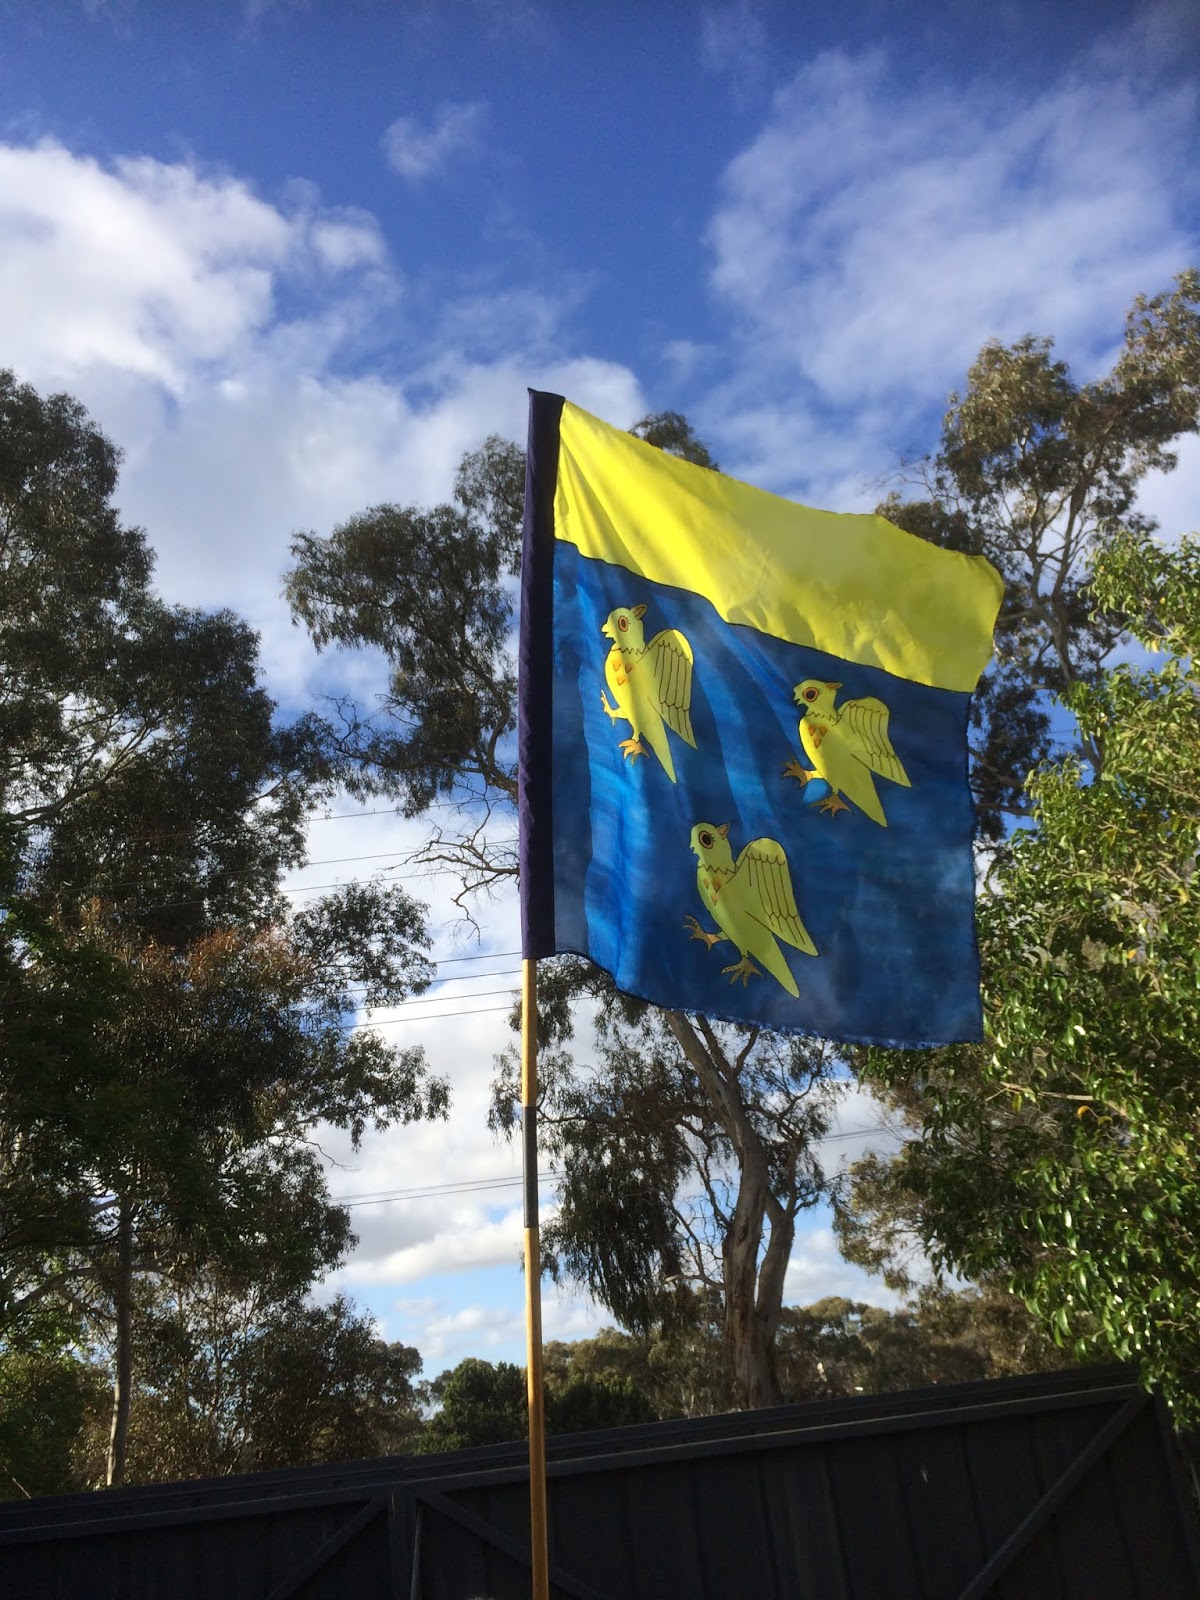
I recently tried my hand at silk banner painting for the first time. I had attended a class on silk banner painting in 2018 which was run by Sir Eva von Danzig and I used the notes from that class as my guide. The aim was to create a heraldic field banner for a friend.

I used Settasilk silk paint and gutta and a fine silk background fabric.
The first step was to draw up my design. I drew it on tracing paper and went over it with a felt tip pen.
I traced the design onto the silk using lead pencil.
The next step was to stretch the silk out and attach safety pins around the edges. I used rubber bands (looped around the safety pins) to attach the silk to the frame. I made the frame out of PVC tubing. Once it was evenly stretched with good tension, I used black silk gutta to draw the outlines. I was so nervous (as this was for a friend) that my hands were really shaking and so my lines were quite wobbly.
Once the gutta was dry, I added the silk paint. There were a couple of areas where the paint ran past the gutta lines. I did two coats of blue and two coats of yellow, with some orange highlights, letting each coat dry before adding the second.
Then I let the banner air dry thoroughly.
I left it on the frame in a warm place to completely dry.
Once the paint was fully dry, I ironed the banner under an ironing cloth with a dry iron following the manufacturer's instructions.
I turned the edges over twice to form a small hem and pinned it into place. It was whip stitched down.
Checking to see how my own banner was constructed (as it was made for me by a friend,) I realised that the delicate silk has worn away at the tip of the banner. This made me decide to add a cotton broadcloth pole sleeve rather than use the silk fabric to hold the pole. Hopefully, it will make the new banner last longer. I also need to make a sleeve to put on my own banner to extend it's life.
 Essential tools
 
Pinning the sleeve onto the edge of the banner.
I machine sewed the banner sleeve onto the banner.
The finished banner flying.
I followed the instructions given by the manufacturers of Settasilk silk paint. If I did the project over, I would wash my silk first (called "scouring") and iron it. I also would use thicker gutta lines to reduce the chance of paint runs. I might try spraying the silk with a mixture of water and rubbing alcohol to slow down drying time and reduce the chance of lines in the background. And I would work out a way -somehow- to stop my hands from shaking.
This project was certainly a learning experience. Even though I was not very happy with my result, I learned a lot. I have a new and greater respect and admiration for people who make beautiful silk banners on a regular basis- the process was more challenging than I thought it would be.


Wednesday, October 23, 2019

Gilded Marzipan Fruits at a Pirate Tourney

I went to a pirate-themed tourney recently, and (as usual,) took plenty of food to share with my friends. Something that always has a big visual impact is marzipan fruits. They are so pretty, and adding edible gold leaf just adds that extra bit of richness.
Violas are in flower at the moment, and I wanted to candy some to add to the dish. I have concerns about using raw eggs in my cooking, so I attempted to candy them in sugar syrup. I made up a simple sugar syrup (with a high concentration of sugar and a splash of rosewater,) and soaked the washed flowers in it. Then I coated them in caster sugar. Once coated, I left them in a dish covered with sugar and with a few cloves for a couple of days to add a delicious scent. They didn't work out as nicely as when done with egg white, but I feel that was made up for by not having to worry about possible salmonella contamination. I will keep experimenting.

Tuesday, October 22, 2019

Short Holiday

I had a few days break on the coast at the end of September. It was a quiet trip as I ended up getting sick with a few infections, but luckily I have a great doctor there. I did some hand sewing and drew up some embroidery designs.


It is an area of stunning natural beauty, and a very nice place to recuperate.

Wednesday, September 25, 2019

A Sad Anniversary

Yesterday was the one year anniversary of my furry helper's death, and I wasn't feeling up to much.
I went through a couple of my UnFinished Object baskets and did some tidying up. I have an amazing array of unfinished items, but the standard of my work is noticably improving so I felt fairly positive about the nice things I will have when I get to work on the stack of incomplete projects.

Monday, September 16, 2019

Fealty Chain

This is the beautiful maille Fealty chain made for me by Law at the Mailed Stag.


Tuesday, September 10, 2019

Black Linen Front lacing Italian Gown for Summer


This was a quick project with some modern sewing techniques used to save time. I modified one of my other gown bodice patterns to drop the waist a bit, make the shoulders a little wider and put a bit more depth into the point of the bodice. I made this gown in January 2019.

The gown bodice was an experiment with no boning. The linen was lined with heavy cotton canvas and the two pieces 'bagged out' or sewn together with the machine. I hand sewed the bottom edge of the bodice and the armholes.

The trim is just simple ribbon, sewn on by hand.

The eyelets were all done by hand with an awl and sewing thread. I decided to add some bias binding along the front edges  and slip bones in for a bit of rigidity and to stop eyelets puckering. Once I tried the completed bodice on, I felt that it needed some extra boning, so I added bias at the centre-side seams and across the back of the bodice, and put four more bones in.

The skirt is simply a series of rectangles of fabric sewn together. I let the skirt hang for a long time to let the hem drop and reduce distortion due to the weight of the fabric.

I pleated the skirt on by turning the top edge under and then marking out regular dots along the skirt top edge. I ran a heavy thread through to draw the skirt up into cartridge pleats. Normally you would use a double row of thread to do this, but I cheated and only did one. The risks with one thread is that it may break and you will have to start all over again, and that the pleats may be slightly uneven if you are not very careful with your dot marking and needle placement. I usually do a two-part line of pleating; on a front opening gown, I run one line of pleating thread from centre-back to centre-front on one side, and do the same on the other. I find that it makes adjusting the pleats more manageable.

Once the lines of pleating thread are in, I put safety pins in to mark the centre-back and centre-sides of the skirt panel. I line the safety pins up with the corresponding side seams, centre-back point and centre-front point of the bodice. Then I carefully draw up my pleating thread, adjusting the pleats to sit evenly in their quarter. Then I adjust a quarter at a time to make sure the pleats are all evenly spread out and looking nice. A quarter panel at a time, I use heavy thread to sew each pleat onto the bottom edge of the bodice. I usually use four strands of sewing thread that has been waxed for strength. I also knot the thread off unobtrusively at about every 10cm point, so that if I were to rip some pleats out by accident when wearing the dress, the whole skirt will not fall off.

Once the skirt is on, I cut the pleating thread. This is optional; if you want defined cartrdige pleats, leave it in. I prefer less defined pleats so I cut mine. I hand finish the front opening gap of the gown and add a buttonhole bar at the bottom of the skirt opening for extra strength. I did not add hooks and eyes on the opening of this gown - I left a bit of extra fabric at the front of the dress that I could pin shut and would be adjustable. I then let the gown hang for several more days to  let the skirt drop if necessary and to let the pleats fall properly.

I had help from my dear Mum with the hemming, and I added some ribbon trim around the bottom when hemmed as well.

Finally, I used some scraps from gown construction and another project to make the pouffy sleeve heads (baragoni) that I like so much. I sewed strips of fabric together too make a panel approximately 2.5 times the size of the sleeve cap pattern that I drafted as a base. I pinned the puffs into place by eye, until I got roughly the look I was going for. This is a tedious task, but I can't think of a better way to do it.


Once pinned, I hand sewed down all the puff pieces in sections to keep it secure. Usually I make all the bulky fabric puffs point to the centre of the sleeve cap and then put the lining piece on top and machine sew most of the way around (without catching any of the puffs in the seam,) Then I trimmed the seams, turned the puff the right way out and hand sewed the gap shut. I also hand sewed around the edge of the entire puff to stop the bulky puff section moving or turning in. It is important to have a stable base for these puffs or they move around and stick up.

I added some lucet ties underneath so I can wear the dress with removable sleeves.

I made and wore the dress in January when it is very hot, and it was cooler than my other garb. I think I lengthened the bodice a bit too much and I have adjusted this on the pattern for future dresses.

Wednesday, September 4, 2019

A Book To Hide A Phone In

I take a lot of photos at events, and sometimes it is really useful to be able to use a mobile phone to take pictures to immediately upload to social media. Of course, it is not nice to spoil peoples' "medieval experience" by waving a mobile phone around at events, so I decided to make a book cover for my phone.

I friend recently gifted me her old phone, so I ordered a cheap case for it. Finding a book for the outer cover was difficult- it had to be a book that I didn't want to read. I found a nice one in a second hand shop. I liked the cover, and the title had worn away and wasn't very visible.
The next part was difficult. I am not a person who underlines passages in books, or turns page corners down, so cutting pages out of the book seemed like a horrible thing to do. I didn't have to remove many, just a few that were a bit ratty and not sitting flat.
My new case arrived, so I sacrificed the old one and pulled it apart. I wanted the plastic case part.
Next I used white acid free craft glue to glue all the pages together, one by one.
This made the book quite heavy and, because the weather is cold and damp at the moment, took a long time to dry. 

I only glued about two thirds of the pages together. I left a section free-turning at the front.

When the glue was finally dry, I ruled up cutting guidelines on the glued pages.
Craft knife to hand, I gradually cut away the pages leaving a cavity.
I also put some gold paint on the edges of the pages.
The book was a lot lighter now, but the edges of the cavity were a bit ragged, so I spent some time trying to tidy them up with a craft knife. I put a couple of coats of white glue on them for stability.
I covered the edges of the cavity with a few coats of white paint. When it was dry, I glued in the plastic phone case using strong E3000 glue. I also varnished the white painted area for durability.
I used the craft knife to carefully cut a hole in the back cover to allow the phone camera to peek through. When the hole was nice and neat, I painted the edges red and varnished them for strength.


I ordered some wine case edges or scrapbooking edges to put on the cover. In retrospect, I should have done this in the early stages of the project, before the pages were all glued together. I had to slice open the pages with the craft knife, add the corners, and then re-glue the pages. Not an ideal way to tackle the project, and it resulted in a slightly wonky looking cover.

I would also like to add a book clasp, but I have not had any luck in finding the appropriate hardware. When I do, I will also paint my heraldic seahorse on the front of the book and probably add a ribbon to mark the pages.

I have give the book a test run at an event, and I loved it! I love it as an accessory, and I love that I can take photos with it. It was worth the time and effort to make it.

Next time around, I will add the decorative metal corners first, and use felt over them so that pliers don't scratch them. I would also take more care to make sure that the book stays true and is not bent or off-centre when the pages are drying. Mine is a bit wonky; it makes it look well-read.

Sunday, September 1, 2019

More Fingerloop Braiding

I have continued to practice my five loop braids and I am now experimenting with different textures. I am also working on maintaining tension in the longer braids; I want to make quite long ones but I can't seem to get the tension even when they are long.


Thursday, August 29, 2019

Seahorse Pendant

My Baron gave me a gift of a beautiful seahorse pendant and I have been planning to string it for a couple of months, but I just hadn't found the right combination of beads.
After a couple of failed attempts,
I think I have finally found a classic design that suits the style of the pendant:

The beads that are showing up as brown are actually purple. All the beads are glass strung on tiger tail wire.


Monday, August 26, 2019

Quince Tart

Quinces are in season at the moment here and I was surprised to find that she had never tried them, so I decided to make a tart.
I used spice very lightly as my sister doesn't have a taste for it, and omitted bone marrow (for the same reason). I also cooked the quinces into a puree rather than in slices or hollowed out because they are hard to cut and it was easier on my hands.
It was delicious!
Source [Two Fifteenth-Century Cookery-Books, T. Austin (ed.)]: Quynces or Wardones in paast. Take and make rounde coffyns of paast; and take rawe quynces, and pare hem wit a knyfe, and take oute clene the core; And take Sugur ynog, and a litull pouder ginger and stoppe the hole full. And then couche ij. or iij. quynces or wardons in a Coffyn, and keuer hem, And lete hem bake; or elles take clarefied hony in-stede of sugur, if thou maist none sugur; And if thou takest hony put thereto a litull pouder peper, and ginger, and put hit in the same maner in the quynces or wardons, and late hem bake ynog.

Source [The Neapolitan Recipe Collection, Terence Scully (trans.)]: Pastizi de Pome Codogne. Aparaghia la pasta como he dito de li altri pastelli; poi habi pome codogne bene mondate he nette he cacia fora quello duro de mezo, he che lo buso dove haverai cazato fora el duro non passi da banda in banda; et in quello busso ponerai de bona medula de bove cum zucaro he canella assai; et li diti pomi aconzaralli in li ditti pastizi sopragiongendoli de la ditta medula dentro he de fora; he fa ch'el non sia tropo salato; poi mettili de sopra una pasta, facendolo cocere secondo l'ordine de li altri pastelli.

Quince Pie. Prepare the dough as I have said for the other tarts; then get peeled quince and remove the hard part in their centre, and do not let the hole you make to remove it go all the way through; into this hole put good beef marrow with plenty of sugar and cinnamon; and lay the quince in the pies, adding the marrow to them inside and out; mind that it is not too salty; put another crust on top, cooking it as with the other tarts.
Recipes reproduced from http://medievalcookery.com/recipes/quinces.html with thanks.

Saturday, August 24, 2019

Freehand Embroidery Update #1 - The Dubious Rabbit

Recently I had an interesting conversation with some fellow embroiderers, and we challenged ourselves to try completely freehand embroidery after a discussion about embroidery techniques. I have been spending a lot of time looking at extant pieces on Pinterest, trying to find my inspiration piece.

I found this interesting English embroidered cover on Pinterest and really liked the odd little animals. They are quite different to most of the other extant Elizabethan pieces I have seen. The cover is held at the V&A museum (c. 1600, Silk, silver and silver-gilt thread embroidered on a linen ground, Museum number T.53-1926).

 
Image from: https://collections.vam.ac.uk/item/O130597/cover-unknown/

It looked to me like the maker was having some fun experimenting with different stitch types, colours and textures, and that seemed perfectly fitting for an experiment like this. (It also looks like they planned to put scrolling vines or linework in and never did.)

I particularly liked the rabbit - I liked the dubious expression on his face.

The ground fabric is mustard linen with no stabiliser. I decided to use grey linen thread instead of metallic because metallic thread can be challenging to work with and I wanted to focus on the process of the freehand embroidery and not have to wrestle with my threads.
Dubious Rabbit came out a bit thin looking, but I am happy enough with the result. Embroidering with no design marked was challenging and liberating at the same time. I had to concentrate much more than I usually do with non-braided stitches, and I found it much more tiring and time consuming. I already think it has been a useful exercise though and I'm glad I tried it, it has already made me more confident. 

The next step is deciding what other elements to add and then I will think about filling stitches. 
I already  think I will do his eye in black because I think the silver metallic eye looks a bit crazy. Maybe Dubious Rabbit is reeling from a bad smell. Maybe the bird above is to blame?! Who knows?! I'm getting a bit of a giggle out of this piece and I like to think the original embroiderer did too. We are joined across the centuries by our love of needlework and our weird senses of humour.

I really like the trees in this piece and I'm thinking of putting one in. Choosing which one will be the tricky part. I'm already planning a bigger project using these designs.

Thursday, August 22, 2019

Barony of Southron Gaard Persona Challenge

I love Challenges; having a date to work to motivates me. I recently heard about this Challenge created by the Barony of Southron Gaard, and I must say it is very tempting. I need to think about whether I can participate (either formally or informally) without causing myself undue stress. Veeery tempting!

Fromhttp://southrongaardarts.blogspot.com/

Nice Little Touches:the Southron Gaard “Persona Gubbins*” A&S Challenge

“The object of art is to give life a shape.”

We know that sometimes people find it hard to “use” their persona at events, or to make their persona relevant to their SCA “game play”.  In this challenge we invite you to use your persona (or someone else’s) to investigate that persona’s world, in order to create small items that you might carry to or use at events to enhance our SCA “game”.

*Gubbins, meaning small items, easily picked up and carried about (mid-16th century word, from the obsolete gobbon ‘piece, slice, gob’, from Old French; probably related to gobbet).  Not to be used in connection with live small animals.

Thanks to Shakespeare and others for the quotes used here throughout.


This Challenge is brought to you by Meisterin Christian Baier, Baroness Isabel Maria del Aguila, Lady Amabillia Threxton, under the gracious patronage of Her Excellency Baroness Ginevra.


We would like to thank Lady Cecily for the inspiration of her excellent and amusing A&S Pentathlon upon which we have shamelessly, but with permission, borrowed.

We would like to thank those Southron Gaard Laurels who have kindly offered to sponsor small prizes or tokens.

The Challenge:

What to enter:
You may enter the challenge by completing one (or more) small objects or items from the categories below.  "Small" may be defined as you choose, and may include "medium", "large", and "gosh, look at the size of that thing" projects.
Entries should be new projects (i.e. not entered in previous competitions/challenges).
All items should be for use at an SCA event.
Items may be for your persona, or for the persona of the person for whom the item is intended.

Who can enter: Anyone!

Entries are welcomed from adults, children and youth.

For any who are not members of the populace of Southron Gaard, please note that her Excellency has decided this Challenge is also open to entry from those not resident in our fair Barony, as it is not your fault that you are so disadvantaged.

Items may be made or performed by an individual, or by a group.


How to enter:

Submit the following information

1) a photograph of the item, and

2) a few brief notes about the item and the persona that inspired it.


When to enter: Enter now!

All projects must be completed by Baronial Anniversary 2020.


Your recognition: All entrants will be awarded a special token at Baronial Anniversary 2020.

Those entrants who complete three projects, and those who complete five projects, from at least two distinct categories listed below, will receive an additional token.

Some of our local Southron Gaard Laurels have generously offered to award small prizes or tokens to the entry of their choice.

Categories:

1. Do you think because you are virtuous, that there shall be no more cakes and ale?

An item of food or drink your persona may have grown, prepared, consumed, or known of.


2. With silken coats, and caps, and golden rings, with ruffs, and cuffs, and farthingales, and things.

A garment your persona may have worn.


3. When I am forgotten, as I shall be, and sleep in dull cold marble, … Say, I taught thee.

The teaching or sharing of knowledge or skills that your persona would have had, for example, classes, published articles etc.


4. With scarfs, and fans, and double change of bravery, With amber bracelets, beads, and all this knavery.

An accessory your persona may have owned, made, used, or gifted.


5. All the world‘s a stage, and all the men and women merely players.

A performance of a persona-appropriate piece (song, poem, play, saga, tale, dance, etc); formal or informal, individual or group.


6. What revels are in hand? Is there no play, To ease the anguish of a torturing hour?

Games, toys, and other such entertainments.


7. 'Fore God, you have here a goodly dwelling and a rich.

Items your persona may have had in their home: housewares, furniture, feast gear, table wear, lighting, and such like.


8. This is the excellent foppery of the world

Develop a repertoire of vernacular language, appropriate to your persona, for use at events, e.g. oratory, witticism, oaths, braggery, vernacular phrases, boasts, etc.


9. To gild refined gold, to paint the lily, To throw a perfume on the violet,…

At your toilette: hairstyling, make up, beauty products, skincare, ointments, unguents, perfumes, etc.  Also items associated with bathing, cleanliness, etc: e.g. soaps, cleaning tools or products, laundering, etc for people, houses, livestock etc.


10. Is this a dagger I see before me?

Items for self-defence or martial activities.

11. Get thee to a nunnery

Religious or spiritual items, e.g. momento mori, devotional items, etc.


12. A garish flag, to be the aim of every dangerous shot.

An item of heraldic display.


13. Throw physic to the dogs; I’ll have none of it.

Items associated with health, medicine, or wellbeing.


14. I do remember an apothecary…

And in his needy shop a tortoise hung,

An alligator stuff'd, and other skins

Of ill-shaped fishes; and about his shelves

A beggarly account of empty boxes,

Green earthen pots, bladders and musty seeds,

Remnants of packthread and old cakes of roses,

Were thinly scatter'd to make up a show.

An item used in an occupation, trade, or task, e.g. a tool, equipment, etc.


15. I'll note you in my book of memory

A written item or document of some kind, e.g. a letter, a piece of calligraphy and illumination, etc.

In particular, we would also encourage you to put together your own commonplace book or similar item relevant to your persona (a commonplace book is a collection of notable extracts from other works, and everyday handy knowledge for your personal use at events e.g. song lyrics, game instructions, recipes to share, etc).

Monday, August 19, 2019

More finger loop braids

Well, the chest infection that apparently never ends turned into pleurisy, and that is why I have been feeling so decidedly ordinary. I feel much less guilty about getting nothing done; although the frustration never goes away.
I have continued to experiment with the five bow fingerloop braids, and I feel like I am  starting to see progress. I want to really get the hang of this form before I branch out into other patterns and more bowes. Tension is improving.