Showing posts with label split stitch embroidery. Show all posts

Monday, August 4, 2025

Heraldic Split Stitch Badge

I made another split stitch heraldic badge this year, for a friend. Instead of working the white split stitches in an oval shape around the tree, I drew a sort of wave pattern across the background and worked the split stitches in waves. I did this to make the sewing a bit more interesting, and to create a feeling of texture across the background.

I wouldn't do this again. I don't feel it was particularly effective in creating texture and it also didn't make the process of stitching it any more interesting. (It was worth trying though.)

This patch will be sewn onto a Championship cloak. It is a cotton calico base fabric with split stitches worked in DMC cotton floss.


Tuesday, June 3, 2025

Mer-folk Embroidered Band

I made this embroidered band last year thinking I might use it on the front of a chemise. I had a big SCA event recently, and I decided to use it as a decorative band on a stomacher to cover my pair of bodies. I actually ended up wearing a different stomacher to the event, but I am glad to have another one in my wardrobe.


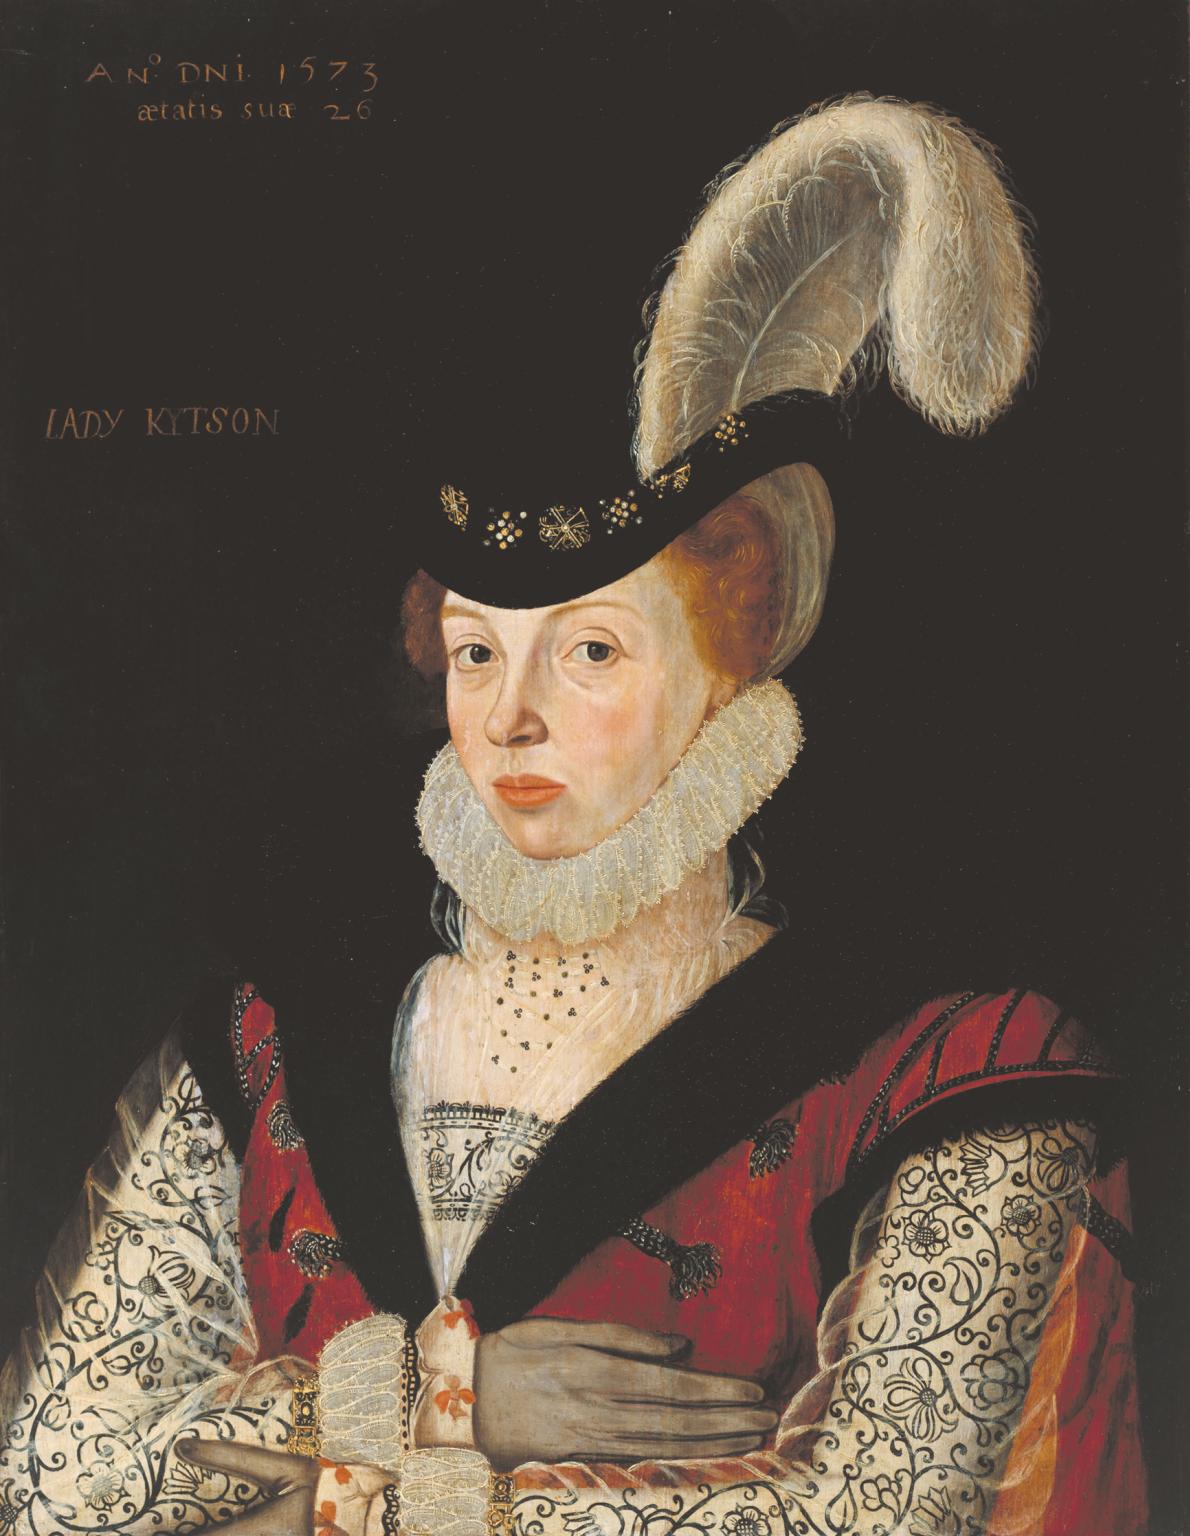
I have admired the clothing in this Portrait of Lady Kytson by George Gower held by the Tate Gallery for a long time, and her chemise band is what inspired this piece. (Image from‘Lady Kytson‘, George Gower, 1573 | Tate) One day I'd love to have time to work a pair of sleeves like this too. 

The base fabric is linen and the embroidery is worked in black DMC floss. The project was created entirely from stash items. I worked out my design and then marked it on tracing paper and traced it onto the fabric with crayola washable marker using a light board. Stitches used are split and double running stitch and knots.

I sewed the band onto a panel of stash cotton fabric, ironed it and bagged it out with another panel of cotton. 'Bagging out' means sewing your lining edge to your fashion fabric edge right sides together. Then you trim, grade or notch (if necessary) and turn right side out. The seam allowance ends up on the inside and you have a finished edge that needs no other treatment. You just need to handsew the opening shut. My understanding is that this is a modern method which is predominantly used with a sewing machine. It is a quick and easy way of sewing squares and rectangles together.

I feel like the top edge needs a little something extra; maybe some tufts or black needlelace similar to the smock/chemise in the portrait.

The finished band

The back of the work

My little helper

My pattern is taken from the Modelbuch 'Splendore Della Virtuose Giovanni' by Iseppo Foresto, published in Venice in 1564 and held by the Met Museum, available here: //www.metmuseum.org/art/collection/search/349915. I have seen many variations on this design in period modelbucher, usually with mer-people (often mermaids) holding something between them and foliate designs around them. (Maestra Praxilla Taurina has put together a useful list of Modelbuch to drool over, which can be found here: Is that an Apres?: Modelbuch List (daughterofthebull.blogspot.com) )
My adjusted design based on the Iseppo Foresto pattern




Saturday, September 23, 2023

Split Stitch Owl Design


I recently had a chance to help a friend with a project for an upcoming ceremony. The project involved split stitching on velvet, which I had never done before.

The texture and pile of the fabric made stitching very different to stitching on cotton or linen, and it took some adjusting to. 

If you are planning an embroidery project on velvet fabric, I would recommend allowing a bit of extra time.


It was a bit of a rush but I am quite happy with how it turned out. The lovely design is by Sir Eva and the owls will be cut out and appliqued onto a garment.

Thursday, March 23, 2023

A split stitch design for a shirt, in the German style

I recently had a chance to make a collar panel for a friend's shirt as part of a collaborative project.

I used this pattern from 'Book of Embroidery: 1534', by Johan Schartzenberger, Woodcutter of Augsburg as my inspiration.

Time was short on this one, so I made some adjustments to make working the piece a bit faster.

The original woodcut is a bit wonky in places, as so many of the period embroidery designs are. I am always torn whether to alter the design to make it more symmetrical, or leave it as is. I altered some of the wonky bits, but left the majority of the design as it was published.

The base fabric is linen (donated by THL Sorcha - thank you). The embroidery is worked in split stitch with a bit of double running stitch. I traced the design onto the linen using a Frixion heat-removable marker and a light board.


Overall, and given the time restrictions, I am fairly happy with how this piece turned out. Now it has been passed onto the next person for making up.

Many thanks to THL Sorcha for donating the linen.


Thursday, July 7, 2022

Embroidered Heraldic Patches

 I recently finished the second of two heraldic patches for a Championship cloak. I wasn't super pleased with how this one turned out, but it was my third try, so it was time to quit and accept it for how it worked out. The embroidery is done in silk thread in split and chain stitch.


The seahorse was done in cotton floss in split stitch.


Monday, June 14, 2021

Heraldic Embroidered Napkins

I made these napkins some time ago as a gift for a friend. They are embroidered with her heraldic animal in split stitch. There is a line of running stitch around the edge of each napkin. I find cloth napkins to be really useful, especially for covering plates of food at events.


Monday, December 7, 2020

Seljuk Lion Embroidered Napkin


In July I attended Polit Uni online and was lucky enough to see Mistress Miriam’s embroidery class. Mamluk and Middle-Eastern embroidery was a new area to me, and I suggested to my local group of embroiderer’s that we challenge ourselves to try some embroidery from this region.

I was particularly taken with this strange looking lion found on a 10-11th Century textile which is now held in the Museum of Fine Arts in Boston https://collections.mfa.org/objects/66368 (Accession Number 31.445, dimensions 11 x 9 cm).


It was found in Mesopotamia but believed to be of Egyptian make. The stitching is predominantly split stitch in silks, highlighted with metallic threads on a cream mulham (silk/cotton) base fabric.

I wasn’t sure if I wanted to use it as decoration on a pouch, or to decorate a tunic with the design, so I decided to work it in cotton on a cotton base fabric to see how it looked, and decide then. I used two threads of DMC cotton and the design was marked out in frixion marker. Originally I planned to use blue thread, but changed to classic black.

Even though the sample is unfilled, it worked up fairly quickly, which actually has done little to solve my dilemma. I think I might work the design as an outline on a tunic because the design is quite striking even as an outline.

I knotted the ends of my threads for durability as the sample is worked on a napkin which will get thrown in the washing machine.I also did a running stitch in black around the hem of the napkin to finish it off.


Acknowledgements

Many thanks to Mistress Miriam for sharing her knowledge, and the MFA Boston for their excellent online resources.

Thursday, November 26, 2020

Grey Linen Blend Tunic with Mammen Style Embroidery

 Here is another of the tunics I made for a friend. This one is intended to be an over tunic, as it has embroidery around the hem and arms which I'd like to be seen, and is slightly shorter in length.

(Here it is worn over the light grey undertunic.)

It is constructed in the t-tunic style per request from the recipient. The seams were enclosed (where possible, by hand,) to make the tunic more durable. All hemming was done by hand.


The embroidery is based on the acanthus design on the textile in the 10th C Mammen find (Denmark).


Image from: http://heatherrosejones.com/mammen/index.html

The textile finds came from a grave site at Bjerringhøj, in Mammen parish, Middelsom herred, in northern Denmark. More information can be found here:http://heatherrosejones.com/mammen/index.html

 I did it as an outline, rather than filled as in the original, but used split stitch like the original embroiderer. The embroidery was worked in crochet cottons gifted to me by Viscountess Ingerith Ryzka in split stitch.

I used the same design for the sleeves and hem, but the sleeves have the design reduced in size.


Saturday, April 25, 2020

Partlet Decorated With Holly Design

I finally managed to get the hems sewn on the holly partlet, and it is ready to wear. I am pleased with how it turned out, and I would like to do another in different colours in the future.
(It is sitting a little askew on the mannikin here.)


Tuesday, January 28, 2020

Embroidered Collar and Cuffs with Pony Detail for a Knighting Gift

Last year I was honoured to attend the elevation of a friend to the Chivalry. I wanted to make a small gift as a memento of the occasion. I decided that embroidered collar and cuff panels for a shirt would be appropriate.

I based my design on a band from the Trevelyon Miscellany(1608); a modelbuch for artists which has a breathtaking array of designs just crying out to be embroidered. I copied the design, and simplified it as well as adding in pony's heads - an element of the recipient's heraldry. I traced the design out onto tracing paper. I photocopied the design and reduced it in size so that the same basic design was used for collar and cuffs (but smaller in size on the cuffs). I then modified the design slightly so that it would fit into the size panel required to go around the wrist.
I traced the design onto my base fabric using a window as a light source and a Frixion marker.
The base fabric is linen and the embroidery worked in Guterman silk in split stitch.
Sometimes you just need to take a break and rest the eyes and re-energise! 
The project was a little challenging as I was on a strict time deadline and I was still having issues with my wrist and hand from the injury in Nov 2018 and my underlying health problems. My stitching is not as fine or as accurate as I would like, which is disappointing. It also took at least twice as long as my usual slow pace.
I love designing embroideries, but I think my favourite moment is when the marker is ironed away and the stitches remain.
The finished piece. I left it in a single panel so that the pieces cannot be lost until it is made up into a garment, and because people make shirts slightly differently and I wanted to allow plenty of fabric for turning under. (Base fabric is zigzag stitched on the edges for durability until it is cut into panels.)

I also can't recommend Modelbuch Muse enough - it is a wonderful information base relating to Renaissance dress as well as lovely embroidery designs to try: https://www.facebook.com/modelbuchmuse/

Portrait photo credits: S.J. Taylor - many thanks!