Showing posts with label non-counted blackwork. Show all posts

Thursday, December 11, 2025

Embroidered Order of Defence Heraldic Panels

Here are the devices I worked on the Lochac Order of Defence cloak for some of the local members of the Order. The devices are worked in black DMC cotton thread in pre-worked shield shapes in a variety of stiches including double running, split, stem and seeding stitch. 

(In case you were wondering why the embroidery isn't fancier (e.g. goldwork) for such a prestigious peerage Order, this cloak can be used on the rapier field and so needs to be very hard wearing. It has a wool outer layer with black-on-black embroidered decoration, and a linen lining with black embroidery.)


Wednesday, August 8, 2018

Camicia Embroidered with Bird Designs

One of the projects I chose to undertake as part of my local A&S Pentathlon challenge is a linen camicia embroidered with birds and flowers. I have worked out a design taken from period sources and cut out my pieces. I am using DMC cotton floss in (predominantly) split stitch for the designs.


Although I am keen to get this project done as I really need a heavier camicia for cooler weather, it is a very large undertaking. I will be disappointed but not surprised if I don't get it finished by early 2019. Hopefully as the weather warms up I will get mobility in my fingers and be able to sew faster!


Wednesday, February 8, 2017

A Brief Introduction to Non-Counted Monochrome Embroidery (Blackwork)

Monochrome Non Counted Embroidery

These are some notes I made as part of an introductory embroidery class I taught at Great Southern Gathering last year.

Blackwork’ was a popular style of embroidery in the later part of the SCA period, although the
term ‘blackwork’ is misleading as it implies that the embroidery was only done in black thread.

Classic black on crisp white is certainly striking and was very popular in the sixteenth century,
but extant monochrome embroideries  in red, green (Carew-Pole nightcap),

blue (1610 waistcoat, V&A: 179-1900), purple and pink (1630s woman’s smock at  http://costume.dm.net/va/smocks.html) still exist.


English smock embroidered in pink silk - V&A museum

Image from: http://collections.vam.ac.uk/item/O110103/smock-unknown/


English smock (c.1615) worked in pink silk

Image from: http://collections.vam.ac.uk/item/O78791/smock-unknown/


Linear monochrome embroidery (often worked in double running stitch) was popular throughout Europe during the sixteenth century. In fact, this type of stitchery is so common in Holbein portraits from that time that the double-running stitch is often called ‘Holbein stitch’.

Hans Holbein the Younger - Jane Seymour, Queen of England - Google Art Project.jpg

Portrait of Jane Seymour by Hans Holbein, showing beautiful embroidered cuffs

Image from: https://en.wikipedia.org/wiki/Jane_Seymour

 Monochrome embroidery (‘blackwork’) is also found in earlier periods in Middle Eastern textiles, and the geometric shapes found in Tudor blackwork echo similar designs and shapes found in Middle Eastern embroideries. This fact may have contributed to the story that Katharine of Aragon brought
monochrome embroidery (‘blackwork’) to England when she arrived to marry Prince Arthur
Tudor in around 1501. It is believed that the occupation of Spanish territories by ‘the Moors’ influenced design and embroidery, and that ‘blackwork’ or ‘Spanyshe worke’ was introduced to England by Princess Katharine. Although references to this story are discussed in ‘Blackwork Embroidery’ by Geddes and McNeill, I have not found any firm documentary evidence that this story is true. I believe that it is just as likely that the Moorish styles were introduced to Europe via mercantile contact with Italy.

Examination of English portraiture from the reign of Henry VII and Henry VIII show a marked increase in blackwork embroidery on clothing during Henry VIII’s reign but we cannot know if this is due to the introduction of a new stitch technique, copying of a fashionable Royal or just a new fashion craze. After Henry’s reign, the Elizabethans took blackwork to a whole new level, with the development of polychrome counted and non-counted blackwork and the introduction of spangles, metal threads and raised elements.

Monochrome embroidery in the sixteenth Century was very popular in England, with portrait examples of blackwork being quite common. It was also popular on the Continent, with portraits from artists as diverse as Anthonis Mor, Hans Holbein, Guillim Scrots, Moroni and Veneto showing sitters with lavishly decorated embroidered garments.

Blackwork (and other colour monochrome work) was popular on chemises and smocks, partlets, collars and cuffs, ruffs, coifs and caps and other linens. It was executed in counted form (usually in running stitch or double running stitch) or in non-counted form, in stitches such as stem, braid, chain, speckling, feather stitch, back stitch, long and short stitch, herringbone stitch and split stitch.

Floral designs were very popular for English embroidery in the sixteenth century, due in part to the proliferation of printed pattern-books and the discovery of the strange flora of foreign lands and the New World. Designs were often copied from pattern-books, as well as bestiaries and herbals.


Blackwork can be done in non-counted form, or in counted form. In counted blackwork, the design is marked out on the background fabric (traditionally linen) by counting threads and working the design over a set number of threads, often filling the interior of the design in with a pattern or repeat. Non-counted blackwork is more free-flowing and involves stitching over a pre-drawn design. I prefer non-counted blackwork because I dislike counted work. Double running-stitch is the most common stitch used for blackwork because it provides an even line that (if done well) is neat and clean on both the front and the back. Non-counted designs can also be filled with counted embroidery for a richer effect. The same techniques can be used with multiple coloured threads also.


 A page from Shorleyker’s pattern book ‘A Scholehouse for the Needle’ (1597), one of many pattern books available in the late 1500s and reprints in the 1600s


Image from- https://s-media-cache-ak0.pinimg.com/236x/d9/af/8b/d9af8b08a95a3359643cec8d509115b7.jpg


Bibliography
Arnold. J (1988) 'Queen Elizabeth's wardrobe unlocked',  Maney,

Anderson, R.M.  (1979) “Hispanic Costume 1480-1530” Hispanic Society of America, New York

Beck, Thomasina (1995) “The Embroiderer's Story: Needlework from the Renaissance to the Present Day”.  Italy: David and Charles

Cavallo, Adolph (1979) “Needlework” Cooper-Hewitt Museum, Smithsonian Institution, USA

Complete Anachronist - Blackwork Embroidery No. #31 May 1987

Complete Anachronist – Wrought with Flowers of Black Silk No. 115 April 2002

Dean, Beryl (1989) “Ecclesiastical Embroidery”, The Bath Press, Avon

Digby, George Wingfield (1963) “Elizabethan Embroidery” Thomas Yoseloff, New York.

Don, S. (1990) “Traditional Embroidered Animals” A David and Charles Craft Book, Birmingham

Geddes, E & McNeill, M. (1976) “Blackwork” Dover, New York

Gostlow, M. (1977) “Blackwork” Dover, New York

King, D. & Levey, S. (1993) “The Victoria & Albert Museum’s Textile Collection: Embroidery in Britain from 1200 to 1750” Canopy Books, New York

Levy, Santina M., (1990), Lace, A History, Victoria and Albert Museum, W.S. Maney and Son Limited, Leeds.

Nourry, C. “Patterns: Embroidery-Early 16th C” An unabridged reprint of four early 16th c. French pattern books. ISBN 1-891656-13-3. available from www.lacis.com


Various reprints
 The Modelbuch, 1537 by Egenolff
 The Needles Excellency
 A booke of curious and strange inventions, called the first part of Needleworkes, William Barley, 1596
 A Schole-house for the Needle, Richard Schorleyker, 1632

 A second booke of flowers, fruicts, beasts, birds and flies exactly drawne, George Humble, 1635(?)


Some stitches Used in Non-counted Monochrome Embroidery/Blackwork


Stem Stitch


Stem stitch was often used in the pre-modern period as an outlining stitch. It could also be used as a filling stitch.
To Work Stem Stitch - Work from left to right, taking regular small stitches along the line of the design. The
thread always emerges on the left side of the previous stitch. This stitch is used for flower stems, outlines, etc.
It can also be worked as a filling stitch if worked closely together within a shape until it is completely filled.


Split Stitch

A popular stitch, split stitch was used in many forms of embroidery including Opus Anglicanum and Heraldic Embroidery. It was used for very fine work, often only using a single strand of silk thread or was done using quite thick threads, such as wool. It was used as an outlining stitch or as a filling stitch.
To Work Split Stitch - Bring the needle through at A and, following the line to be covered, take a small back stitch so that the needle comes up through the working thread, as shown in the diagram. Generally, it is easiest to work this as a two step stitch by making a small stitch, then bringing the needle up through the thread at the half way point.


Back Stitch

Bring the thread through on the stitch line and then take a small backward stitch through the fabric. Bring the needle through again a little in front of the first stitch, then take another stitch, inserting the needle at the point where it first came through. In blackwork, a single back stitch is usually worked over two threads on a single-thread even-weave. This stitch is used in both counted and free embroidery.


 Chain Stitch

To Work Chain Stitch - Bring the thread up at the top of the line and hold it down with the left thumb. Insert the needle where it last emerged and bring the point out a short distance away. Pull the thread through, keeping the working thread under the needle point.
Surface Couching

To Work Surface Couching - Lay down the thread to be couched, and with another thread catch it down with small stitches worked over the top.

 From: http://medieval.webcon.net.au/technique_stitches.html


Wednesday, June 18, 2014

New Leafy Collar Piece

I am starting to feel much better after a bout of the 'flu, and have spent my leisure time this week adjusting patterns for the IRCC4.

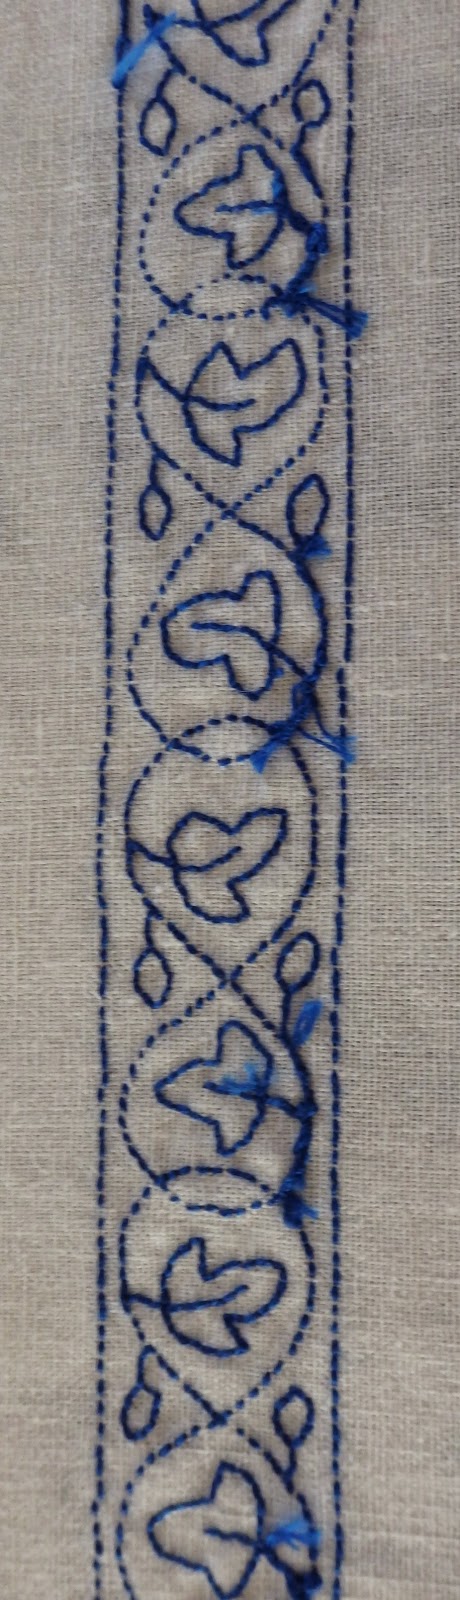
I also managed to complete a quick shirt collar piece for a friend. The base fabric is linen and the blue thread is Anchor cotton floss. The design is adapted from Modelbuch Aller Art and is worked in split stitch and double running stitch with a double thread.

  I knotted the back of my threads off very securely because I think the shirt this goes on will be under a lot of wear and tear.

Tuesday, January 31, 2012

Speckled Holly Leaf Coif


Today's post is on a coif that I started a really long time ago and only finished in about 2010. I had grown disenchanted with the project because the pattern was not cut in an accurate way. For a long time I debated about whether I should continue the embroidery or whether it was a waste of time to finish the garment if it was not accurate.


The finished coif

In the end, I modified the pattern to make it more accurate for the sixteenth century and decided to finish the garment. The piece was good practice in speckling stitch, which was popular with Elizabethan embroiderers for adding depth and texture to monochrome embroidery. I found it quite a tedious and time consuming stitch also, but I liked the end result.

Here you can see the original coif pattern modified to make it more accurate for a sixteenth century English style coif. Note the join down the middle of the garment. I have never seen an extant coif with a join, but that was the only way to modify this coif from it's original 'Jorvik hood' style shape into a more appropriate shape.

There are many examples of floreate patterns in extant English monchrome and ploychrome embroidery from the sixteenth century - the Elizabethans loved them! I particularly wanted a holly pattern and was inspired by patterns from 'A Scholehouse for the Needle' and the images below.


The spiky leaves from this Elizabethan man's nightcap in the V&A Museum (c1600-1629/Museum # 814-1891) reminded me of holly leaves  although I suspect they are supposed to be thistle leaves.

A really excellent collection of images of extant coifs can be found at the Blackwork Guild 'Blackwork Headwear' page - http://www.theblackworkguild.com/COSTUMES-MEMBERS%202.html


Stylised holly design in silk and gilt from a sixteenth century English coif in the V&A Museum collection

The finished coif worn by a model with very short hair. It does fit better over a bun or hair taping.


Spangles were attached with three stitches, and the centre seam was decorated with chain stitch. All the embroidery was done in DMC cotton thread with two strands of black. Cotton floss and fabric were used for this project instead of silk and linen to save money. The spangles are silver metal. 

Centre top seam decorated with chain stitch.


The centre top seam was decorated with chain stitch and the edges with a slanting whip stitch. In period, an Elizabethan braid stitch would most likely have been chosen for the top centre seam, but when I tried it, it just didn't fit with the embroidery. If I started this project again, I would make the embroidery design more crowded and full. When I drew this design out, I was less familiar with Elizabethan style than I am now, and I think I was looking at the design with a modern eye. It needs a lot more spangles and have less bare areas.

I gathered the central seam in an approximation of the same technique that I used on the Red Stripey Coif (posted previously). It doesn't look quite right due to the adjusted shape of the coif. The main embroidery stitches used were stem and speckling stitches, and a funny little knot I use in lieu of french knots. (It is close to a colonial knot.)

The finished coif is lined with a light cotton lining to protect the embroidery from hair oils etc. The lucet cords were hand made by Heather - thank you Heather! Also thanks to Alisondre who helped with some of the speckling stitches.

Friday, January 20, 2012

Orange-red Geometric Band Partlet


Today's post is a picture of one of my early monochrome embroidered partlets. It is embroidered in two strands of an orange-red DMC cotton floss. In period, silk would probably have been used. I used cotton fabric for the body of the garment, whereas in the sixteenth century linen was a much more commonly used fabric. Both these substitutions were made for financial reasons. The garment is hand sewn and was completed in early 2007.


Stitches include stem stitch, running stitch and an ornamental buttonhole stitch.

I rely very heavily on reprints of sixteenth century pattern books to source my embroidery designs and gain inspiration. This partlet embroidery design is a direct copy of a popular sixteenth century band design that crops up in several pattern books. 

Here is a book that I use very often  

Thursday, January 19, 2012

Article on Red Striped Coif


This is an article that I wrote to accompany a coif I made in 2009.


Background
After cutting my waist-length hair short in November 2008, I realised that I needed to reassess my hair coverings for SCA events. I normally wear sixteenth century Italian and Elizabethan style clothing and I found that I didn’t have enough hair for my normal cauls to fit securely.
On Christmas Day 2008, I received my much hoped for copy of Janet Arnold’s Patterns of Fashion 4 (POF4) and subsequently spent many enjoyable hours poring over the detailed colour plates of extant items. I realised that an Elizabethan coif might be the solution to my headwear problem and decided to create one as much in keeping with period techniques as possible. Previously I have made several shaped coifs because I wanted to minimise bulk at the crown and back of the head. Having cut off my long, thick hair, bulk is no longer an issue, so I decided to make one with pleats at the back of the head.
Pattern, Materials and Techniques
Making the pattern for the garment was a case of trial and error. I played around with paper patterns in the approximate shape of the unjoined extant coifs reproduced below. There is some variety in the shape of extant coifs, probably due to personal preference on the part of the wearer. I don’t like having headwear obscure my peripheral vision, so the ear ‘flaps’ on my coif are quite small.
Having settled on the style of coif, choosing an embroidery design was the next challenge. I was very taken with the linen coif embroidered with red, green, black and ivory silks shown in POF4 on Plate 51, but took my main inspiration from Plate 50 (below).  The original has lines of flowing foliate stems and flowers worked in black silk, separated with enclosed areas of silver gilt spangles. I have never tried to completely reproduce an extant piece of embroidery, preferring instead to change small details to make a piece completely ‘my own’ and allow my own creativity to shine through.


The extant piece that first inspired me to make a coif; I loved the colours and may attempt something like this in the future. (Plate 51, POF4; Linen coif embroidered in silk from around 1600 from the Museum of Costume and Textiles, Nottingham.)


My embroidery design and layout is largely inspired by this extant coif (POF, Plate 50) in the Burrell Collection, Glasgow that dates from around 1610.

Although most of the examples I have used date from around 1600, coifs were in use at least a decade earlier than that. The picture by William Peake the Elder, 1590 (below) shows Lady Catherine Constable wearing a linen coif and forehead cloth (POF4, Plate 51A), and a variety of plates in ‘the Tudor Tailor’ show similar garments. Plate 6, A portrait of an Unknown Woman 1568 (p. 10) shows a lady wearing a distinctly coif like garment. Coifs could be worn under another item of headwear, or used to cover the hair on informal occasions, such as when inside the house.

For this project, I decided to change the design from flowers to pomegranates, keeping the original scheme of geometric lines separating the coif into segments. The pomegranate motifs from the Warwick Museum’s men’s shirt inspired this choice, although I altered the shape and style of the fruit somewhat.
I chose a red monochrome colour scheme rather than black because I have several red Elizabethan style garments in various stages of construction. Red monochrome embroidery was popular in both Italy and England in the sixteenth century, with many extant examples still in existence. Red-worked smocks, shirts, chemises and coifs from England and Italy are all shown in POF4 and can be found in most museums that have clothing collections. A variety of embroidery styles is shown on these garments, but geometric and freestyle monochrome and polychrome styles are both found. A lovely red worked Italian camicia from the sixteenth century can be found in Moda a Firenze on p. 124. It and the large number of Italian and English red-worked garments in POF4 indicate the trans-continental appeal of this colour combination.
I used cotton floss rather than silk purely due to financial restrictions, but I was really happy to find a piece of unbleached pure linen in a remnant basket, and I used this for the coif itself. (Extant coifs are worked on linen but I usually can’t afford linen.)


This late sixteenth century Chalice Veil (V&A Collection as shown in Geddes et al, p. 12) is worked in red silk. The embroiderer has edged the piece in a similar way to the edging on the ‘face’ edges of my coif. Stitches used here include stem stitch, double running stitch (‘Holbein stitch’) and braid stitch.


I used stem stitch and open buttonhole/blanket stitch for the majority of the embroidery. I wanted to practice my open buttonhole/blanket stitch on this project because I am not very confident with the technique or tensioning of this type of stitch. For this reason I changed the diagonal segment edging style of the original from little triangles to lines of open buttonhole/blanket stitch, although I did keep the little triangles in the two vertical centre segments because of their aesthetic appeal.


This linen panel, known as ‘the Shepheard Buss’, dates to around 1600. Worked in black silks, lines of what look like blanket stitch are used to separate the different sections of the design. I have used this technique in the sections of the coif containing spangles. (V&A Museum, Geddes et al, p. 42.)

I have not been able to find any really detailed pictures of the original coif, so had to make educated guesses about what type of stitches the original embroiderer used. Braid, chain, stem, back and double Holbein stitches are all commonly used in Elizabethan embroidery, so I used stem stitch for the dividing segment lines and the pomegranate stems, with blanket/open buttonhole stitch for the fruit segments and leaves, and satin stitch for the circular points at the top and bottom of the fruits. The decorative triangles in the centre vertical columns are done in large double running stitches, although I suspect that the original embroiderer would have used two stitches to my one, judging from the trouble I had with the tension.
I used silver-gilt spangles of 4.0mm diameter from the Thread Studio, which appear to be slightly smaller than those used on the extant garment. Although pressed metal spangles or ‘ooes’ were used in period, I am not sure what these modern alternatives are made of. I suspect that they are a metal alloy blend as they are light, don’t seem to tarnish, don’t snap and don’t melt under the iron.  I have seen examples of spangles being sewn on with four stitches (see below), but the majority of garments seem to have spangles stitched with three so I used three. The extant garment appears to have spangles sewn on with one thread, but I used a doubled cotton thread because it is likely that my coif will be machine washed, and durability is very important to me. I knotted off the thread after each spangle was secured, but did not cut the thread so the back of the work would be tidier.


A sixteenth century polychrome coif (Synge, unknown page) unusually showing spangles sewn with four stitches instead of three!

For the same reason, I have a natural cotton lawn lining waiting to be whip stitched in before I wear the garment. Although I can find very little evidence of coifs and similar headwear being lined in period, I have decided to line mine to reduce the chance of hair oils/products from soiling the linen. (I have left the lining off so that the back side of the stitching is visible.)
I have never made a coif where the embroidery goes right to the edge before; on my previous efforts the embroidery has always stopped within a centimetre or two from the edges. I don’t want to get too stuck in my ways, so decided that I would copy the designer from Plate 54 of POF4 and draw my designs all the way to the edges.


This coif from c. 1610 in the Burrell Collection (Plate 54, POF4) and this coif from c.1600 in the V&A Museum (p. 44, Geddes et al.) demonstrate the technique of taking the embroidery design all the way to edge of the garment. The V&A Coif at the right also shows (faded) small diagonal decorative stitches around the edges of the coif that frame the face.

Although ink was often used in period to mark out embroidery designs, I am not confident enough about my draftsmanship to risk using ink, so I traced the design in modern water soluble ink. I taped my sketched design to a window and used the pane as a natural light box. The salamander design below, dating from around 1600, demonstrates how ink was used to mark out designs for the embroiderer to follow (V&A Collection, T.88-1925, Arnold {QEWU} p. 272).


In period, many embroiderers seemed to avoid knots and work their thread ends back into the embroidery. I have knotted my threads and then worked the thread ends back into the work, again for durability and security when the garment is machine washed.


This red and gold worked coif from about 1610 shares similar attributes to mine; the colours are similar, the design goes all the way to the edges and no edging lace is used, small spangles are used, and the embroiderer seems to have anchored their stitches in places with knots. (POF4, plates 53-A.) Compare with a back view of my coif, below.


The edges of the garment were bound with natural cotton thread using a satin stitch before the garment was cut out with snips. I chose to use the snips because they were used in period, and I wanted to get a feel for the technique. I found them unwieldy, probably because I am used to modern scissors and because I was worried about making a mistake that would ruin the work. After the edges were cut, I hemmed them with natural cotton thread, and a casing was made along the lower edge for the lucet cord. The hand made cord was provided by my friend Heather Carter and was made on a wooden lucet. The side edges were ornamented with diagonal stitches. Of the coifs I have looked at, some were decorated on the edges, and some were not. Because I didn’t want to use lace on this coif, I chose to decorate the edges.
I joined the top seam with a small diagonal stitch in natural cotton, and then tried to replicate the cartridge pleats seen on the coif in Plate 52B of POF4. My pleat stitches must have been larger than those on the original because my coif has fewer pleats. Because of this, I managed to push the main part of the pleats down into the ‘hole’ created by the gathering to give a cleaner look to the area. When I copied the original in Plate 52 exactly, the result looked wrong, possibly because of the larger pleats. I secured the pleats with small stitches in natural cotton, then cut away the pleating guide stitches because they looked too big and a bit untidy. I then attempted to do the gathering cross just visible in pale green thread on Plate 52B (POF4). I used a triple securing stitch in embroidery floss, which I then buttonholed over for strength. I did the same on the smaller side arms. The extant piece seems to have a five armed knot, but the function is the same.


Plate 52B, POF4 shows a detailed picture of the top seam of a polychrome coif from around 1610, held in the Museum of Fine Arts in Boston.


Even though my pleats are larger, when I put it on, the pleats on the back of my coif do sit like this (POF4, Plate 52), detail previous page.

 Reflective Notes
The coif fits, and I am quite happy with the finished product, although there are several things I would do differently if I could do it again. I am not completely happy with the tension on the blanket stitched leaves and fruit segments, and I will be interested to see how they stand up to repeated washing. I was disappointed that the diagonal lines don’t match up at the top of the coif when sewn. I thought I had been very meticulous in designing the pattern; perhaps I moved the fabric when tracing out the design on the window.

 I have started a partlet with the same design in black cotton, and I have added seeding stitches inside the fruits on that project. I am glad I left the seeding off the coif- I like the clean lines. I may make a matching forehead cloth for the coif if I can match the linen fabric. Although I started researching in December 2008, I didn’t start work on the coif ‘til February 2009, so I happy to have finished it so quickly.


References
Arnold, J. 1988, Queen Elizabeth’s Wardrobe Unlock’d, W S Maney and Son Ltd, London.
Arnold, J; Tiramani, J; and Levey, S. 2008, Patterns of Fashion 4, Pan Macmillan Ltd, London.
Geddes, E and McNeill, M. 1976, Blackwork Embroidery, Dover Publications, New York.
Mikhaila, N and Malcom-Davies, J. 2006, The Tudor Tailor, B T Batsford Ltd, London.
Orsi Landini, R and  Niccoli, B. 2005,  La Moda a Firenze 1540-1580, Pagliai Polistampa, Florence.
Synge, L. 1982, Antique Needlework, Blandford Press, New York.

Bibliography
Like many needlework enthusiasts, I have a collection of books that I like to look through to get general inspiration for a project. Here are a few that I looked through before starting this one:
  • Compleat Anachronist 115: Wrought with flowers of Black Silk, Prudence Catesby
  • Compleat Anachronist 31: An introduction to Blackwork, Shoshonnah Jehanne ferch Emrys
  • The Encyclopedia of Embroidery Techniques, Pauline Brown (1994, Simon and Schuster, Australia).
  • Dress at the Court of King Henry VIII, Maria Hayward (2007, Maney Publishing, UK).

Credits
  • I also utilised the resources at the addresses below for information on stitches used in period,  and these were suggested by THL Katerina da Brescia in her article “WIP – Tuscan Camicia of the 16th Century” as published in the WCoB Newsletter, Twelfth Night 2008:
-Archive of Stitches from Extant Textiles - www.bayrose.org
-Sewing Stitches Used in Medieval Clothing- http://www.personal.utulsa.edu/~marccarlson/cloth/stitches.htm

  • Thanks to Lady Jane of Stockton for her articles and on and motifs from the Warwick Museum’s men’s shirt as published in various WCoB newsletters and her hints on writing documentation as published in WCoB Newsletter, November Crown Tourney 2005 as ‘Research – Don’t Panic!’
  • Thankyou to Heather  for the lucet cord.
  • Thanks also to the Lady Ysmay de la Mor who first introduced me to stem stitch and the delights of freehand monochrome embroidery at a collegium many years ago.


Wednesday, January 18, 2012

Blue vine partlet


Here's another one from the 'finished' pile. It is an Elizabethan style high necked blackworked partlet made out of cotton fabric with dark blue DMC cotton floss embroidery that I made to go with my blue loose Elizabethan coat/gown.


The pattern is one that I developed myself and was inspired by several 'band' patterns from sixteenth century embroidery pattern book reprints. 'Band' patterns seem to have been very popular in period as they would have suited a range of garments and textile products. The monochrome stitching on this partlet is done in stem stitch with two strands of embroidery cotton. I tend to wax my floss lightly to minimise tangles.


Here is a photo of the embroidery on the body of the garment prior to making up, The pattern runs in four bands down the back of the partlet too.


The collar has a very small ruffle pleated into it. The ruffle was cartridge pleated and hand sewn into place. The garment was hand sewn. The lucet cords which tie at the neck were made by Heather (Queen of Luceters), and the pattern for this partlet was adapted from one that I created under advice from THL Katerina da Brescia. (You can see her site at http://katerina.purplefiles.net/). Many thanks to both ladies.

Tuesday, January 17, 2012

Elizabethan wasp smock


Here is another project from the to-do pile. It is a low necked Elizabethan smock, made out of rectangular and square panels of natural linen. The panels have not been assembled yet, but I plan to finish each panel separately (after the embroidery is finished) and then whip them all together.


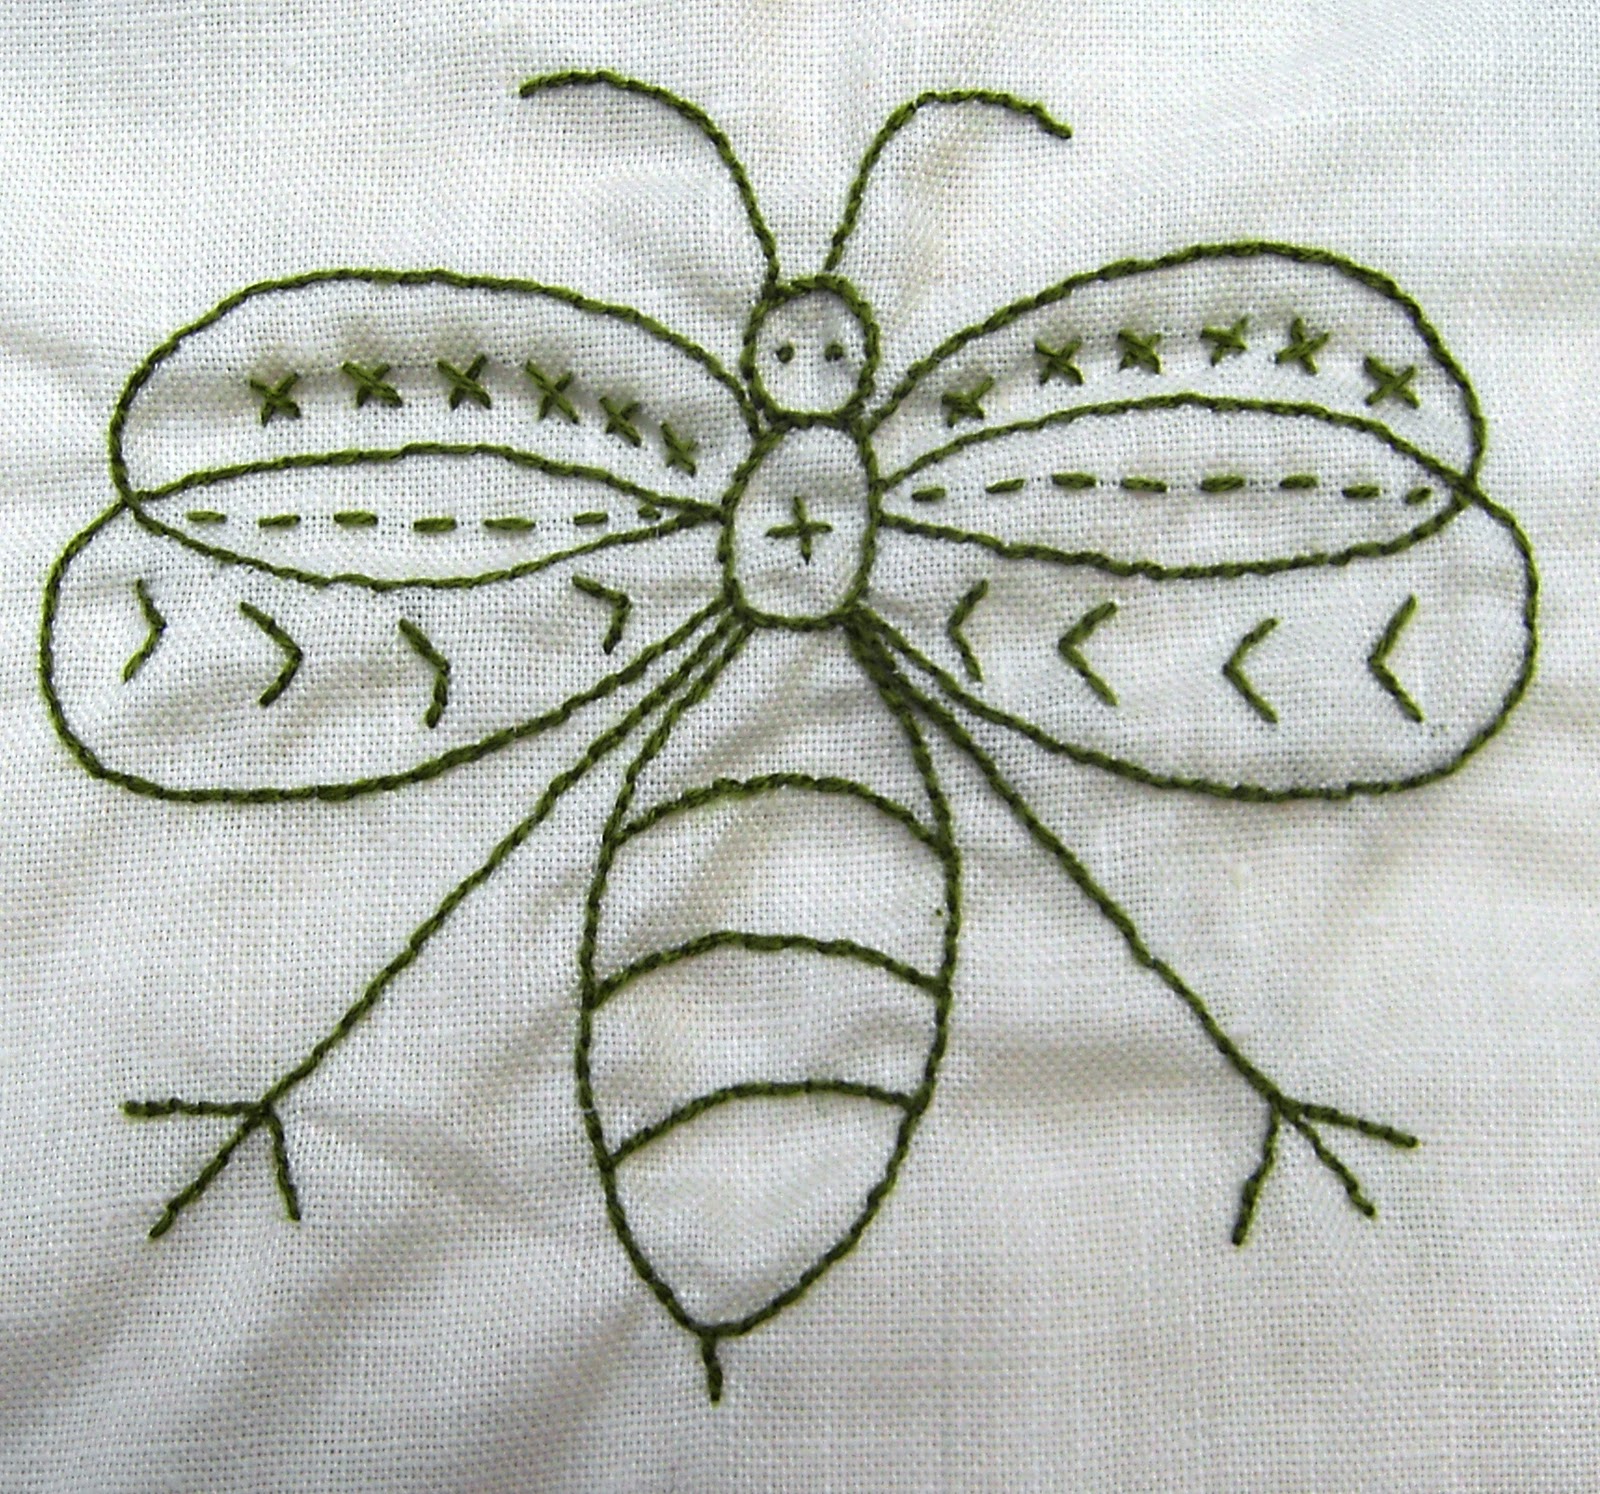
I would have to check, but I think I started this project in 2007 or 2008. The motif is adapted from an extant piece in Queen Elizabeth's Wardrobe Unlock'd (page 292). It is a flying insect drawn in ink onto linen and embroidered in black silk, circa 1585-1600.  Here is a scan of the image:


The original is in the Museum of Costume in Bath. I decided to change the insect a little bit and also include a stinger. Also, some of my wasps have smiley faces. Mine are embroidered in two strands of green DMC cotton floss.


As you can see, there are several types of stitches used here, including double running stitch.

Honestly, I had forgotten all about this project! I am glad that I wrote it up for today's entry. I will try and finish this smock this year - the little wasps make me smile.

Monday, January 16, 2012

Grey flower motif chemise

I finished this chemise a few years ago. It is made of light cotton gathered into a bias binding neckline. The sleeves are decorated with flower designs inspired 'A Scholehouse for the Needle' and by the Warwick shirt.  'A Scholehouse' was a pattern book drawn by Richard Shorleyker (1632.) It contains many designs that exist in pattern books printed at various times in the sixteenth century. The Warwick shirt is an extant example of Elizabethan monochrome embroidery* (done in red). It It has some beautiful designs on it, and can be seen here:
http://www.warwickshire.gov.uk/web/corporate/pages.nsf/links/aa47f702d5996adc80257149002da95e


The shirt is part of the collection of the Warwickshire Museum: 
http://www.warwickshire.gov.uk/museum


You can see a very interesting article, including some designs from the shirt, here:
http://knol.google.com/k/elizabethan-blackwork-embroidery#

The sleeves on my chemise are very big and are designed to be puffy enough to allow them to be pulled out through slits in split sleeves. When worn without an oversleeve, they flow over my hands:


As with most of my clothes, the chemise is used for both Italian styles and under my Elizabethan loose gowns. The designs are worked in grey DMC cotton in a range of stitches, including buttonhole stitch, seeding stitch, stem stitch and double running stitch. All visible seams were handsewn, except for the hem.

The sleeve laid out before sewing (the white tiles underneath are showing through the thin fabric.)


* also called as 'linear blackwork' or 'single-colour, non-counted blackwork'

Sunday, January 15, 2012

Collarless Italian Partlet


For my second post today I am posting a picture of a previously completed project. This is a collarless Italian partlet. The ground fabric is a natural fibre; I suspect a cotton blend. The fabric came from the remnant bin and looks like a coarse linen. The embroidery is taken from a sixteenth century reprinted pattern book. The design was traced out with a water soluble pen with the fabric taped to a window. In period, a common method of transferring embroidery designs onto light fabric was to draw them on with ink. We know this because examples of unfinished sixteenth century embroideries still exist. Check out the V&A Museum's collections for some lovely examples: http://collections.vam.ac.uk/

I prefer the soluble pen because my hand is not that steady!

The embroidery at just past half way
This project was undertaken pre-2008. I don't normally trace designs onto garment pieces that are pre-cut. I can't remember why I did it this way; perhaps it looked too bare with no embroidery. The embroidery was done in two strands of DMC cotton. Silk would have been the most popular choice in the sixteenth century, but it is hard to source where I live, and also usually beyond my budget.

I worked the embroidery in a hoop. The plant stems (in black) were executed in stem stitch, and the flowers (in gold) were done in a double running stitch.


This is the finished partlet, which has been hand sewn and hand finished. I added some commercially available, machine-made metallic bobbin lace to finish the garment off.