Tuesday, April 3, 2018

Second Newcomer's Tunic

A second t-tunic for the College newcomers, based on the same basic pattern (below).
Image from: https://www.pinterest.com.au/pin/570901690249020212/
A pattern such as the one below would be more authentic and waste less fabric, but also take longer to make up, and time was something that was in short supply with this project as the tunics were needed for a newcomers event in a couple of days.
Tunic pattern from: https://www.pinterest.com.au/pin/460282024388882275/


This tunic was made at the same time and in the same way as the one that I posted about yesterday. The sleeves were pieced from scraps as the fabric was not wide enough to allow for sleeves and I wasn't sure that newcomers would be wearing undertunics, so longer sleeves were needed.

Wherever possible I enclosed the seams so that the tunic would last longer. The guide below explains the process:

Image from https://www.pinterest.com.au/pin/200410252144075736/


The neckline was finished with a handsewn rolled hem.

When finished, I saw a bit of a problem with the bright fabric- the garment was looking alarming like a soccer guernsey. I was on a very tight time deadline and I was pretty desperate. I decided to stencil or stamp a design.

 I had some woodblock stamps that I had never used, and gave them a try. I had trouble matching up the design and very quickly realised that I didn't have time to master a new skill with the deadline looming. Also there was a lot of potential for things to go disastrously wrong very quickly.


Next I drew a quatrefoil design on a piece of cardboard and  cut the design out with a craft knife. I used a removable pen to mark the design at measured intervals and painted it in with craft paint mixed with a fabric fixative to make it washable.


The design looked OK but needed a yellow dot in the centre to break the design up a bit.
I put quatrefoils on all the green bands (arms and hemline).


The finished tunic. The colours are not to my taste, but I worked with what I had available and the garment should last reasonably well and be easy to care for.

Monday, April 2, 2018

Sewing for Newcomers' Month


March was SCA Lochac Newcomers' Month, and as part of the festivities I went to my local College group to teach a basic garb making class. I had a big box of donated fabric scraps and some purchased fabric and unfortunately no attendees as everyone wanted to learn rapier. So I busied myself making some scraps into t-tunics for newcomers. I ran out of time and took some projects home, thinking it would be a quick job. Which it probably would have been if my sewing machine had not decided to break down! I have more to do at a later time when my machine is fixed.
Basic t-tunic pattern from https://www.pinterest.com.au/pin/570901690249020212/

The pattern above is the basic shape that I cut my fabric pieces into, although I had to piece the sleeves.

Putting all the pieces together

 The tunic was machine sewn with enclosed seams wherever possible for durability.

Hand sewing a narrow rolled hem for the neckline

The finished tunic ready to go back to the College

Friday, March 23, 2018

Stress Sewing A Chalice Cover

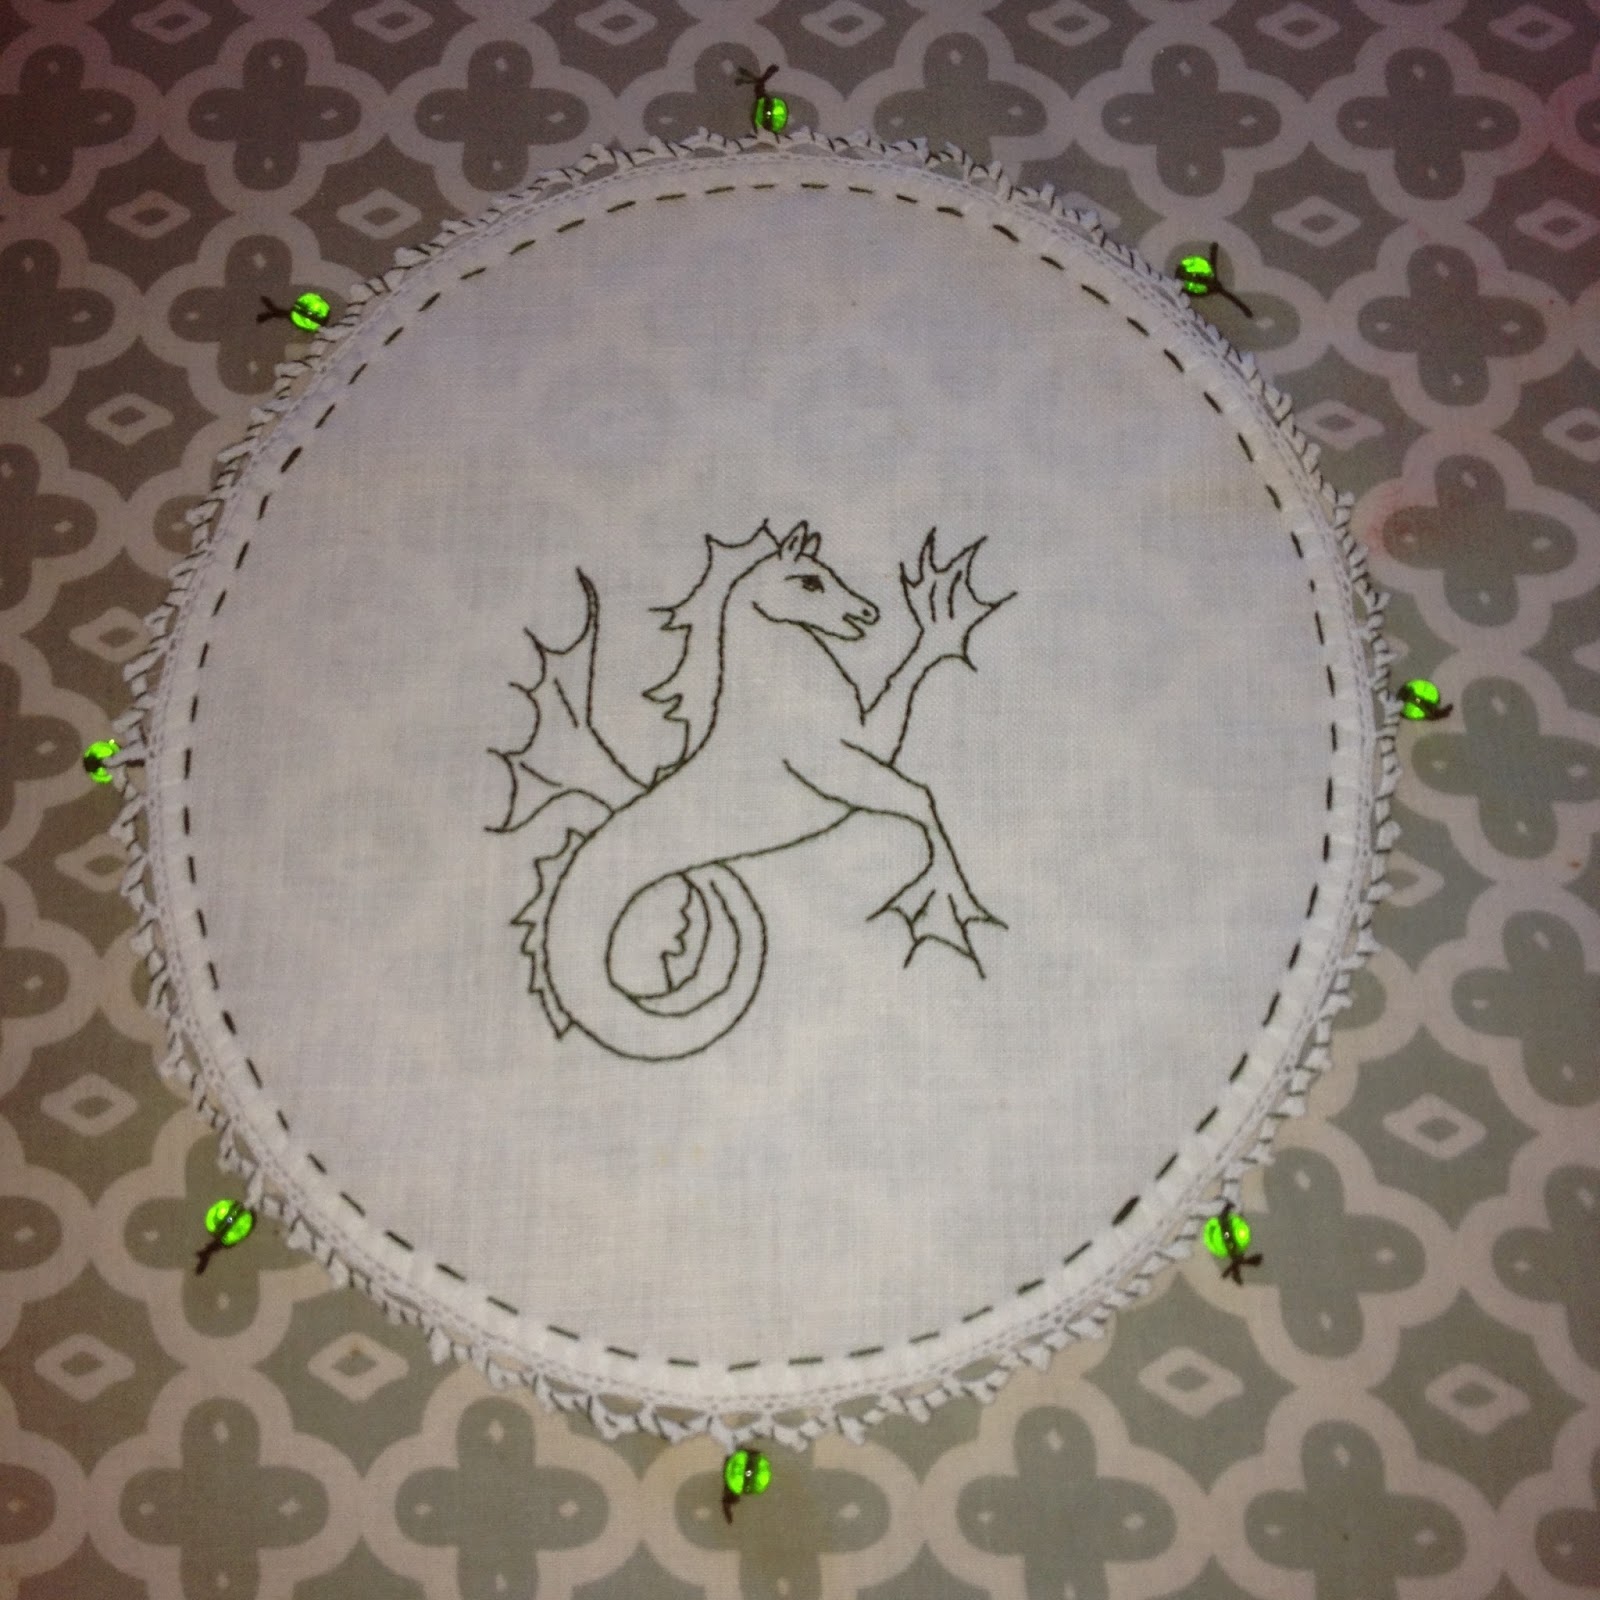
My furry little helper has been very ill lately. We had a public holiday here recently, and I was waiting to hear from the emergency vet on how she was responding to treatment. The hours were ticking by with no word. I was too agitated to work on anything for someone else, because my concentration was elsewhere. So I converted a vintage doily into a chalice cover for use at outdoor SCA events like tourneys. We have a real problem with European wasps here when it is warm, and a cover for my drink seemed like a good idea.

The original, vintage doily

I marked my heraldic design out by tracing it onto the linen doily with a removable pen, using a window as a light box.


The stitching is double running stitch with a double thread of DMC cotton floss. I'll admit that it is not terribly accurate stitching because my mind was elsewhere. I knotted the embroidery off on the back as this will be washed in the washing machine and needs to be sturdy.

When the main embroidery was done, I did a line of running stitch around the edge of the doily and also wove some floss around the needle lace edging.


Some beads were required to finish it off and add weight to the cover. I used some green glass beads and secured them with the embroidery floss.
My cover is very simple, but suits my needs. I had just finished pressing it when the crucial vet call came in, so the timing was good. Quick projects can sometimes be just what I need to get my motivation and enthusiasm for craftwork back.

Here are some SCA-period chalice covers (used in a religious context) in case you feel inspired to make something more complex:

Image from V&A Museum: http://collections.vam.ac.uk/item/O125784/chalice-veil-unknown/
Chalice veil - Place of origin: England (made)
Date: ca. 1560 to ca. 1600 (made)
Materials and Techniques: linen, silk embroidery
Museum number: 1415-1874
Gallery location: In Storage


Image from: LACMA https://collections.lacma.org/node/224478
Chalice Veil -England, circa 1600
Costumes; ensembles
Linen plain weave with silk embroidery, metallic-wrapped thread lace
22 1/2 × 22 3/4 in. (57.15 × 57.79 cm)


''Shepheard Buss'' Textile held in the V&A, Image from https://www.pinterest.com.au/malcm2557/shepheard-buss/

Place of origin: England (made)
Date: 1570-1600 (made)
Materials and Techniques: Embroidered linen in silk, bobbin lace
Museum number: T.219-1953
Gallery location: British Galleries, Room 58, case 6
http://collections.vam.ac.uk/item/O78790/shepheard-buss-picture-unknown/

Russian Chalice Veil. Image from Pinterest https://www.pinterest.se/pin/386887424219161266/
Chalice veil Date: 16th century. Culture: Russian. Medium: Metal, silk Dimensions: 18 1/2 in. (47 cm). Classifications: Textiles-Embroidered, Textiles-Ecclesiastical.: Brooklyn Museum Costume Collection at The Metropolitan Museum of Art. Accession Number: 2009.300.3453
Attribution not confirmed.

Friday, February 16, 2018

Red Velveteen Caul with Gold Trim

I was so pleased with the grey velveteen caul that I decided to do another one.

This one is made of a remnant of red cotton velveteen. I cut the basic circle pattern out last year when I cut out all those sleeve pieces. I tend to zig zag the edges of my patttern pieces for stability and protection, especially since it so often takes me a long time to finish these projects.

You may remember that my pattern is traced around the top edge of a bucket to get a nice circle. Another option is to use an oval shape to get more of a German-style caul with a bit more body at the back of the head towards the nape of the neck.
This embroidered caul that I finished in 2017 has an oval shaped bag pattern and is wider at the back of the head

On my circle bag/piece I marked out a grid pattern but only sewed down my ribbon where it intersected. I hoped that this would create a nice visual effect as the ribbon puffed up a bit.


At the intersections of the ribbon I added a glass bead.

I didn't think there was a need to line this caul; I tend to get overheated rather than cold and the velveteen is quite bulky.

I put gathering stitches around the edge of the circle/bag piece. I used to do one unbroken line of gathering stitches, but I now do two lines that each go roughly half way around the circle/bag piece. This allows me to better control the gathers and even up any areas where the gathers look a little bulky.

For the last few cauls I have been leaving an ungathered section across the top of my head. I think it is more flattering and looks more like the portraits from the time.

Once the gathering stitches are in the circle/bag part, I prepare the band. It is a rectangular piece the length around my head plus seam allowance on both ends. I join the short ends so that I have a continuous band. (I also usually stab stitch the seam allowance down flat to reduce bulk, especially when using thick fabrics like velveteen.) I then fold the band in half and iron a crease into it. Then I fold the two outside edges into the centre crease and tack them into place. This gives a narrow band with the raw edges fully enclosed inside the band.


Slide the edge of the circle/bag piece inside the band so that the edge of the circle bag piece butts up against the crease. I usually start by matching the centre top of the circle/bag piece and the centre top of the band and pinning it into place. Do the same at the bottom centre - it will help you to keep the gathers even.

Then start drawing up your gathering threads. I adjust my gathers by eye, and pin them into place as I go. I double check again before stitching to make sure that they look even. 
The next step is to start hand stitching the band into place. Stitch around the band on the outside (the part you will see); I use a small whip stitch.

Now turn the hat inside out and pin the gathers down on the inside of the band and stitch around again, securing the inside of the gathers as you go. Use very small stitches as you don't want any to show on the outside of the hat if you stitch beyond the band.

Your hat is done! At this stage  I add a metal comb in the centre front and a wig clip in the area of the band that sits behind my ear. This is not authentic and simply helps to keep the caul on my head and stop wispy bits of hair escaping as the day wears on.

On the red velveteen caul, I decided to add some commercial trim around the band at the last minute because it looked a bit bare. It is hand-stitched down. You could also add beads or embroider a design onto the band before sewing it to the circle/bag pattern piece.


The inspiration portrait-

Image result for judgment of paris by attributed to antonio da vendri
The Judgement of Paris (detail), Attributed to Antonio da Vendri
Image from https://www.rijksmuseum.nl/en/collection/SK-A-1296

This project has inspired more ideas, including a caul with different coloured panels like the one above, and one decorated with little tufts of thread (inspired by the inside of this caul)-

I'll keep you posted on the results!

Thursday, February 15, 2018

Felling Seams

Well, it took quite a while but I think I have found the issue with the photos that were not showing up on the blog, and fixed it. It took me on quite a trip down memory lane; reviewing past projects and remembering other things that were going on in my life at the same time. It reminded me also that I do achieve quite a lot despite my health challenges, and that I should probably stop criticising myself quite so much and stop comparing my efforts to what all the able bodied energetic people are doing. Hmmm...... easier said than done.

This week I have spent my sewing time hand felling hems for a friend who has an event coming up and needs some hot weather garb. It's not exciting stuff by any stretch of the imagination, but it is a good opportunity to practice my hand stitching. And it is lovely to work with pure linen, which is usually our of my price range.


Wednesday, January 31, 2018

Making an Italian Style Renaissance Caul - Velveteen Caul with Applied Ribbon

Eleonora de Toledo by Bronzino 1543 (Image from Pinterest)
This image of Eleanora with her pretty ribbon caul inspired this project


Back in late 2016 when I was cutting out all those sleeves to sew up, I cut some caul bags out of the leftover fabric scraps. The Lochac Lids Hat Challenge seemed like a great opportunity to get one finished at last.  I trace around the top of a bucket to get the pattern for the caul bag shape (I have a large head).

I chose a circle of grey cotton velveteen and marked chalk lines in a diagonal pattern. Then I hand sewed some narrow commercially produced black ribbon in a large grid or net pattern. Once the ribbon was sewn down, I added some large wine coloured red glass beads and put four gold glass seed beads around them.
The outside of the caul bag (which is just a circle of fabric)

The inside of the caul bag

For the band of the caul, I measured around my head (in the area that you would wear a headband). I added 3cm extra for seam allowance (2 x 1.5cm). I worked out how wide I wanted the band and multiplied by four. This allows me to turn the two edges into the centre and then fold the band in half to enclose the edge of the caul bag. Once you have your band cut out, sew the ends together. I flatten the seams out and stab stitch down to reduce bulk, but this is a matter of personal preference.
The caul band with the ends sewn, raw edges turned in and tacked and pinned into place to reduce movement when sewing the caul band on
Once you are happy with the decoration and have your band prepared, you are ready to assemble the caul. If your caul bag fabric is very fine or needs lining for some reason, this is the stage where you would sandwich your two caul bag/circle pieces together and tack them so they don't move. I find that velveteen is stable enough not to need lining, and lack of lining also reduces heat. I live in an area which is very hot over summer, so this is a bonus. If you live in cold climes, adding a lining to keep in the heat might be a good idea.

To assemble the caul, you will need to put gathering stitches around the edge of the caul bag/circle piece. I set my stitches in about 5mm from the edge and make the stitches about 1 cm apart. A running stitch works well for this step. I usually mark the centre top and centre bottom of my circular piece and gather each side separately. I find that doing it this way makes it easier to manipulate the gathers and keep them even and neat. 

I have made several of these cauls, and I have recently been experimenting with not gathering the part that goes over the top of my head (roughly five centimetres above each ear.) With some of my cauls there is a lumpy bunching that sort of sticks up in that area, and I notice that in the Italian portraits from the sixteenth century the caul usually sits quite flat. Fabric choice and head shape probably has something to do with this - it is entirely personal preference how you do it and what suits your face/head. I prefer the flatter look.

Setting the running stitches for gathering

Once your gathering stitches are in (and knotted with loops at the end in case you get over enthusiastic and accidentally pull the stitches out), start gently pulling your running stitch tight. You need to gather the bag/circle part up until it fits into the band. If you are not gathering the area that goes over the top of the head, you can just pin that part into place. I put the edge of the circle/bag part up against the inside centre fold of the band. Once the caul bag has been gathered up to fit the band, start pinning it into place, making sure that the gathers are neat and even.
Then start hand stitching the band into place.
Sewing the band into place
Once the band is sewn down on the outside, turn the band and bag carefully inside out. Pin the band into place on this side, making sure all the edges of the caul bag are still tucked in neatly. Then sew it down. 
Sewing down the band on the inside of the caul

Once it is all sewn, remove any tacking stitches holding the band together and cut off the ends of your gathering threads.


Alright- at this point the caul is basically finished. You can add decoration to the band if you want to.  When I was making this one, I thought that the band was a bit bare, so I decided to add a few lines of the black and gold ribbon.
Adding ribbon around the band

I choose to finish off the caul by sewing a comb into the inside of the band in the centre, and adding two wig clips that sit a few centimetres behind my ears. You could omit this step and use pins if you would prefer a more period way to attach the caul, or even bobby pins. I have unruly wavy hair that always seems to escape near my ears, so wig clips work for me.


Some images of the finished project. The photographs make it look quite dark, but the velveteen is a mid-grey and the wine coloured beads are brighter than they appear in the images.