Showing posts with label fifteenth century Italian costume. Show all posts

Friday, February 16, 2018

Red Velveteen Caul with Gold Trim

I was so pleased with the grey velveteen caul that I decided to do another one.

This one is made of a remnant of red cotton velveteen. I cut the basic circle pattern out last year when I cut out all those sleeve pieces. I tend to zig zag the edges of my patttern pieces for stability and protection, especially since it so often takes me a long time to finish these projects.

You may remember that my pattern is traced around the top edge of a bucket to get a nice circle. Another option is to use an oval shape to get more of a German-style caul with a bit more body at the back of the head towards the nape of the neck.
This embroidered caul that I finished in 2017 has an oval shaped bag pattern and is wider at the back of the head

On my circle bag/piece I marked out a grid pattern but only sewed down my ribbon where it intersected. I hoped that this would create a nice visual effect as the ribbon puffed up a bit.


At the intersections of the ribbon I added a glass bead.

I didn't think there was a need to line this caul; I tend to get overheated rather than cold and the velveteen is quite bulky.

I put gathering stitches around the edge of the circle/bag piece. I used to do one unbroken line of gathering stitches, but I now do two lines that each go roughly half way around the circle/bag piece. This allows me to better control the gathers and even up any areas where the gathers look a little bulky.

For the last few cauls I have been leaving an ungathered section across the top of my head. I think it is more flattering and looks more like the portraits from the time.

Once the gathering stitches are in the circle/bag part, I prepare the band. It is a rectangular piece the length around my head plus seam allowance on both ends. I join the short ends so that I have a continuous band. (I also usually stab stitch the seam allowance down flat to reduce bulk, especially when using thick fabrics like velveteen.) I then fold the band in half and iron a crease into it. Then I fold the two outside edges into the centre crease and tack them into place. This gives a narrow band with the raw edges fully enclosed inside the band.


Slide the edge of the circle/bag piece inside the band so that the edge of the circle bag piece butts up against the crease. I usually start by matching the centre top of the circle/bag piece and the centre top of the band and pinning it into place. Do the same at the bottom centre - it will help you to keep the gathers even.

Then start drawing up your gathering threads. I adjust my gathers by eye, and pin them into place as I go. I double check again before stitching to make sure that they look even. 
The next step is to start hand stitching the band into place. Stitch around the band on the outside (the part you will see); I use a small whip stitch.

Now turn the hat inside out and pin the gathers down on the inside of the band and stitch around again, securing the inside of the gathers as you go. Use very small stitches as you don't want any to show on the outside of the hat if you stitch beyond the band.

Your hat is done! At this stage  I add a metal comb in the centre front and a wig clip in the area of the band that sits behind my ear. This is not authentic and simply helps to keep the caul on my head and stop wispy bits of hair escaping as the day wears on.

On the red velveteen caul, I decided to add some commercial trim around the band at the last minute because it looked a bit bare. It is hand-stitched down. You could also add beads or embroider a design onto the band before sewing it to the circle/bag pattern piece.


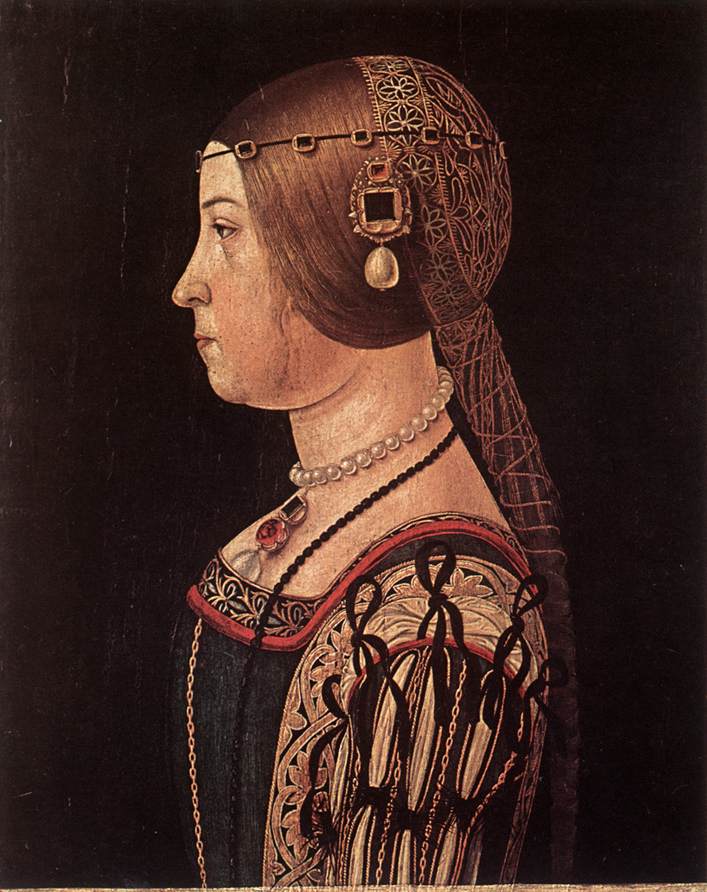
The inspiration portrait-

Image result for judgment of paris by attributed to antonio da vendri
The Judgement of Paris (detail), Attributed to Antonio da Vendri
Image from https://www.rijksmuseum.nl/en/collection/SK-A-1296

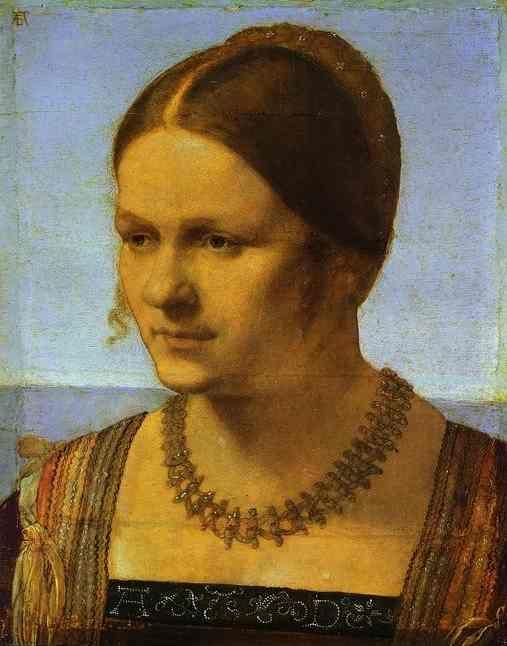
This project has inspired more ideas, including a caul with different coloured panels like the one above, and one decorated with little tufts of thread (inspired by the inside of this caul)-

I'll keep you posted on the results!

Wednesday, September 6, 2017

Hemming and skirt tucks

Today I am working on finishing a project for a little friend's birthday. The task is hemming and adding tucks to a skirt.


Tuesday, October 2, 2012

Blue dress update

Not much has been happening on any of my projects due to being away and also health problems. The sleeves are a little closer to completion, but not much!


Thursday, September 20, 2012

Blue dress update

Today I have some hand sewing to do on the sleeves that match the blue dress. I made some more bias binding which needs to be hand stitched into place.

The tie-on sleeve and lining waiting to be sewn

The sleeves will be tie-on and have gaps where the chemise will puff out. I have saved some blue fabric to do 'fancy' sleeves later.

I also bought some toupe clips to sew into my Juliet cap to help hold it in place.

Saturday, September 15, 2012

Juliet cap

Over the last week or so, I have been working on a Juliet cap. It sits on the back of my head and is secured with clips. It is made of a mystery jacquard sample I had in my stash, lined with broadcloth, and edged with gold and cream cord. It is trimmed with pearls and gold braid.


The cap with trim and pearls added


With a jewel and hanging bead added at centre front.


Below are some images that inspired my design -


Portrait of a Young Woman by Neroccio de Landi (1490)  from terminartors.com 

Portrait of Barbara Pallvicino by Alessandro Araldi c. 1510 from en.wikipedia.org


1490 by Unknown Veronese artist from  oceansbridge.com 

Carpaccio's Meeting of the Betrothed Couple (detail)  1495  from   realmofvenus.renaissanceitaly.net 


Albrecht Durer's Portrait of a Woman c.1506


Friday, September 7, 2012

Blue dress update

I worked on the gold bias binding last night but have had a few hiccups with the joins being too thick. I think I have enough in one strip to trim the bodice, but will have to try again for a longer piece for sleeve trimming.

Wednesday, September 5, 2012

Blue dress update


I have done most of the hand sewing of the blue dress bodice. I stab stitched the bodice pieces together and then whipped the edges. I also stab stitched and reinforced the seams. I have one armhole to finish and then I will post photos.

Now I am ready to make the bias binding to decorate the bodice, and decide on what I am going to do about the lacing.

My inspiration portraits have hidden lacing.

       
St Ursula (also known as Woman with a book) by Carpaccio- denverartmuseum.org            


Portrait of a Lady by Carpaccio c. 1495 - wikipaintings.org


But I have a large bust, so I am thinking that I might be better served by eyelet holes for extra strength. I do have some lovely lacing rings for a front opening bodice, but I am not sure they will be strong enough.

There are many examples of front lacing dresses from Italy and surrounds that would work:

Portrait of a a Girl With Cherries by Circle of Leonardo c.1491-95 - paintingall.com
(See also http://www.metmuseum.org/toah/works-of-art/91.26.5)

Ghirlandaio's Portrait of a Lady - en.wikipedia.org
Portrait of Constanza Caetani by Fra  Bartolomeo c. 1489-90 from


http://www.angelfire.com/zine/kiarapanther/garb/gamurra.html
Portrait of a Woman, by Domenico Ghirlandaio
Ghirlandaio's Portrait of A Woman - artcyclopedia.com


I am thinking that this type of lacing (below) will add strength and be unobtrusive. I hope the horizontal lines won't ruin the look of the gold bias decoration.
Portrait of a Young Woman by Ghirlandaio c 14885 -  
http://commons.wikimedia.org/wiki/File:Domenico_Ghirlandaio_078.gif 

Portrait of a Girl by Ghirlandaio c. 1490 - from wikipaintings.org

Portrait of Giovanna Tornabuoni by Ghirlandaio-    from wikipedia.org

Monday, September 3, 2012

Blue dress update


I haven't made any progress this week on the blue dress but I did play around with adapting a sleeve pattern. This is a completely new style to me, so I have no idea how it will work...


Wednesday, August 29, 2012

Blue dress ideas


denverartmuseum.org / wikipaintings.org

I have been looking hard at the two pictures I posted recently which are the inspiration for the new blue dress. It looks to me that, in the St Ursula one at least (left), the large pearls are attached to the underdress or chemise.

I like the decoration, I am just not sure that I want to be restricted to wearing a particular chemise with that specific dress. I think I will have to pull out my stash of pearl beads and see how it will look if I add a line of pearls to the top of the bodice itself. There are lots of examples of similar dresses from similar times in Italy with pearl decoration, so I have a bit of lee-way. (I don't want to make an exact replica of the St Ursula dress.) If you look closely at the two portraits, there are big differences between the way the artists have drawn the layers of clothing.


Here are some more paintings that I have been looking to for inspiration:


Portrait of a Lady by Neroccio de Landi -  http://bertc.com/subfour/g128/neroccio.htm


Carpaccio's 'Meeting of the Betrothed Couple' (1495) - realmofvenus.renaissanceitaly.net


Carpaccio's 'Meeting of the Betrothed Couple' (1495) - oceansbridge.com


Portrait of Catharina Corano, Queen of Cyprus (1500)-  1st-art-gallery.com


It's time to start thinking about sleeves and hair accessories too.

Tuesday, August 28, 2012

Blue dress progress

Well, I tried the bodice on, and it looks like it will do. It is much less structured than I am used to, but should be fine for casual events when I cannot wear a corset.

Next I will hand finish the arm holes and make a decision about pleating the skirt, and the type of lacing I will use.


Monday, August 27, 2012

Blue Dress Progress


I am still plodding along slowly with the front-lacing blue dress.


I have sewn and edge-stitched the front and neck edges of the bodice and tacked the armholes into place. The tiny bones fit in very nicely and I am extremely happy with how that part turned out. I just sewed a small casing between the interlining and base lining and slotted them in.


Next I will dig out a chemise and try it on. That is always the daunting part! Then, I will stab stitch and edge stitch the armholes.