Sunday, July 7, 2013

White tie-on sleeves

I needed new sleeves to go with my (relatively) new blue drill, pointed front gown, but hesitated because I wasn't sure about what pattern to use. I have tie on sleeves for other gowns, but have never been completely happy with the fit or the shape of the pattern.

I was so unsure of how to tackle the problem that I procrastinated about it until two weeks before I needed the finished sleeves. Desperation caused me to make a decision! The sleeve is not an accurately period pattern, being reasonably wide with a modern underarm seam. I added extended my existing sleeve pattern in the area around the arm pit, as I didn't want any chemise or smock to puff out there. The end result is very user-friendly. The sleeves are comfortable, look nice, and are not restrictive. One day when I am feeling confident, I will move the seam on the paper pattern to a more appropriate place.

Tacking on the ribbon prior to hand sewing


The sleeves are white cotton drill, lined in white cotton broadcloth. They are trimmed with a commercial ribbon that I have had in my stash for several years. The ribbon was hand sewn on. The sleeves needed to be wearable with Italian and English sixteenth century gowns. I would have preferred horizontal stripes to vertical, but I did not have enough trim. I thought some added gold ribbon would have been nice, but did not have the time to add it.


As I was rushing to prepare for an event, the sleeves were made without a piccadil strip, but I intend to add one in on each sleeve later.


Saturday, July 6, 2013

Medieval gingerbrede and Omelettes

Recently I have been trying out some medieval recipes. A few weeks ago I tried Medieval gingerbrede. The consistency was quite unusual compared to the modern sort. I think that the next time I try the recipe I might use a blender to 'grate' fresh bread rather than use toasted breadcrumbs. The recipe called for the gingerbread to be sliced into pieces, but I rolled it into balls and dipped it in sugar so that it would be easier for people to nibble on.


I also tried a broad bean omelette, which I made in a frittata dish. It wouldn't take much to put me off  eggs, and I had never tried broad beans, but I did enjoy the frittata. My family are not familiar with Medieval food, and they all enjoyed it too. So I was very pleased with that recipe!


Tuesday, July 2, 2013

Elizabethan Hood and Hairstyle

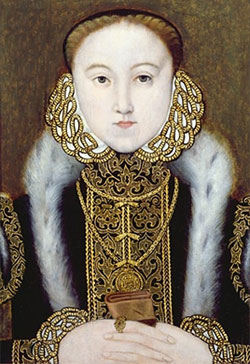
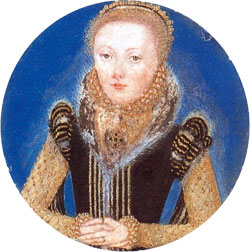
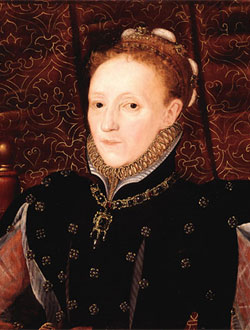
As part of my outfit for the event I recently attended, I decided to make an Elizabethan Hood. For ease of wearing, I replaced the hood with a caul. I used a Tudor hood pattern that I adapted from the one in the Tudor Tailor. I was very happy with my Tudor hood except for the fact that the buckram in the 'visor' went quite limp. The fit was good and I felt that it looked good.

These images of Queen Elizabeth I show the sort of style I was going for, although I wanted my hood to be very understated:
Elizabeth as Princess, c. 1555.Miniature Portrait of Queen Elizabeth I c. 1565. attr. to Levina TeerlincQueen Elizabeth I, c. 1565-1570. Previously attributed to Eworth.

I cut the hood base back by about half to allow for the padded rolls of hair to be worn in front. I couldn't find my buckram, so I used two layers of stiff needlepoint canvas, a think layer of interfacing and a layer of felt. These were all stitched together and wired along the front brim. The fabric 'case' was then inserted over the top, and the caul gathered up into the back of the band. I added a billiment of beads and pearls with gold trim at the front and a piece of starched gold lace at the back. I added a wig clip inside the brim, but I didn't need to use it; the hood stayed fairly secure without it.


To do the Elizabethan rolls in front of the hat, I parted my hair horizontally just behind my ears (because my hair is very thin right now,) and barrel curled the front section. I sprayed the hair with strong hair spray and teased it. I managed to put it up over the 'hair riser' combs quite easily and smoothly. Then I pinned it behind the combs and tucked the ends into the bun that I had made with the rest of my hair. Another hefty spray of hair spray and the whole 'do' was as solid as a rock. I added a pearl drop and put on the hat. Easy.


Getting the teasing and spray out of my hair was not quite as easy. When I took the hair riser combs and pins out, my hair wanted to stay in the roll shape. I could have pinned it all back up and worn it again without the combs, it was so stiff.
Post-revel hair!

Luckily, my sister was on hand to give me some hair treatment gel that really helped. Once the hot water from the shower hit it, all the spray and tangles just eased away, and a bit of shampoo and thorough conditioning brought it all back to normal. Flat, boring, normal. I was never a fan of big, 80's hair, but I do love my Elizabethan hair!

Tools of the trade: bun clips, hair riser comb and barrel curler. Plus hairspray and pins.

One of my previous Elizabethan hair styles, done using the same techniques (just different hair accessories).

Monday, July 1, 2013

Blue pointed bodice dress


Finally, here is a picture of the blue dress that I finished back in April. This is a picture of me, running late and about to rush off to an event. My lacing is askew, my partlet and girdle are not sitting right, my skirt is twisted- pictures like these make me consider never eating anything but cabbage water or getting in front of a camera again! There were lots of 'wardrobe malfunctions' while I was getting ready for the event, including my partlet ties pulling through and my farthingale being too big since I last wore it. Hence no farthingale.


The white tie-on sleeves and Elizabethan hood and caul were new for the event, and the girdle was made as part of the Italian Renaissance Costuming Challenge III.

Dancing Figures Solteltie

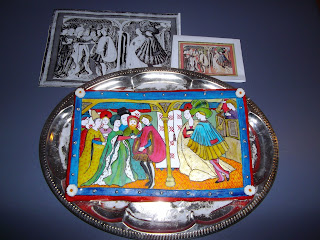
This week I have spent a lot of time creating a solteltie for a Ball and feast. The base was created from gingerbread which was then covered with commercially produced fondant icing. The figures were roughly marked out as an imprint, based on an early Renaissance image of a betrothal. I tweaked the image to make it look like people dancing, and added a tassel hanging in front of the banner of my Barony as there was to be a tassel kicking competition at the event.

I had hoped to try out my new edible ink felt tip pen, but it just collected the icing. Back to the old fashioned way- food colouring and a small paintbrush. Most of the colours were gel food colourings mixed with a little bit of vodka. I thought that they covered very well.

Decorating the icing took a long time, but I thought that the result was worth the time. The silver 'balls' are soft sugar pearls. They look like cachous but do not have that horrible tooth-cracking feeling when you bite into them. The little daisies are made of fondant.

The 'naked' gingerbread


The iced gingerbread


Some figures have been marked out..


Nearly completed


The piece with the inspiration images beside it

The finished piece. I added caster sugar around the edges later, to cover the platter