Wednesday, June 27, 2012

Completed banner device

Last week I finished the banner device that I had been working on. It is predominantly made of felt, with lucet cords and embroidery.


When it came to doing the harps or lyres, I ran into trouble. Originally I had planned to use a metal foil tube, but it started to catch on the felt fibres and pull out of shape. The banner that this device will be applied to gets rolled up, so it wasn't a practical choice.


Next, I tried sparkly glass bugle beads. Because the end of each bugle was slightly irregular, they didn't sit as neatly as I had hoped.

Finally, I tried small pieces of lucet cord. Although not shiny, they sat perfectly straight and could handle the stress of being rolled. The extra details were added with matching crochet cotton and cotton sewing thread embroidery.


Many thanks to Heather for whipping up the little lucet cords for me so quickly!


Saturday, June 23, 2012

Mouse Pouch

I finished the Mouse Guard Pouch that I have been working on. It is linen, lined in linen, with an appliqued felted wool mouse.


The mouse has an embroidered outline, bead eye and cotton thread whiskers. Glass beads have been used instead of tassels. 

Thank you to Heather for the hand luceted cords.

The Mouse Pouch is given to SCA children in Lochac who have been made part of the Mouse Guard. More information on Mouse Pouches can be found at the Worshipful Company of Broiderers of Lochac website.

Thursday, June 21, 2012

Banner device

I am still plodding along with all my projects, although today it is so cold where I live that I can hardly feel my fingers!

Here is the central panel of a device that I have been working for my Barony. We have the registered devices of the populace on a series of banners. They are a great hall decoration and also make for a great guessing game at feasts. The device is predominantly done in felt and applique.


I hope to have this project finished within the week.

Wednesday, June 20, 2012

Some sew-free days

I had a couple of days with no sewing to try and clear my mind and get things moving again. I have a lot to finish in the next few weeks. I am working on a range of subtelties and some embroidery. Several of the items that I am working on are gifts for people at the big Midwinter event that I have been talking about for the last few months, so I won't be able to post pictures until after the event.

I have lots of projects planned for after the event too. I would like to assemble some necklaces and start a pair of Elizabethan embroidered sleeves, among other things. Plus there is the huge to-do pile to work on too. As always!

Thursday, June 14, 2012

One of those weeks

It has been 'one of those weeks'. I have been sick again, which certainly doesn't make for clear thinking, but everything seems to have gone wrong with my projects this week. I have been hand-sewing a mini Italian style dress for my God-daughter, but just can't get the bodice to sit right. I dyed some braid to match some trim on a loose coat, but it doesn't match. The trim I ordered hasn't arrived. A pattern I adapted and made a toile of just doesn't look 'right'. I am starting to get downright despondent! All this wouldn't be a drama except for the fact that my big event is less than four weeks away. Oh well. Hopefully things will start to come right soon!

Monday, June 11, 2012

Elizabethan Hair

I have hair that will just not stay in place when I style it unless I use so much product that it looks like I am wearing a shiny helmet! My hair has a lot of movement in it, and lots of little 'fuzzies' that pop out around the hairline, especially near my ears. In the past I have done an Elizabethan style hairdo by crimping my hair with my old 80's crimper, and then backcombing and spraying it into place. It works fairly well, but doesn't give much height or support ornaments.

This week my Awesome Sister solved my problem. She curled my hair with a three prong barrel curler. The curls added a lot of body, which gave me the idea to try an Elizabethan hairstyle. It was just a test, so it is not perfect, but it only took about ten minutes after my hair was curled. I did a centre part, and then a part from ear to ear. I pulled back the back part of the hair with a clip, and brushed the front forward over my face. Then I put one of those 'hair riser' combs on either side. I drew the front part of the hair firmly over the combs, and secured it behind the combs with a couple of long bobby pins flat against my head. Then I drew all the hair into the back part and secured it into a ponytail in the middle of the back of my head. I added a little hair donut that I previously made out of a sock, and arranged the hair over that. I tucked the ends in and used the bun clips I got from The Undertailor to secure the bun. I added a fancy bun cover and some pearled pins. I did a light spray of hairspray at the front, and then added more jewelled pins and a drop pearl. Then I put on a beaded headband (behind the combs).


I am very pleased with how it all turned out. I took the ornaments out, but kept the bun and clips in for the whole day to see how well the style would last. It felt unusual, but didn't hurt or feel uncomfortable, and the clips didn't slide around or drop. All in all, it is a style that I could comfortably wear for a day. I will have to be careful getting into the car with the combs in though!

Wednesday, June 6, 2012

Another snoskyn pic

Oops, I forgot to put this picture in when I did the last post!


Portrait of Margaret Radcliffe (Queen Elizabeth I's Maid of Honour) from tudorplace.com.ar

Sunday, June 3, 2012

New manizza or snoskyn

Muffs were popular accessories in Elizabethan England as well as Italy in the sixteenth century. They were a way of keeping your hands warm while demonstrating your wealth and stature through furs and fine fabrics. Queen Elizabeth I had several muffs (also called manizzas, snoskyns or countenances) and there is a record of Amyas Paulet purchasing a muff on her behalf in Paris in 1579 (Queen Elizabeth's Wardrobe Unlocked by Janet Arnold, p. 97).


Here are some examples of muffs in period:


From:  Vecellio's Costume Book


Lady Dressed in the French Fashion in Album Amicorum of a German Soldier 1595 from
webspace.webring.com


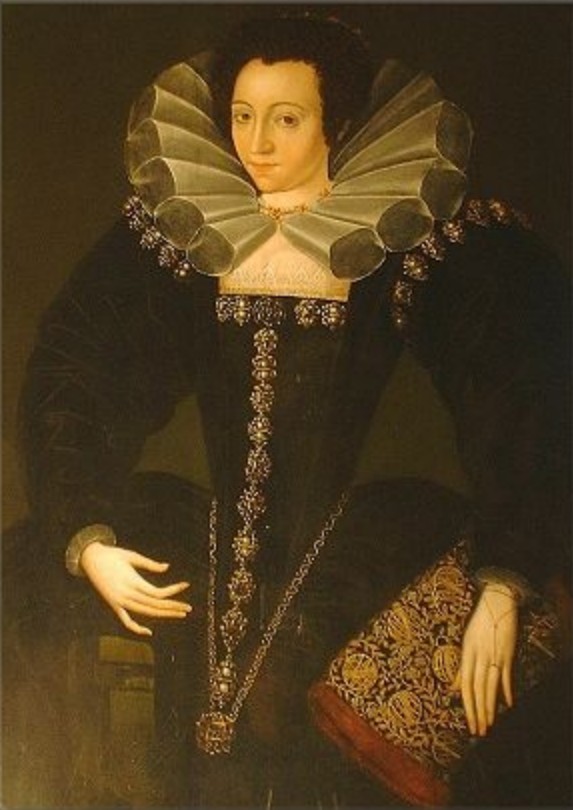
Portrait of Eleanor Verney, Mrs William Palmer, c 1590 attributed to William Segar from
elizabethan-portraits.com


Detail from an embroidered valance at the V&A Museum as shown in 'Queen Elizabeth's Wardrobe Unlocked' by Janet Arnold, Pl 442, c.1588-1590


Image of Queen Elizabeth I in 'Queen Elizabeth's Wardrobe Unlocked'


Here is my first attempt at making a muff.


Here are my materials ready to start my first attempt at a manizza. The fabric is a cotton furnishing fabric and the fur is kangaroo.


In Australia, kangaroos are used for the pet and human meat trade. I found this kangaroo skin at an opportunity shop. I do not support the fur trade, but I do believe that it is disrespectful not to use everything possible of an animal that has been killed for food, so I didn't have a problem with using this fur to line my manizza. I realise that kangaroo fur is completely out of period for the SCA, but I felt that it was worth trying to see if it would be suitable. Areas of the fur were too coarse and hard, but the body of the fur was a lot softer than I expected (although it doesn't compare to rabbit fur.)


I actually liked the rear side of the fabric better, but I was worried that the threads were too loose and may catch on things.


The fabric, fur and satin ribbon


I sewed the fur to the rectangle of fabric, leaving a small section un-sewn to enable me to turn the 'bag' inside out.


Then I pinned the satin tape into position, mitre-ing the corners. Once the tape was secured with small hand stitches, I marked out where I wanted to attach the pearl beads and sewed them on.


Then I added the plain wooded buttons and corresponding simple button loops. Finally I hand sewed the gap in the bag to close it all up.

It is a relatively simple manizza, as far as they go, but I am happy with it. It is warm, not too heavy, and useful for both my Italian and Elizabethan clothes. I am pleased that I got a chance to test out how the kangaroo skin worked. I feel more confident now about tackling the lovely red fabric that I put aside for a future manizza. I am currently adding a metal loop to this one so I can hang it from a girdle chain.


Friday, June 1, 2012

New toy

Today I got a new toy! I am now the proud owner of a Simplicity bias binding maker. I use a LOT of bias binding, so I hope that this toy will save me time and money. I'll let you know how it goes.


Thanks so much for paying it off for me Mum!