Wednesday, March 28, 2012
Add another one to the list!
I have three unfinished loose kirtles sitting in my (huge) 'to-do' pile. This week I tried one on, and my body shape has altered. Now they look very weird! I need to re-do my pattern. At least you only see the foreparts under my Elizabethan coats. Another thing to add to the 'to-do' list!
Monday, March 26, 2012
Elizabethan coat ideas
Here are some ideas for the other option that I am considering for my upcoming event - Elizabethan coats or 'frocks'. The advantages with this option are that I have several that are mostly finished, I am familiar with construction techniques, I have ironed out the kinks in my pattern, I have completed loose under-kirtles that are ready to wear, and I can make a low-necked version to help keep me cool. The disadvantage is that I really need to wear a hoop to make this style look it's best on me, and that is not a hugely practical option.
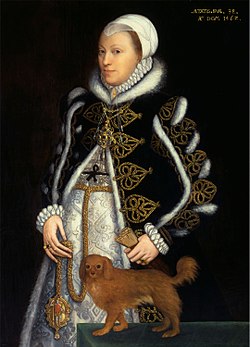
I absolutely love this one below from http://www.tudorplace.com.ar/images/Cooke,Mildred(BBurghley)01.jpg One day I would like to make a complete outfit based on this portrait.
01.jpg)
 |
| Catherine Carey 1562 - |


Hans Eworth's Portrait of An Unknown Lady c 1565 - shafe.co.uk
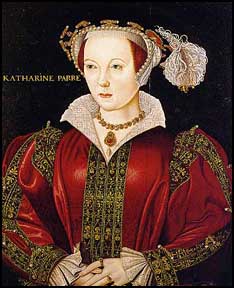 |
| Portrait of Katherine Parr - luminarium.org |
 |
| Portrait of Bess of Hardwick as Mistress St Lo (1550s) - |
 |
| Portrait of Elizabeth Benlowes 1569 - modehistorique.com |
 |
| Portrait of Mary Hill (1567) - kate meersonhistoricals.com |
 |
| Portrait of Anne Russell, Countess of Warwick (c 1565) - lookandlearn.com |
 |
| Portrait of An Unknown Lady (1567) - larsdatter.com |
 |
| Anne Browne, Lady Petre (1567) - larsdatter.com |
 |
| Mary Throckmorton, Lady Scudamore (1615) - threadtraveller.blogspot.com.au |
 |
| Portrait of Lady Dacre by Hans Eworth (1547) - larsdattar.com |
 |
| Portrait of Theophila, wife of third Earl of Worcester (1567) - larsdatter.com |
 |
| Portrait of the family of Lord Cobham - myartprints.co.uk |
Friday, March 23, 2012
Beautiful loose gown
I finally managed to get the results page for the Realm of Venus Over and Above Mini Challenge to load. Check out the winner Hannah Fuhriman in her lovely loose gown/zimarra
http://realmofvenus.renaissanceitaly.net/challenges/IRCMC-Feb2012-Results.htm
Yep. Add another item to the wish list! I LOVE that coat! What a gorgeous creation.
http://realmofvenus.renaissanceitaly.net/challenges/IRCMC-Feb2012-Results.htm
Yep. Add another item to the wish list! I LOVE that coat! What a gorgeous creation.
Thursday, March 22, 2012
Dress Ideas
I am hoping to make it to Midwinter Coronation in July. Now I need to plan for what I will wear......
I have a real dilemma- there are so many dresses I would like!
Heading into winter, I try not to plan anything big because my health problems are always much worse during the colder months. In a normal year, I am lucky if my health problems allow me to make two or three big garments like coats or dresses.
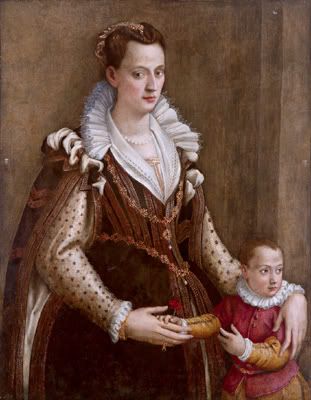
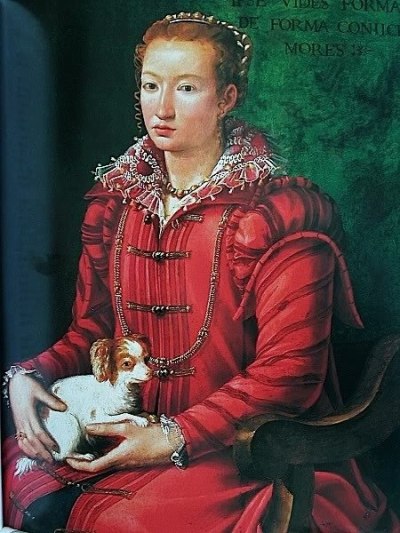
 |
| Lorenzo Costa's Portrait of A Lady with A Lap-Dog |
I really like Bianca Cappello's style. I love most of her outfits. The only thing is that I tend to get really hot because of my health issues, so these layers might be too much. Plus the ruff may not be the most practical accessory for a busy day and night.
+Portrait+of+Bianca+Cappello+(1548-1587)++1590.jpg) |
I really love the coat below, and I have some very similar fabric to this in my stash. But I don't think I will be able to make the coat and underdress in time. One day I will own this ensemble though. I guess I had better add 'learn reticella lace making' to my long-term plan...

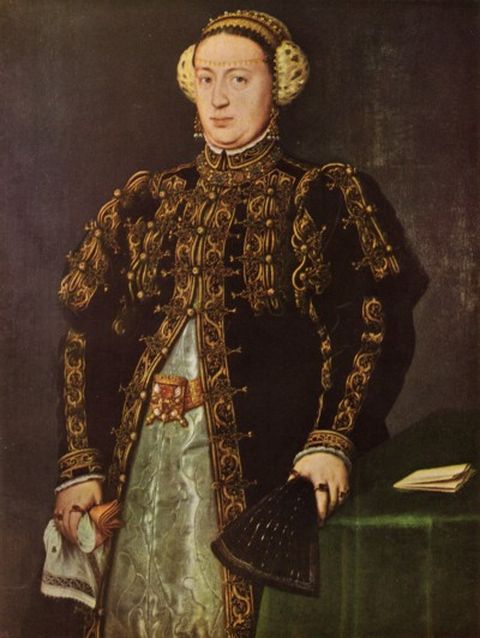
Now, this one would look much better on me in a darker colour. I like the sleeves just as they are. The only problem is that I think this style would not hide my belly as much as I would like. Also, I certainly couldn't get those sleeves done in time. There seems to be some intricate decoration in the white sleeve panes. Embroidery? Maybe one day this will grace my wardrobe!
 |
| Possibly Isabella de Medici and her son by Allori (1574 )-http://aneafiles.webs.com/eleonoraditoledo.html |
Here is a different version of the same picture (from the same site).
I like the 1530's big sleeve/big hat combo, and I think it looks OK on me, but I won't have time to do this sort of ornamentation. I probably won't have time to make a new balzo either. Plus, I did this style last year.
 |
| Lucretia by Lorenzo Lotto - lucyvivante.net |
 |
| Bordone's Portrait of A Woman with a Child (1530s) - kunst-fuer-alle.de |
One day I will own a version of the two dresses below.
 |
| Bernardino Licinio's Portrait of A Woman - terminartors.com |
 |
| Another 'Portrait of A Woman' by Licinio - terminartors.com |
I love this dress too, but the decorative features would take far too long to make it achievable this year.
 |
| Bronzino's Portrait of A Young Girl With A Prayer Book - allpaintings.org |
Finally, I think this is probably the most realistic Italian style for me, given all the limitations that are restricting the project. I could add an overgown for the feast in the evening. I really like the parti-coloured dress, but not for this event. I won't do a reproduction; I prefer to use a portrait as a reference and an inspiration but to change colours and decorative elements to suit my personal taste, style and budget.
 |
| http://habanera-nonblog.blogspot.com.au/2008/09/un-agosto-bologna-2.html |
I haven't put in any images of loose Elizabethan coats; that was the other option. I have several loose underkirtles and many accessories ready to go. The only thing that was putting me off about that option was the fact that I really need to wear a hoop skirt to make the Elizabethan 'frocks' or loose coats look nice, and I think it will be a crowded event.
I will have to think about it a bit more....
Sunday, March 18, 2012
Reproduction Playing Cards
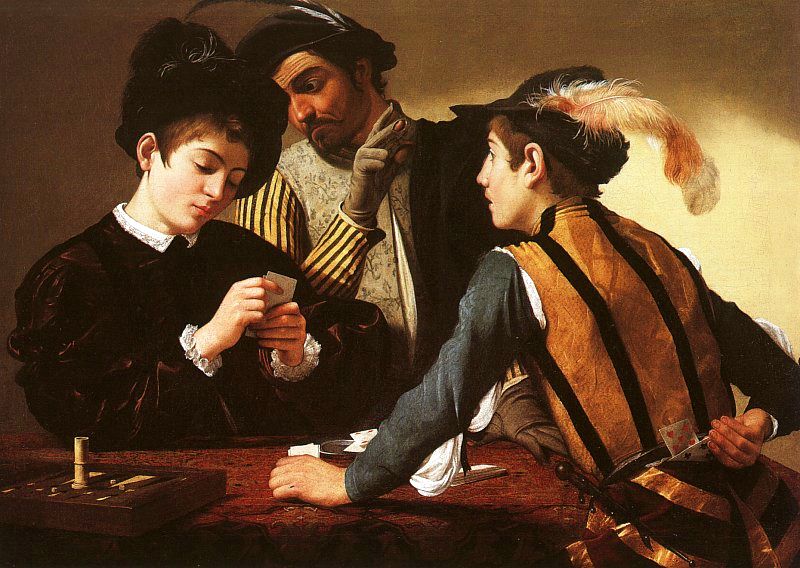 |
| Caravaggio's 'The Cardsharps' (1594) - |


.JPG)

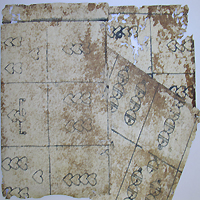
This extant set is very similar to my set:
 |
| 16th C Swiss cards - http://worldradio.ch/wrs/news/switzerland/archivist-uncovers-deck-of-500-year-old-swiss-play.shtml |
 |
| http://www.nlm.nih.gov/exhibition/bathtub/littletreasures.html - mid 16th C uncut cards |
Here are some extant examples of renaissance playing cards:
 |
| http://www.vam.ac.uk/images/image/49190-popup.htm - French cards 1475-1500 |
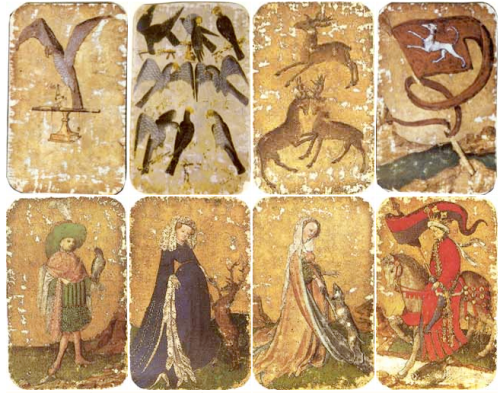 |
| Pasteboard German cards c. 1430 - |
 |
| http://www.wopc.co.uk/austria/hofamterspiel.html - mid 15th C European card |
 |
| The Card Players by Lucas van Leyden (1520) - |
Thursday, March 15, 2012
Elizabethan Coif Pattern
Here is an embroidery design that I was playing with over the Christmas break. I know I don't actually need a new Elizabethan coif, and my 'to do/finish' pile is huge, but there is something infinitely more appealing about starting an exciting new project than working on something that has been dragging on for months! Plus, I think I like designing more than actual embroidering.

Wednesday, March 14, 2012
Hirchones/Hedgehogs
It has been a thundery day where I live; very humid. I cut out an Elizabethan loose underkirtle and a new Elizabethan sleeve pattern. When the garment is eventually finished, I will blog a write-up on how it all went.
In the spirit of all things renaissance-y, here is what I made to go with tea. I used Constance Hieatt's version of the recipe. I think it came from 'An Ordinance of Pottage', but it may have been 'Pleyn Delit'.
In the spirit of all things renaissance-y, here is what I made to go with tea. I used Constance Hieatt's version of the recipe. I think it came from 'An Ordinance of Pottage', but it may have been 'Pleyn Delit'.
 |
| Hedgehogs made of pork mince, spices and slivered almonds |
 |
| Hedgehogs after cooking |
Everybody enjoyed them!
Monday, March 12, 2012
Split stitch badge
I managed to finish a couple of items already this month (!) but I can't post pictures of everything because some or them are for an upcoming event and are supposed to be a surprise.
Here is a heraldic split-stitch badge that I finished and have given to the recipient.

Here is a heraldic split-stitch badge that I finished and have given to the recipient.

Wednesday, March 7, 2012
Sixteenth Century Over-gown
 |
| The finished over-gown |
I have needed a warm over-gown for some time, so the Realm of Venus ‘Over and Above’ Mini-challenge was a great opportunity to get motivated and produce a finished item quickly. (I have some significant health challenges, so I normally never get anything done quickly!)
Initially, I prepared by spending time looking at portraits and woodcuts from the sixteenth century. I predominantly wear mid-sixteenth century Italian and English garb, so it was very important that my over-gown be accurate and appropriate for both Italian and English courts.
Sometimes choosing a style can be the hardest part of the project, and I certainly found it very difficult. In the end, I chose the fabric that I wanted to use and narrowed down my style options from there. I am on a very strict budget, so using what I had seemed the most sensible and practical option. I chose this fabric which I got cheaply as a remnant. The colour would match most of my wardrobe, and the design is very similar to many sixteenth century silk damasks. The fabric is most likely a poly-cotton blend. I prefer 100% natural fabrics as being more historically accurate and nicer to wear, but my budget simply doesn’t extend to silk so poly-cotton is an alternative that I can afford.
 |
| My over-gown fabric |
Vecellio came to the rescue on the style front. I decided to base my design on a montage of designs from his book of fashion woodcuts (below). I chose a three quarter length style to economise on fabric.


I also admired the portraits below, which show the popularity of coats/over-gowns in chilly England as well as Italy and Europe. The Elizabethan loose coats tend to be worn over loose kirtles, such as the example in Janet Arnold’s ‘Patterns of Fashion’, whereas the Italian coats/over-gowns tend to be worn over dresses.
|
| http://en.wikipedia.org/wiki/File:Bess_of_Hardwick_as_Mistress_St_Lo.jpg |
 |
| http://home.earthlink.net/~elisale/costume.html |
 |
| http://home.earthlink.net/~elisale/costume.html |
 |
| http://cilean.hubpages.com/hub/Clothing-the-Renaissance |
 |
| http://cilean.hubpages.com/hub/Clothing-the-Renaissance |
 |
| http://www.backtoclassics.com/gallery/agnolobronzino/portraitofalady/ |
 |
| http://thehouseoftudor.tumblr.com/page/7 |
|
| http://en.wikipedia.org/wiki/File:Alessandro_Allori_-_Portrait_of_Grand_Duchess_Bianca_Capello_de_Medici.jpg |
 |
| http://www.internetstones.com/history-of-pearls-part-nine.html |
Several years ago I was given a ‘Reconstructing History’ Elizabethan loose gown pattern for my birthday.

I have a weird body shape, so I needed to significantly adjust and re-draw the coat pattern to try and make it fit me properly. Over the years, I have continued to change the pattern to suit me, and it was this pattern that I adapted to make the three quarter over-gown for this project. I used some pale green 100% cotton fabric that I had in my stash for lining.
I was devastated to find that, despite careful cutting, I didn’t have quite enough blue jacquard to make the hanging sleeves that I wanted to go with the over-gown. Lovely Kerry at Spotlight Clovercrest even checked her personal stash to see if she had any left, but no luck there. I bought a length of furnishing fabric as a substitute (below) but it didn’t look good with the darker blue. After much searching, I decided not to compromise on design, and to put the hanging sleeve element on the back-burner until I found more of the jacquard. I will be moving into a sewing room in a few months, and I really hope that I have a small extra remnant stashed away somewhere.
 |
| The replacement sleeve fabric -which I decided not to use |
 |
| The fabric and adjusted pattern |
Once the fabric had been cut, I edged the pieces with a zig-zag stitch to reduce fraying. In period, wax or glue was often used, but machine zig-zag stitch is a great time saver and very practical when garments may be heavily laundered. I cut several long strips to make slashed picadil strips to edge the front of the garment. This type of decoration can be seen in many sixteenth century portraits, and seems to have been popular in England and Italy. Eleanor of Toledo seems to have particularly favoured this type of decoration, and the pictures below show several examples of Eleanor’s dresses from ‘La Moda A Firenze’. While I have admired this decoration for several years, the actual construction was first demonstrated to me by THL Katerina da Brescia, to whom I am grateful for her instruction.
 |
| Details of slashed strips on the dresses of Eleanora of Toledo in 'Moda a Firenze' |


I sewed the body pieces of the gown and lining together by machine to save time. To make the garment look more accurate, I overstitched several of the seams (on the outside) by hand with a small whip stitch. Once I had established and tacked my centre front seam into place, the piccadil strips were pinned in and sewn down with a running stitch. This was reinforced with a whip stitch (below). Once securely in place, the small cuts were made (very carefully) 1cm apart.
.JPG) |
| I have put a white ruler under the piccadil strip to try and show the cuts more clearly |
.JPG) |
| This shows the same technique in a different colour |
I really liked the triangular edge on the trim in a couple of the Vecellio woodcuts. I couldn’t find anything as ornate as that in the stores, so I decided to try and replicate it. I got some rick rack braid for 50c a metre, and dyed it a purple colour to go with the satin ribbon that I already had in stash. I hand stitched the wine ribbon onto the grey ribbon. I had originally planned to add white running stitch accents which were used in several of Henry VIII’s outfits, but I didn’t like the way the test piece looked:
TestTrim.JPG) |
| The 'test' trim which I decided not to use |
I was lucky to get eleven metres of Japanese gold gimp braid for $11, so I used that instead. I sewed it onto the centre of the ribbon with three lines of stitching. I tend to catch my clothes on things a lot, so I wanted it to be very secure.
StuffForTrim.JPG) |
| The 'ingredients' for my base trim |
HowTrimWillLook.JPG) |
| The combination after the rick rack braid has been dyed |
GimpSewnDown.JPG) |
| The ribbon base with the gimp braid sewn on |
.JPG) |
| The trim nearly complete. All I need to do now is stitch down the rick rack braid |
CompletedButton.JPG) |
| A completed woven button |
ShoulderButtons.JPG) |
| Buttons sewn onto the shoulder |


I sewed a small band onto the neckline to make a tiny standing collar. I cut strips of jacquard and lined them with 100% cotton broadcloth in a faded wine colour to make sleeve tabs. I originally planned to make a double row of sleeve tabs, but after the trim had been hand sewn onto each piece, they were far too heavy. I like the look of the single row of tabs, and adding the hanging sleeves later will probably be easier with one row of tabs anyway. I have enough trim and buttons to trim the hanging sleeves when they are complete.
.JPG) |
| The sleeve tab edges being oversewn |
Tabs.JPG) |
| Trim and sleeve tabs. You can see the rows of stitching under the ribbon trim. |
TabsTackedOn.JPG)
Above you can see the tabs tacked into place and ready to sew. This took a lot of careful hand stitching as the fabric was so thick. I only broke one needle doing it!
I made a stretched tear drop shaped bag of fabric to use as removable fake sleeve puffs. The panel can be threaded through the sleeve tabs to make them stand up and look like a padded roll, or be left off to change the look of the outfit.
 |
| Without the false sleeve puffs |
 |
| With the false sleeve puffs |
Once the gown and lining had hung and dropped for a week or so, they were hemmed, and the lining was whip stitched into the gown by hand. The lining seams were machine stitched to save time. I was sorry that I had to use the machine for this when most of the rest of the garment was made by hand, but I couldn’t have finished the garment in time if I hadn’t used machine stitching. I did use hand-sewing for the armhole seams though.
.JPG) |
| Hemming the armholes of the lining |
As it was, I only finished sewing in the hooks and eyes at 11.20pm on 29 February. This was partly due to the fact that I am very bad at sewing in hooks and eyes and it is one of my most hated sewing jobs! The ladies from ‘The Tudor Tailor’ recommend alternating hooks and eyes to prevent the garment from coming undone, and that is the way that I normally do it.
EyeSewnOn.JPG) |
| An eye sewn on |
I would certainly welcome suggestions from readers about whether I should put the buttons back on or not.
In my pictures, I am wearing the gown with a partlet and also with a ruff. I will need to be able to wear the garment both for Italian and English garb. I am also modelling it with no ruff or partlet so that the tiny standing collar is visible. In one photo, the first few hooks and eyes are undone, showing the lining. The coat is extremely warm, and I am considering doing some maroon and gold embroidery on the inside of the neckline in case I wish to wear it slightly open in the future. All the accessories and garb in the photos are made by me, with the exception of the fur muff which was made by THL Katerina da Brescia.


.JPG)

.JPG)
This project was a great challenge. It really motivated me to get organised and do some thorough planning. Have a look at what the other participants made at http://realmofvenus.renaissanceitaly.net/challenges/IRCMC-Feb2012.htm
Thank you to my excellent photographers, and also to my sewing buddy who got much less attention than usual during the project and didn’t resent me too much!
HelperCropped.JPG)

Bibliography
Arnold, J. 1988, Queen Elizabeth’s Wardrobe Unlock’d, W S Maney and Son Ltd, London.
Arnold, J. 1985. Patterns of Fashion, Pan Macmillan Ltd, London.
Arnold, J; Tiramani, J; and Levey, S. 2008, Patterns of Fashion 4, Pan Macmillan Ltd, London.
Mikhaila, N and Malcom-Davies, J. 2006, The Tudor Tailor, B T Batsford Ltd, London.
Orsi Landini, R and Niccoli, B. 2005, La Moda a Firenze 1540-1580, Pagliai Polistampa, Florence.
Vecellio, C. 1598 (reproduction) Vecellio’s Renaissance Costume Book, Dover.
Subscribe to:
Posts (Atom)