Tuesday, January 31, 2012

Preparations


I am preparing to start the Realm of Venus mini-challenge tomorrow. In light of my health problems, I have probably bitten off more than I can chew, but I have enjoyed the preliminary research. I need a nice new coat for winter; I have a green Dutch coat made out of green recycled wool blanket, but it is quite itchy so I am keen to get something more comfortable.

The coat must be usable for both Elizabethan and Italian ensembles. Here are my main inspirations scanned  from Vecellio's Costume Book (Italian section):

Plate 190- 'Unmarried peasant woman of Tuscany' got added by mistake!


Hopefully I will be able to finish in time. I will post progress and pictures at the end.

Speckled Holly Leaf Coif


Today's post is on a coif that I started a really long time ago and only finished in about 2010. I had grown disenchanted with the project because the pattern was not cut in an accurate way. For a long time I debated about whether I should continue the embroidery or whether it was a waste of time to finish the garment if it was not accurate.


The finished coif

In the end, I modified the pattern to make it more accurate for the sixteenth century and decided to finish the garment. The piece was good practice in speckling stitch, which was popular with Elizabethan embroiderers for adding depth and texture to monochrome embroidery. I found it quite a tedious and time consuming stitch also, but I liked the end result.

Here you can see the original coif pattern modified to make it more accurate for a sixteenth century English style coif. Note the join down the middle of the garment. I have never seen an extant coif with a join, but that was the only way to modify this coif from it's original 'Jorvik hood' style shape into a more appropriate shape.

There are many examples of floreate patterns in extant English monchrome and ploychrome embroidery from the sixteenth century - the Elizabethans loved them! I particularly wanted a holly pattern and was inspired by patterns from 'A Scholehouse for the Needle' and the images below.


The spiky leaves from this Elizabethan man's nightcap in the V&A Museum (c1600-1629/Museum # 814-1891) reminded me of holly leaves  although I suspect they are supposed to be thistle leaves.

A really excellent collection of images of extant coifs can be found at the Blackwork Guild 'Blackwork Headwear' page - http://www.theblackworkguild.com/COSTUMES-MEMBERS%202.html


Stylised holly design in silk and gilt from a sixteenth century English coif in the V&A Museum collection

The finished coif worn by a model with very short hair. It does fit better over a bun or hair taping.


Spangles were attached with three stitches, and the centre seam was decorated with chain stitch. All the embroidery was done in DMC cotton thread with two strands of black. Cotton floss and fabric were used for this project instead of silk and linen to save money. The spangles are silver metal. 

Centre top seam decorated with chain stitch.


The centre top seam was decorated with chain stitch and the edges with a slanting whip stitch. In period, an Elizabethan braid stitch would most likely have been chosen for the top centre seam, but when I tried it, it just didn't fit with the embroidery. If I started this project again, I would make the embroidery design more crowded and full. When I drew this design out, I was less familiar with Elizabethan style than I am now, and I think I was looking at the design with a modern eye. It needs a lot more spangles and have less bare areas.

I gathered the central seam in an approximation of the same technique that I used on the Red Stripey Coif (posted previously). It doesn't look quite right due to the adjusted shape of the coif. The main embroidery stitches used were stem and speckling stitches, and a funny little knot I use in lieu of french knots. (It is close to a colonial knot.)

The finished coif is lined with a light cotton lining to protect the embroidery from hair oils etc. The lucet cords were hand made by Heather - thank you Heather! Also thanks to Alisondre who helped with some of the speckling stitches.

Friday, January 20, 2012

Orange-red Geometric Band Partlet


Today's post is a picture of one of my early monochrome embroidered partlets. It is embroidered in two strands of an orange-red DMC cotton floss. In period, silk would probably have been used. I used cotton fabric for the body of the garment, whereas in the sixteenth century linen was a much more commonly used fabric. Both these substitutions were made for financial reasons. The garment is hand sewn and was completed in early 2007.


Stitches include stem stitch, running stitch and an ornamental buttonhole stitch.

I rely very heavily on reprints of sixteenth century pattern books to source my embroidery designs and gain inspiration. This partlet embroidery design is a direct copy of a popular sixteenth century band design that crops up in several pattern books. 

Here is a book that I use very often  

Thursday, January 19, 2012

Mouse pouch


Here is a photo of the mouse pouch I made last year. I have three more in the 'to do' pile.

The pouch is made of red linen and lined with red linen. The mouse is made of appliqued wool felt and surrounded by white linen chain stitch. It doesn't show up properly, but the mouse has 3D whiskers. The eyelets are hand stitched, and the cords were luceted by Heather.


For those in the SCA in Lochac, the instructions can be found here - http://www.sca.org.au/broiderers/Docs/mouseguard_pouches_instructions.pdf

Red striped coif


Here are some more photos to go with the article on the red striped coif (below).


Here is the coif with completed embroidery but before spangles were added.


The back of the coif showing embroidery and spangling threads. I knot off my spangling threads after each spangle so that if a thread should break, I will not lose all the spangles.


Here is the coif all finished and ready to be made up. If I could do it over, I would add more gold metal spangles. This was one of my first spangling projects, and I completely under-estimated just how long that part of the project would take! I would also make the vine design fill the band more completely.


A close up shot of the edge of the coif before the decorative edge stitching was added.


The finished coif and the view from the inside so that the underside of the embroidery can be examined.


Article on Red Striped Coif


This is an article that I wrote to accompany a coif I made in 2009.


Background
After cutting my waist-length hair short in November 2008, I realised that I needed to reassess my hair coverings for SCA events. I normally wear sixteenth century Italian and Elizabethan style clothing and I found that I didn’t have enough hair for my normal cauls to fit securely.
On Christmas Day 2008, I received my much hoped for copy of Janet Arnold’s Patterns of Fashion 4 (POF4) and subsequently spent many enjoyable hours poring over the detailed colour plates of extant items. I realised that an Elizabethan coif might be the solution to my headwear problem and decided to create one as much in keeping with period techniques as possible. Previously I have made several shaped coifs because I wanted to minimise bulk at the crown and back of the head. Having cut off my long, thick hair, bulk is no longer an issue, so I decided to make one with pleats at the back of the head.
Pattern, Materials and Techniques
Making the pattern for the garment was a case of trial and error. I played around with paper patterns in the approximate shape of the unjoined extant coifs reproduced below. There is some variety in the shape of extant coifs, probably due to personal preference on the part of the wearer. I don’t like having headwear obscure my peripheral vision, so the ear ‘flaps’ on my coif are quite small.
Having settled on the style of coif, choosing an embroidery design was the next challenge. I was very taken with the linen coif embroidered with red, green, black and ivory silks shown in POF4 on Plate 51, but took my main inspiration from Plate 50 (below).  The original has lines of flowing foliate stems and flowers worked in black silk, separated with enclosed areas of silver gilt spangles. I have never tried to completely reproduce an extant piece of embroidery, preferring instead to change small details to make a piece completely ‘my own’ and allow my own creativity to shine through.


The extant piece that first inspired me to make a coif; I loved the colours and may attempt something like this in the future. (Plate 51, POF4; Linen coif embroidered in silk from around 1600 from the Museum of Costume and Textiles, Nottingham.)


My embroidery design and layout is largely inspired by this extant coif (POF, Plate 50) in the Burrell Collection, Glasgow that dates from around 1610.

Although most of the examples I have used date from around 1600, coifs were in use at least a decade earlier than that. The picture by William Peake the Elder, 1590 (below) shows Lady Catherine Constable wearing a linen coif and forehead cloth (POF4, Plate 51A), and a variety of plates in ‘the Tudor Tailor’ show similar garments. Plate 6, A portrait of an Unknown Woman 1568 (p. 10) shows a lady wearing a distinctly coif like garment. Coifs could be worn under another item of headwear, or used to cover the hair on informal occasions, such as when inside the house.

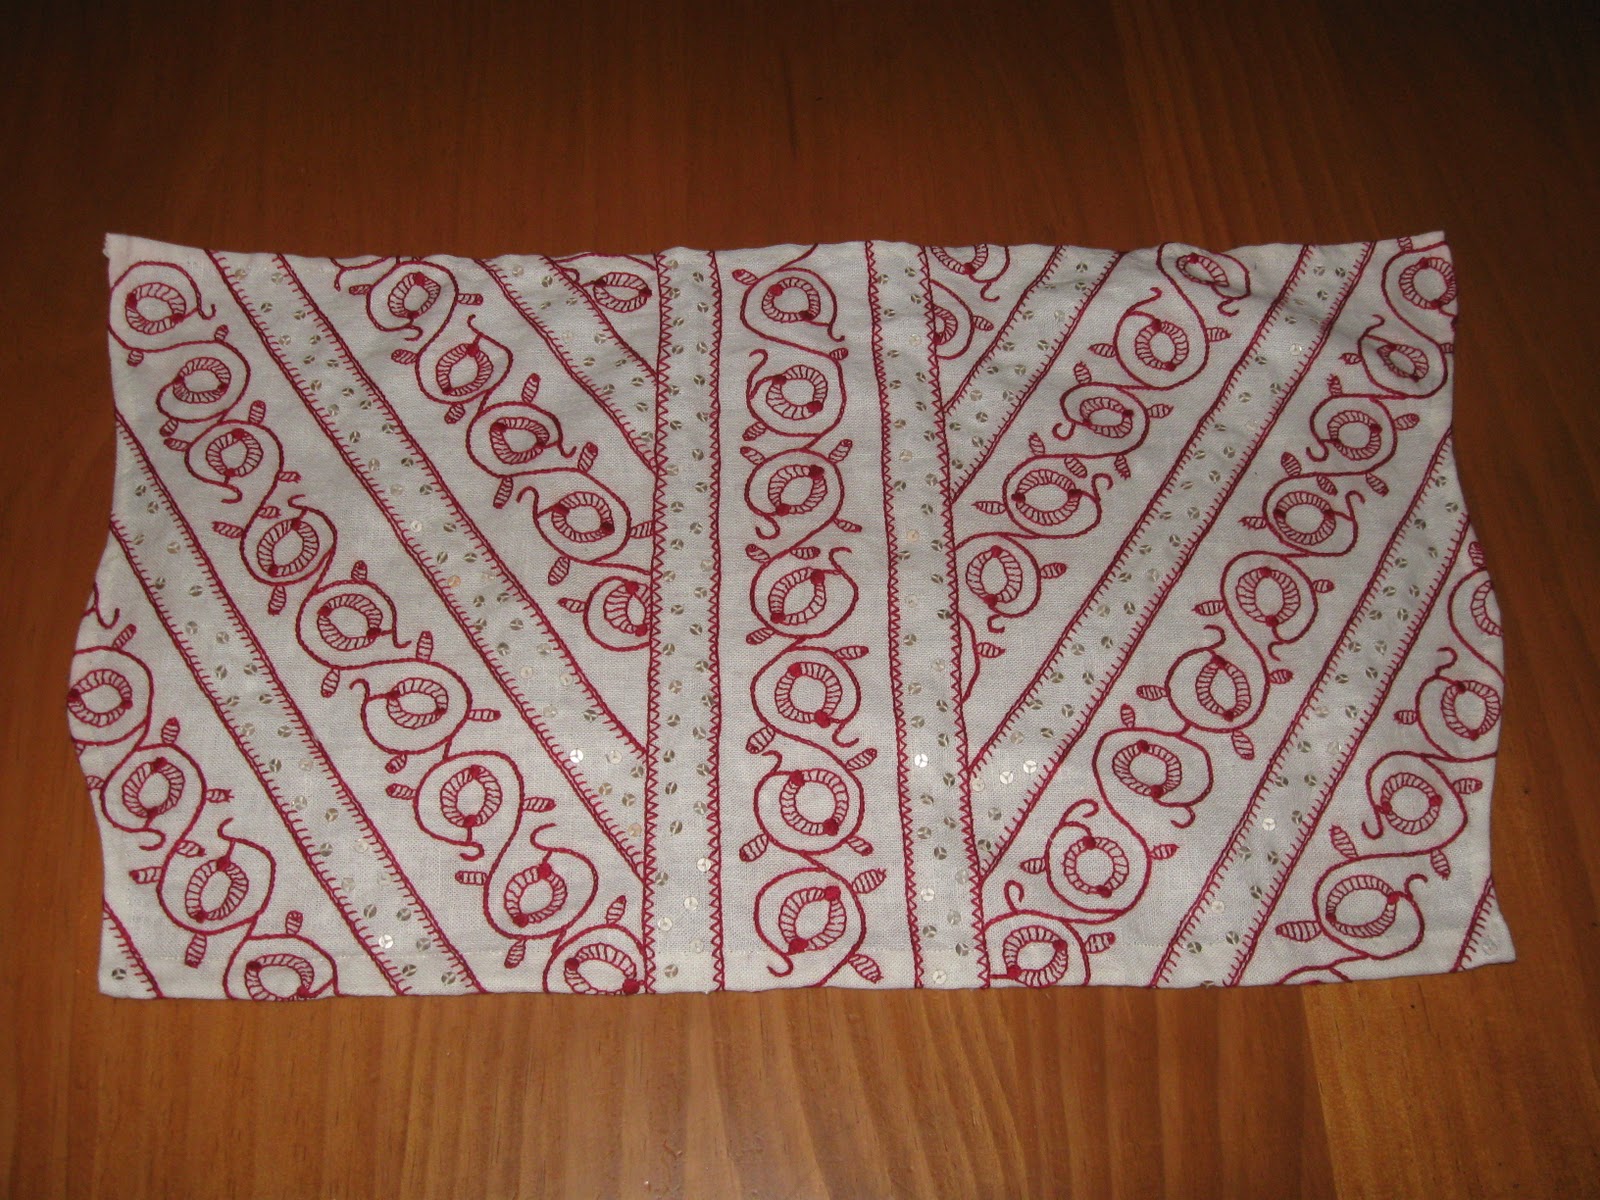
For this project, I decided to change the design from flowers to pomegranates, keeping the original scheme of geometric lines separating the coif into segments. The pomegranate motifs from the Warwick Museum’s men’s shirt inspired this choice, although I altered the shape and style of the fruit somewhat.
I chose a red monochrome colour scheme rather than black because I have several red Elizabethan style garments in various stages of construction. Red monochrome embroidery was popular in both Italy and England in the sixteenth century, with many extant examples still in existence. Red-worked smocks, shirts, chemises and coifs from England and Italy are all shown in POF4 and can be found in most museums that have clothing collections. A variety of embroidery styles is shown on these garments, but geometric and freestyle monochrome and polychrome styles are both found. A lovely red worked Italian camicia from the sixteenth century can be found in Moda a Firenze on p. 124. It and the large number of Italian and English red-worked garments in POF4 indicate the trans-continental appeal of this colour combination.
I used cotton floss rather than silk purely due to financial restrictions, but I was really happy to find a piece of unbleached pure linen in a remnant basket, and I used this for the coif itself. (Extant coifs are worked on linen but I usually can’t afford linen.)


This late sixteenth century Chalice Veil (V&A Collection as shown in Geddes et al, p. 12) is worked in red silk. The embroiderer has edged the piece in a similar way to the edging on the ‘face’ edges of my coif. Stitches used here include stem stitch, double running stitch (‘Holbein stitch’) and braid stitch.


I used stem stitch and open buttonhole/blanket stitch for the majority of the embroidery. I wanted to practice my open buttonhole/blanket stitch on this project because I am not very confident with the technique or tensioning of this type of stitch. For this reason I changed the diagonal segment edging style of the original from little triangles to lines of open buttonhole/blanket stitch, although I did keep the little triangles in the two vertical centre segments because of their aesthetic appeal.


This linen panel, known as ‘the Shepheard Buss’, dates to around 1600. Worked in black silks, lines of what look like blanket stitch are used to separate the different sections of the design. I have used this technique in the sections of the coif containing spangles. (V&A Museum, Geddes et al, p. 42.)

I have not been able to find any really detailed pictures of the original coif, so had to make educated guesses about what type of stitches the original embroiderer used. Braid, chain, stem, back and double Holbein stitches are all commonly used in Elizabethan embroidery, so I used stem stitch for the dividing segment lines and the pomegranate stems, with blanket/open buttonhole stitch for the fruit segments and leaves, and satin stitch for the circular points at the top and bottom of the fruits. The decorative triangles in the centre vertical columns are done in large double running stitches, although I suspect that the original embroiderer would have used two stitches to my one, judging from the trouble I had with the tension.
I used silver-gilt spangles of 4.0mm diameter from the Thread Studio, which appear to be slightly smaller than those used on the extant garment. Although pressed metal spangles or ‘ooes’ were used in period, I am not sure what these modern alternatives are made of. I suspect that they are a metal alloy blend as they are light, don’t seem to tarnish, don’t snap and don’t melt under the iron.  I have seen examples of spangles being sewn on with four stitches (see below), but the majority of garments seem to have spangles stitched with three so I used three. The extant garment appears to have spangles sewn on with one thread, but I used a doubled cotton thread because it is likely that my coif will be machine washed, and durability is very important to me. I knotted off the thread after each spangle was secured, but did not cut the thread so the back of the work would be tidier.


A sixteenth century polychrome coif (Synge, unknown page) unusually showing spangles sewn with four stitches instead of three!

For the same reason, I have a natural cotton lawn lining waiting to be whip stitched in before I wear the garment. Although I can find very little evidence of coifs and similar headwear being lined in period, I have decided to line mine to reduce the chance of hair oils/products from soiling the linen. (I have left the lining off so that the back side of the stitching is visible.)
I have never made a coif where the embroidery goes right to the edge before; on my previous efforts the embroidery has always stopped within a centimetre or two from the edges. I don’t want to get too stuck in my ways, so decided that I would copy the designer from Plate 54 of POF4 and draw my designs all the way to the edges.


This coif from c. 1610 in the Burrell Collection (Plate 54, POF4) and this coif from c.1600 in the V&A Museum (p. 44, Geddes et al.) demonstrate the technique of taking the embroidery design all the way to edge of the garment. The V&A Coif at the right also shows (faded) small diagonal decorative stitches around the edges of the coif that frame the face.

Although ink was often used in period to mark out embroidery designs, I am not confident enough about my draftsmanship to risk using ink, so I traced the design in modern water soluble ink. I taped my sketched design to a window and used the pane as a natural light box. The salamander design below, dating from around 1600, demonstrates how ink was used to mark out designs for the embroiderer to follow (V&A Collection, T.88-1925, Arnold {QEWU} p. 272).


In period, many embroiderers seemed to avoid knots and work their thread ends back into the embroidery. I have knotted my threads and then worked the thread ends back into the work, again for durability and security when the garment is machine washed.


This red and gold worked coif from about 1610 shares similar attributes to mine; the colours are similar, the design goes all the way to the edges and no edging lace is used, small spangles are used, and the embroiderer seems to have anchored their stitches in places with knots. (POF4, plates 53-A.) Compare with a back view of my coif, below.


The edges of the garment were bound with natural cotton thread using a satin stitch before the garment was cut out with snips. I chose to use the snips because they were used in period, and I wanted to get a feel for the technique. I found them unwieldy, probably because I am used to modern scissors and because I was worried about making a mistake that would ruin the work. After the edges were cut, I hemmed them with natural cotton thread, and a casing was made along the lower edge for the lucet cord. The hand made cord was provided by my friend Heather Carter and was made on a wooden lucet. The side edges were ornamented with diagonal stitches. Of the coifs I have looked at, some were decorated on the edges, and some were not. Because I didn’t want to use lace on this coif, I chose to decorate the edges.
I joined the top seam with a small diagonal stitch in natural cotton, and then tried to replicate the cartridge pleats seen on the coif in Plate 52B of POF4. My pleat stitches must have been larger than those on the original because my coif has fewer pleats. Because of this, I managed to push the main part of the pleats down into the ‘hole’ created by the gathering to give a cleaner look to the area. When I copied the original in Plate 52 exactly, the result looked wrong, possibly because of the larger pleats. I secured the pleats with small stitches in natural cotton, then cut away the pleating guide stitches because they looked too big and a bit untidy. I then attempted to do the gathering cross just visible in pale green thread on Plate 52B (POF4). I used a triple securing stitch in embroidery floss, which I then buttonholed over for strength. I did the same on the smaller side arms. The extant piece seems to have a five armed knot, but the function is the same.


Plate 52B, POF4 shows a detailed picture of the top seam of a polychrome coif from around 1610, held in the Museum of Fine Arts in Boston.


Even though my pleats are larger, when I put it on, the pleats on the back of my coif do sit like this (POF4, Plate 52), detail previous page.

 Reflective Notes
The coif fits, and I am quite happy with the finished product, although there are several things I would do differently if I could do it again. I am not completely happy with the tension on the blanket stitched leaves and fruit segments, and I will be interested to see how they stand up to repeated washing. I was disappointed that the diagonal lines don’t match up at the top of the coif when sewn. I thought I had been very meticulous in designing the pattern; perhaps I moved the fabric when tracing out the design on the window.

 I have started a partlet with the same design in black cotton, and I have added seeding stitches inside the fruits on that project. I am glad I left the seeding off the coif- I like the clean lines. I may make a matching forehead cloth for the coif if I can match the linen fabric. Although I started researching in December 2008, I didn’t start work on the coif ‘til February 2009, so I happy to have finished it so quickly.


References
Arnold, J. 1988, Queen Elizabeth’s Wardrobe Unlock’d, W S Maney and Son Ltd, London.
Arnold, J; Tiramani, J; and Levey, S. 2008, Patterns of Fashion 4, Pan Macmillan Ltd, London.
Geddes, E and McNeill, M. 1976, Blackwork EmbroideryDover Publications, New York.
Mikhaila, N and Malcom-Davies, J. 2006, The Tudor Tailor, B T Batsford Ltd, London.
Orsi Landini, R and  Niccoli, B. 2005,  La Moda a Firenze 1540-1580, Pagliai Polistampa, Florence.
Synge, L. 1982, Antique NeedleworkBlandford PressNew York.

Bibliography
Like many needlework enthusiasts, I have a collection of books that I like to look through to get general inspiration for a project. Here are a few that I looked through before starting this one:
  • Compleat Anachronist 115: Wrought with flowers of Black Silk, Prudence Catesby
  • Compleat Anachronist 31: An introduction to Blackwork, Shoshonnah Jehanne ferch Emrys
  • The Encyclopedia of Embroidery Techniques, Pauline Brown (1994, Simon and SchusterAustralia).
  • Dress at the Court of King Henry VIII, Maria Hayward (2007, Maney PublishingUK).

Credits
  • I also utilised the resources at the addresses below for information on stitches used in period,  and these were suggested by THL Katerina da Brescia in her article “WIP – Tuscan Camicia of the 16th Century” as published in the WCoB Newsletter, Twelfth Night 2008:
-Archive of Stitches from Extant Textiles - www.bayrose.org
-Sewing Stitches Used in Medieval Clothing- http://www.personal.utulsa.edu/~marccarlson/cloth/stitches.htm

  • Thanks to Lady Jane of Stockton for her articles and on and motifs from the Warwick Museum’s men’s shirt as published in various WCoB newsletters and her hints on writing documentation as published in WCoB Newsletter, November Crown Tourney 2005 as ‘Research – Don’t Panic!’
  • Thankyou to Heather  for the lucet cord.
  • Thanks also to the Lady Ysmay de la Mor who first introduced me to stem stitch and the delights of freehand monochrome embroidery at a collegium many years ago.


Wednesday, January 18, 2012

Blue vine partlet


Here's another one from the 'finished' pile. It is an Elizabethan style high necked blackworked partlet made out of cotton fabric with dark blue DMC cotton floss embroidery that I made to go with my blue loose Elizabethan coat/gown.


The pattern is one that I developed myself and was inspired by several 'band' patterns from sixteenth century embroidery pattern book reprints. 'Band' patterns seem to have been very popular in period as they would have suited a range of garments and textile products. The monochrome stitching on this partlet is done in stem stitch with two strands of embroidery cotton. I tend to wax my floss lightly to minimise tangles.


Here is a photo of the embroidery on the body of the garment prior to making up, The pattern runs in four bands down the back of the partlet too.


The collar has a very small ruffle pleated into it. The ruffle was cartridge pleated and hand sewn into place. The garment was hand sewn. The lucet cords which tie at the neck were made by Heather (Queen of Luceters), and the pattern for this partlet was adapted from one that I created under advice from THL Katerina da Brescia. (You can see her site at http://katerina.purplefiles.net/). Many thanks to both ladies.

Tuesday, January 17, 2012

Elizabethan wasp smock


Here is another project from the to-do pile. It is a low necked Elizabethan smock, made out of rectangular and square panels of natural linen. The panels have not been assembled yet, but I plan to finish each panel separately (after the embroidery is finished) and then whip them all together.


I would have to check, but I think I started this project in 2007 or 2008. The motif is adapted from an extant piece in Queen Elizabeth's Wardrobe Unlock'd (page 292). It is a flying insect drawn in ink onto linen and embroidered in black silk, circa 1585-1600.  Here is a scan of the image:


The original is in the Museum of Costume in Bath. I decided to change the insect a little bit and also include a stinger. Also, some of my wasps have smiley faces. Mine are embroidered in two strands of green DMC cotton floss.


As you can see, there are several types of stitches used here, including double running stitch.

Honestly, I had forgotten all about this project! I am glad that I wrote it up for today's entry. I will try and finish this smock this year - the little wasps make me smile.

Monday, January 16, 2012

Grey flower motif chemise

I finished this chemise a few years ago. It is made of light cotton gathered into a bias binding neckline. The sleeves are decorated with flower designs inspired 'A Scholehouse for the Needle' and by the Warwick shirt.  'A Scholehouse' was a pattern book drawn by Richard Shorleyker (1632.) It contains many designs that exist in pattern books printed at various times in the sixteenth century. The Warwick shirt is an extant example of Elizabethan monochrome embroidery* (done in red). It It has some beautiful designs on it, and can be seen here:
http://www.warwickshire.gov.uk/web/corporate/pages.nsf/links/aa47f702d5996adc80257149002da95e


The shirt is part of the collection of the Warwickshire Museum: 
http://www.warwickshire.gov.uk/museum


You can see a very interesting article, including some designs from the shirt, here:
http://knol.google.com/k/elizabethan-blackwork-embroidery#

The sleeves on my chemise are very big and are designed to be puffy enough to allow them to be pulled out through slits in split sleeves. When worn without an oversleeve, they flow over my hands:


As with most of my clothes, the chemise is used for both Italian styles and under my Elizabethan loose gowns. The designs are worked in grey DMC cotton in a range of stitches, including buttonhole stitch, seeding stitch, stem stitch and double running stitch. All visible seams were handsewn, except for the hem.

The sleeve laid out before sewing (the white tiles underneath are showing through the thin fabric.)


* also called as 'linear blackwork' or 'single-colour, non-counted blackwork'

Sunday, January 15, 2012

Collarless Italian Partlet


For my second post today I am posting a picture of a previously completed project. This is a collarless Italian partlet. The ground fabric is a natural fibre; I suspect a cotton blend. The fabric came from the remnant bin and looks like a coarse linen. The embroidery is taken from a sixteenth century reprinted pattern book. The design was traced out with a water soluble pen with the fabric taped to a window. In period, a common method of transferring embroidery designs onto light fabric was to draw them on with ink. We know this because examples of unfinished sixteenth century embroideries still exist. Check out the V&A Museum's collections for some lovely examples: http://collections.vam.ac.uk/

I prefer the soluble pen because my hand is not that steady!

The embroidery at just past half way
This project was undertaken pre-2008. I don't normally trace designs onto garment pieces that are pre-cut. I can't remember why I did it this way; perhaps it looked too bare with no embroidery. The embroidery was done in two strands of DMC cotton. Silk would have been the most popular choice in the sixteenth century, but it is hard to source where I live, and also usually beyond my budget.

I worked the embroidery in a hoop. The plant stems (in black) were executed in stem stitch, and the flowers (in gold) were done in a double running stitch.


This is the finished partlet, which has been hand sewn and hand finished. I added some commercially available, machine-made metallic bobbin lace to finish the garment off.


First item for January finished


Yesterday, in between studying, I managed to get my first item for January completed. It is a feather fan with turkey and ostrich feathers and a dyed feather pad. Feather fans were a sign of status, as well as being a beautiful and practical accessory, in many renaissance courts. I made mine to go with my Elizabethan loose coats.

There are many excellent portraits of Elizabeth I showing beautiful fans. Here are examples from a great site that I use often -

Her fan is definitely pinkish!
 

My fan base had lots of coats of different coloured paints, including metallic gold, and six layers of satin varnish. Then the fun part began! I used a hot glue gun to glue a base layer of turkey feathers to both sides, overlapping them to hide the wooden base. Then I glued on the ostrich feathers. I had one less feather than I thought, so the back side is less well covered.


At this point, I got a bit over excited and forgot the lovely dyed peacock feathers that I had planned to add, and glued on the feather pads. Oops! Actually, I think it turned out better for the omission. I have fairly simple taste- I quite liked the look of the fan just with the turkey feathers.


The 'jewel' at the base is a purchased hair clip that I adjusted. I also painted the diamantes to make them look more like cabochons. Here is the finished product.


I have a peacock feather fan in production too, but I am still working on the jewel elements for the fan handle.

Saturday, January 14, 2012

Keeping things moving

In order to keep things moving in between finishing projects, I thought I might start posting pictures of previously finished articles, plus 'progress' shots of things that I am currently working on. (I use the term 'currently' very loosely here, as some of the in-progress items haven't been touched for more than a year!)


This is a close-up of the embroidery I did on a wide collar partlet in 2007 or 2008. I was inspired by the portrait of Katherine Parr in a belted loose gown (image here: http://www.encyclopedia.com/topic/Catherine_Parr.aspx). I made the gown in a red cotton jacquard but machine sewed the trim. I was happy with the gown when it was finished, but the trim ruined it. So that is in the to-do pile too, waiting to have the trim stripped and re-sewn by hand. (I HATE re-dos!) It is true what they say about putting the effort in to hand sew to 'get it right'. In fairness, I was up against a huge time deadline for this gown.

I didn't want an exact copy, just a loosely inspired piece. I was happy with the way the partlet came out. I used  a pattern from a sixteenth century pattern book. It is a woodcut, and some of the angles are a bit wonky but I decided not to correct them; I like them the way they are. The embroidery is in a very pale DMC cotton. In period, silk would have been preferred, but my budget usually doesn't stretch that far. I couldn't afford linen and had to use a fine cotton for the body of the partlet. It is hand-sewn except for the internal shoulder seams. They are french seamed so you can't see  the machine stitching.

I also made a necklace to go with the outfit, which I was very happy with.

Hopefully one day I will have a photo of the finished re-done outfit to post. I really like the aiglets that I made out of metal beads to go with this one. I also made a wired and pearled white coif. The only thing that I haven't made yet for this outfit is a smock with the gold around the cuffs and the black velvet hat. I have the fabric, but I need to choose a design that will go with most of my outfits.

Friday, January 13, 2012

Other sites


Here are a couple of little sites that I have used in the past to showcase projects


https://sites.google.com/site/fionnsprojects/


https://sites.google.com/site/fionnssubtleties/


and


https://sites.google.com/site/fionnsotherprojects/ 

Still spangling...

Here is a work in progress that was started somewhere between four and seven years ago! I have been dragging it around to tourneys and only recently finished the embroidery and started spangling. It will be a high necked Elizabethan partlet. Eventually.