Thank you for all your support over the last year. Here's to a more precedented and uneventful, less challenging year in 2022. Stay safe everyone!

Thank you for all your support over the last year. Here's to a more precedented and uneventful, less challenging year in 2022. Stay safe everyone!
Here is another scribal trading card I painted earlier in the year. The painting is done on a commercially produced card with Winsor and Newton gouache.


Thank you all for following my blog this year. Stay safe over the Christmas period and I hope that you get time to spend on things that you enjoy.


I made these tassels for a friend's event some months back. I have wanted to try to recreate the style of woven tassel heads I have seen in some extant Elizabethan pieces, and this was my first experiment.
 The tassels are created in by winding threads over the hands, as seen in this picture tutorial: : http://broidermebethan.blogspot.com/2017/05/a-century-challenge-simple-tassels.html
The tassels were made out of crochet cotton because I wanted a fairly robust tassel. Silk would look very nice, I think.
Once the tassels were made up, I took a length of crochet cotton and anchored it with a big knot inside the head of the tassel, bringing the thread up near the centre of the tassel head. I then worked a detached buttonhole stitch around and around the tassel head, anchoring it to itself with a discreet knot when I reached the bottom. I then hid the tail of the thread back inside the body of the tassel before trimming the length.
The final part of the exercise was to add the rings of blue and white buttonhole stitch around the base of the tassel head.
I'm really pleased with how these turned out. I would like to experiment a bit more with this style of tassel and examine images of extant ones. I think I remember seeing tassel making in Jacqui Carey's Sweet Bag book, but, as is always the way, I did not have a copy to hand when I needed it, so I had to work from vague memories and imagination.

via Pinterest https://www.pinterest.com.au/pin/292945150746851405/
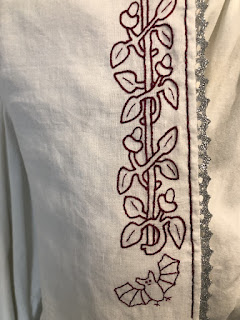
This Italian style partlet is a piece that I finished in September. The design is adapted from a sixteenth century modelbuch pattern (which I will post later).
The embroidery is worked in split and double running stitches on a linen base fabric and the thread used was Madeira silk.
The partlet has machine sewn French seams on the side and shoulder seam, with all other stitching done by hand. The lace is commercially produced gilt lace.
The partlet style has closed side seams for ease of dressing without help and to ensure it sits flat under the bodice. An alternative and common style of partlet in period had ties at the side, as seen in this image:


Portrait of a Woman by an Anonymous Painter circa 1550
from: http://starlightmasquerade.com/PortraitGallery/Ladder-Laced-Venetian/inspiration-pages/openbodice23.htm
 |
| This pattern layout gives the basic idea, although my measurements would be different Image from: https://www.pinterest.com.au/pin/273171533621522685/ |
 |
| A small hem doubles over twice. |
 |
| I bought some geometric trim to decorate the tunica, but I decided not to in the end. (I like it plain.) |

 |
| Me in the completed tunica and matching jewellery. I don't wear it much because I don't feel that it flatters my body type. A softer linen might have been more flattering and drape better. |
Lately, I have challenged myself to not forget the UnFinished Objects pile. Most of the UFOs are there because they involve tasks that I don't like (such as eyelets,) or because I am not excited or enthusiastic about them. So it is actually more of a challenge than it sounds. (Let's face it, many of us would rather tap into the excitement of new research and a new project than tackle the old, boring tasks.)

Another little project got ticked off the list last week. I had been running an embroidery challenge in my local group following an introductory embroidery class I ran at a College event. The theme of the Challenge was 'Something New'. Participants could display their embroidered work, whether it was a new item, something in a new embroidery or stitch style, etc. They were encouraged to display their work at an event, and I made little tokens as a memento of the Challenge.

A job that has been on the back-burner for many months is finishing off some late period woven buttons. The main part of the buttons were done, I just needed to add the decorative flossing and make the buttonhole bar 'shank' to go across the bottom of the buttons. (Some people prefer to omit the bar and use the long tail of thread that is left at the end to sew the button on, but I prefer a buttonhole bar as the button will be easier to remove if the buttons get re-used or if the garment needs a good soak.)


Here is a project that I finished last month- bags with a painted heraldic device.
I strive to cover up mundanities at events, but sometimes, when I'm in a rush, I have forgotten to bring cloths to cover up with. To help remedy this problem, I decided to paint some bags with a version of my heraldic device.
The 'stencil' was one of a set of birthday decorations that my sister bought me last year. I just love it. The bags are commercially produced cotton bags available from Spotlight stores.


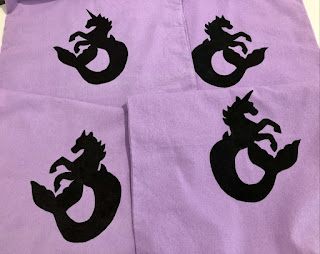

Painting on fabric is a period technique; Cennino d'Andrea Cennini discusses it in section X of 'Il Libro dell'Arte'. Modern acrylics and textile medium are much easier and faster to use than gesso and lead paints, and certainly safer. Time will tell how well the textile medium wears and stands up to washing.
Dover Publications 'The Craftsman's Handbook (Il Libro dell'Arte) translated by Daniel V Thompson Jr (1960) [https://store.doverpublications.com/048620054x.html] is an inexpensive reproduction which will be of interest to SCA painters and craftspeople. It gives an insight into artistic practices common in Italy in the Renaissance.
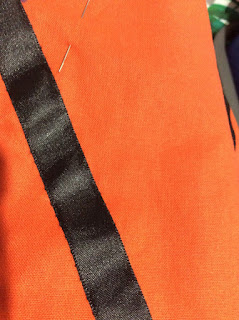
I have so many unfinished projects that I will never be bored! They actually came in handy recently though, when someone suggested that an upcoming event have a relaxed Halloween style theme.
I remembered that I had a pair of mostly complete orange tie on sleeves with black ribbon stripes in the pile. All that was needed was about five eyelets. It didn't take long and they were finished and ready to wear on 31st of October!

Some months ago I challenged members of my local SCA group to create an embroidered piece with the theme of 'Something New'. It could be a new item of clothing, something in a new style, something using a new stitch or technique, etc.
My aim with this challenge was to make a budget friendly partlet using items only from my stash. I also wanted to utilise some of the stitches I planned to teach in my Introduction to Embroidery class at the 'Herman’s Hnefetafl' SCA event.


The design and the colour palette remind me of a late 16th
century, purple embroidered Italian camicia held at the Met Museum. I am
tempted to add some gilt thread to my partlet, although it will make it itchy
to wear. That will be a decision for later on.

Analysis of this camicia can also be found in Patterns of Fashion 4 by Janet Arnold.
The base fabric that I have used for the partlet is cotton, because I am on a tight budget and I had it in my stash. Cotton was less commonly used in the sixteenth century for middle and upper class undergarments than linen, but of course is much more readily available and cheaper in modern times.
Here is an extant embroidered petticoat worked on a
cotton-linen blend base which is held at the Museum of London:

Image from: https://collections.museumoflondon.org.uk/online/object/79216.html, ID 59.77b
I have similarly used DMC cotton threads for the embroidery,
when silk would have been used in period. This choice is due to budget and
availability.
Another modern adaptation that I have used is marking the
design out in heat-removable Frixion marker. A range of options for marking out
were used in the sixteenth century, including ink(!) but I really like the
modern Frixion marker. I drew out my design in black texta on tracing paper and
stuck it to a sliding door to act as a sort of light box for marking out the
design.
I have a range of laces in my stash that I can use to edge
the partlet when the embroidery is completed. Plain and gilt bobbin lace as well as needle laces can be
seen edging camicia, partlets, coifs etc. in sixteenth century portraiture and
extant examples. Since I am not likely to have time to learn how to make bobbin
lace by the end of this challenge, commercially produced alternatives will have
to do.
I am also likely to add some sort of embroidered edging near
the centre front hem of the partlet, as this is commonly seen in sixteenth
century undergarment examples which have embroidery. I haven’t decided on a
design yet; I will wait until the embroidery is finished and choose something
appropriate then.
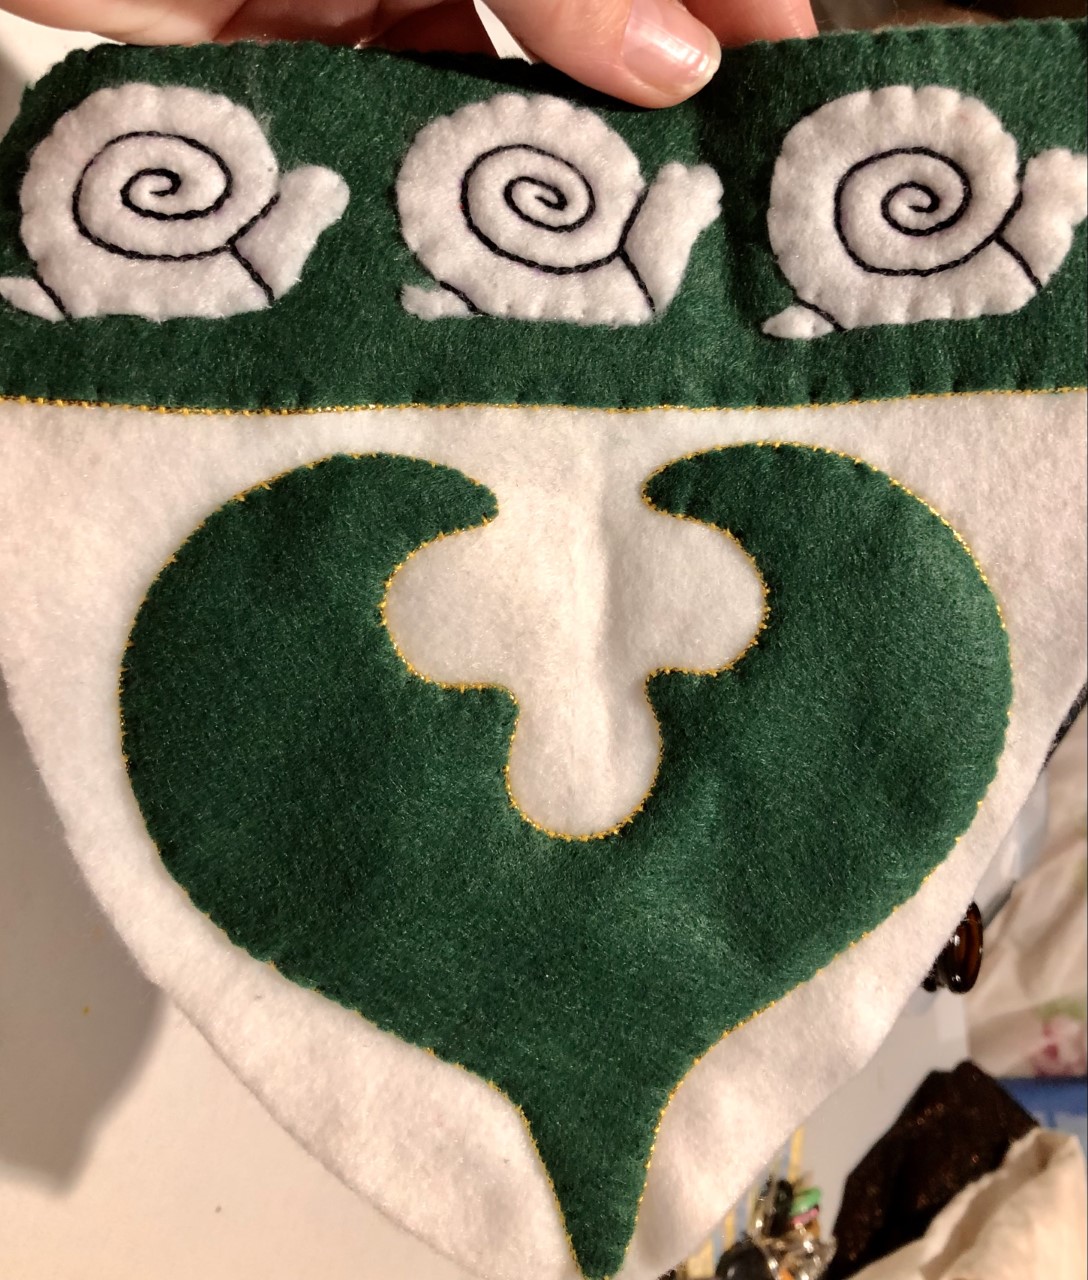
I finished another banner device in September. I used felt again; it is so durable and doesn't fray, and I like working with it.

The motifs were sewn on first with tiny stitches. I went around the big motif with couched gilt cord and also added the same style of couching under the green panel at the top.


A nice, quick project that I finished recently for a friend. I found this agate pendant at the thrift shop and strung it with some glass and natural gemstone beads on tiger wire.

