Saturday, September 22, 2012

ICC Mini-Challenge - 'Perfectly Period Pink' Update


Like many costumers and SCA participants, for a long time I have been inspired by the extant 'Pisa dress'. I love the colour, the richness of the velvet, the style, and (most of all) the embroidery.
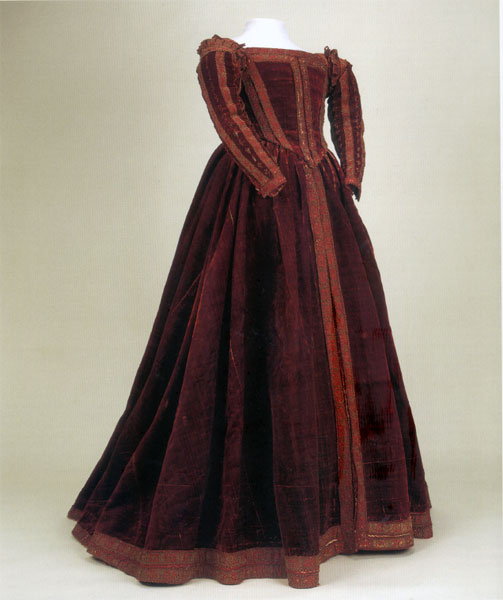

The Pisa gown from http://centuries-sewing.com/wp-content/uploads/2010/03/pisagownModa.jpg

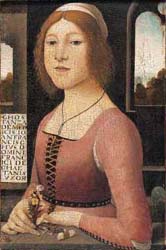
images of the Pisa dress from  centuries-sewing.com


Image from Moda Firenze by Bruna Niccoli  and Roberta Orsi Landini


I have always wanted to try my hand at a version of the embroidery on this dress, so the ICC Mini Challenge seemed like a perfect opportunity. I chose to work on a pair of sleeves to give me an idea of how I would go if I decided to make a version of the whole gown later on.

There are other well known-examples of embroidered bands on Italian dresses, particularly those of Eleanora de Toledo:

Archivo:Eleonora di Toledo 1543 Agnolo Bronzino.jpg
Eleanora de Toledo by Bronzino (1543) from es.wikipedia.orgArchivo:Eleonora_di_Toledo_1543_Agnolo_Bronzino.jpg


Eleanora de Toledo burial gown bodice, image from http://aneafiles.webs.com/
(See also Anea's excellent article at http://aneafiles.webs.com/renaissancegallery/stays.html )


Image from Patterns of Fashion by Janet Arnold

Image from Moda Firenze


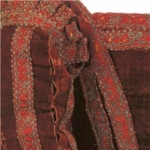
The embroidered panels on the 'Pisa' dress (copyright K. Carlisle) from http://cockatricearts.blogspot.com.au/2011/04/extant-dresses-in-pisa-updates-on.html - check out this site for an excellent article

I loosely based my embroidery design on the original on the extant 'Pisa' dress. I doodled until I found a design that flowed well and which resembled the original design. I then photocopied the panel and stuck the copies together until I had a repeating design. I photocopied that into a long continuous piece.

After pre-washing and ironing my fabric, I traced the design onto one edge and experimented with different types of thread and different stitches. Although the extant Pisa dress looks to have a lot of couching on it, I decided to avoid couching if possible. I have used couching to secure metallic thread on sleeves in the past, and I found that the couched threads regularly caught on aiglets and hooks and eyes, resulting in pulled threads. I didn't want to go to the trouble of embroidering sleeves that wouldn't wear well.

The pink chain stitch on  the right was the one  I decided to use
I tried the design in several crochet cottons and embroidery cottons. Budget was a factor, as I knew I would end up using a LOT of floss. I tested light and dark pinks as well as gold, and in the end settled on a DMC cotton floss as it sat really well with no fluffing. I also changed my mind about stitch type; the double running stitch I originally planned to use lacked impact, so I changed to chain stitch.


The next step was marking out the design panels ready to embroider.


(I had been so busy with other projects that I was almost a week into the challenge before I got to this stage!)


 I bought some fabric tracing paper which works like carbon paper, except that the design washes out in water. What a brilliant invention! I laid the 'carbon' paper on the fabric, and then put my photocopied design panel over the top and traced around the design. The only part of the design that I wasn't sure of was the little circles in the centre of the motif. I plan to try and change them into spirals.


I started embroidering the design in chain stitch. I haven't decided yet what stitch to use for the spirals.


Blue dress update

The blue dress is getting very close to completion. I have been playing with different sizes and colours of pearls to see how they will look along the front edge of the bodice, and working on the sleeves.


Testing how pearls will look along the front edge of the bodice.


Thursday, September 20, 2012

Blue dress update

Today I have some hand sewing to do on the sleeves that match the blue dress. I made some more bias binding which needs to be hand stitched into place.

The tie-on sleeve and lining waiting to be sewn

The sleeves will be tie-on and have gaps where the chemise will puff out. I have saved some blue fabric to do 'fancy' sleeves later.

I also bought some toupe clips to sew into my Juliet cap to help hold it in place.

Wednesday, September 19, 2012

Blue dress update


I managed to blunder my way through my first attempt at knife pleating, and I am quite happy with how it turned out. The knife pleats sit much more smoothly than cartridge pleats, and I am now a fan of knife pleating. I had forgotten how much sewing down pleats hurts the fingertips- no difference there between knife and cartridge pleats!


The knife pleats sewn in


I also finished the lacing holes. I am playing with different ways of lacing - here is X lacing. The ladder lacing also looks nice.


I now need to add some hooks and eyes in the gap in the skirt. I am considering adding a modesty placket as well. I will hang the dress for a few more days, then hem it.


I am also pleased to say that the dress fits. I made it a bit looser than I normally make my gowns, mainly because I normally wear a corset which smooths out the lumps and bumps. I won't be wearing a corset with this one, so I think the world doesn't need to see my back fat!

Sunday, September 16, 2012

Progress Update

Today I worked on the sleeves for the blue dress, and also started tackling the skirt pleating.

I had hoped to start my project for the ICC Mini-Challenge, but didn't get time. The fabric is washed and pressed, and approved by my furry helper.....

and I have worked on a handful of test panels to pick which design will work best. Now I need to mark my design out and start embroidering.


Saturday, September 15, 2012

Juliet cap

Over the last week or so, I have been working on a Juliet cap. It sits on the back of my head and is secured with clips. It is made of a mystery jacquard sample I had in my stash, lined with broadcloth, and edged with gold and cream cord. It is trimmed with pearls and gold braid.


The cap with trim and pearls added


With a jewel and hanging bead added at centre front.


Below are some images that inspired my design -


Portrait of a Young Woman by Neroccio de Landi (1490)  from terminartors.com 

Portrait of Barbara Pallvicino by Alessandro Araldi c. 1510 from en.wikipedia.org


1490 by Unknown Veronese artist from  oceansbridge.com 

Carpaccio's Meeting of the Betrothed Couple (detail)  1495  from   realmofvenus.renaissanceitaly.net 


Albrecht Durer's Portrait of a Woman c.1506


Friday, September 14, 2012

A&S tokens

Today I worked on the blue dress, made a tie-on sleeve pattern to go with it, and made some Arts and Sciences tokens for my Barony.


A&S commendations and award bells

Thursday, September 13, 2012

New Trim Arrival

I love it when nice things arrive in the mail! Look at this beautiful trim that I ordered from Celtic Trims!


Saturday, September 8, 2012

Portrait of a Lady With A Dog


I'm too tired to do any constructive hand work today so I am indulging in a bit of web-surfing and drooling over sixteenth century portraits. Here is one I have never seen before with an interesting button front closure.


Portrait of a Woman with her Dog by Parrasio Micheli
from  starlightmasquerade.com

Friday, September 7, 2012

Blue dress update

I worked on the gold bias binding last night but have had a few hiccups with the joins being too thick. I think I have enough in one strip to trim the bodice, but will have to try again for a longer piece for sleeve trimming.

Thursday, September 6, 2012

Blue dress update

Here is what I have been up to over the last few days with the blue dress...


Overstitching the edges for extra strength. There is a layer of 'fashion fabric' (cotton), an interlining of strong calico and a lining of cotton duck.


The layers of the bodice tacked and  ready to be pinned and hand stitched together.


A completed edge showing stab and whip stitching.


Preparing to mark out the gold broadcloth to make bias trim (with my furry helper!)

The skirt panels are cut and waiting to be sewn. I still need to decide on what style of pleating; I am thinking knife pleats.


Wednesday, September 5, 2012

Blue dress update


I have done most of the hand sewing of the blue dress bodice. I stab stitched the bodice pieces together and then whipped the edges. I also stab stitched and reinforced the seams. I have one armhole to finish and then I will post photos.

Now I am ready to make the bias binding to decorate the bodice, and decide on what I am going to do about the lacing.

My inspiration portraits have hidden lacing.

       
St Ursula (also known as Woman with a book) by Carpaccio- denverartmuseum.org            


Portrait of a Lady by Carpaccio c. 1495 - wikipaintings.org


But I have a large bust, so I am thinking that I might be better served by eyelet holes for extra strength. I do have some lovely lacing rings for a front opening bodice, but I am not sure they will be strong enough.

There are many examples of front lacing dresses from Italy and surrounds that would work:

Portrait of a a Girl With Cherries by Circle of Leonardo c.1491-95 - paintingall.com
(See also http://www.metmuseum.org/toah/works-of-art/91.26.5)

Ghirlandaio's Portrait of a Lady - en.wikipedia.org
Portrait of Constanza Caetani by Fra  Bartolomeo c. 1489-90 from


http://www.angelfire.com/zine/kiarapanther/garb/gamurra.html
Portrait of a Woman, by Domenico Ghirlandaio
Ghirlandaio's Portrait of A Woman - artcyclopedia.com


I am thinking that this type of lacing (below) will add strength and be unobtrusive. I hope the horizontal lines won't ruin the look of the gold bias decoration.
Portrait of a Young Woman by Ghirlandaio c 14885 -  
http://commons.wikimedia.org/wiki/File:Domenico_Ghirlandaio_078.gif 

Portrait of a Girl by Ghirlandaio c. 1490 - from wikipaintings.org

Portrait of Giovanna Tornabuoni by Ghirlandaio-    from wikipedia.org