Sunday, May 7, 2017

Days 8 & 9 - 100 Days of A&S (Hemming and Split Stitching)

I couldn't post yesterday, so you get two day's worth today!

Day 9
Boring old hand hemming again today.


Day 8
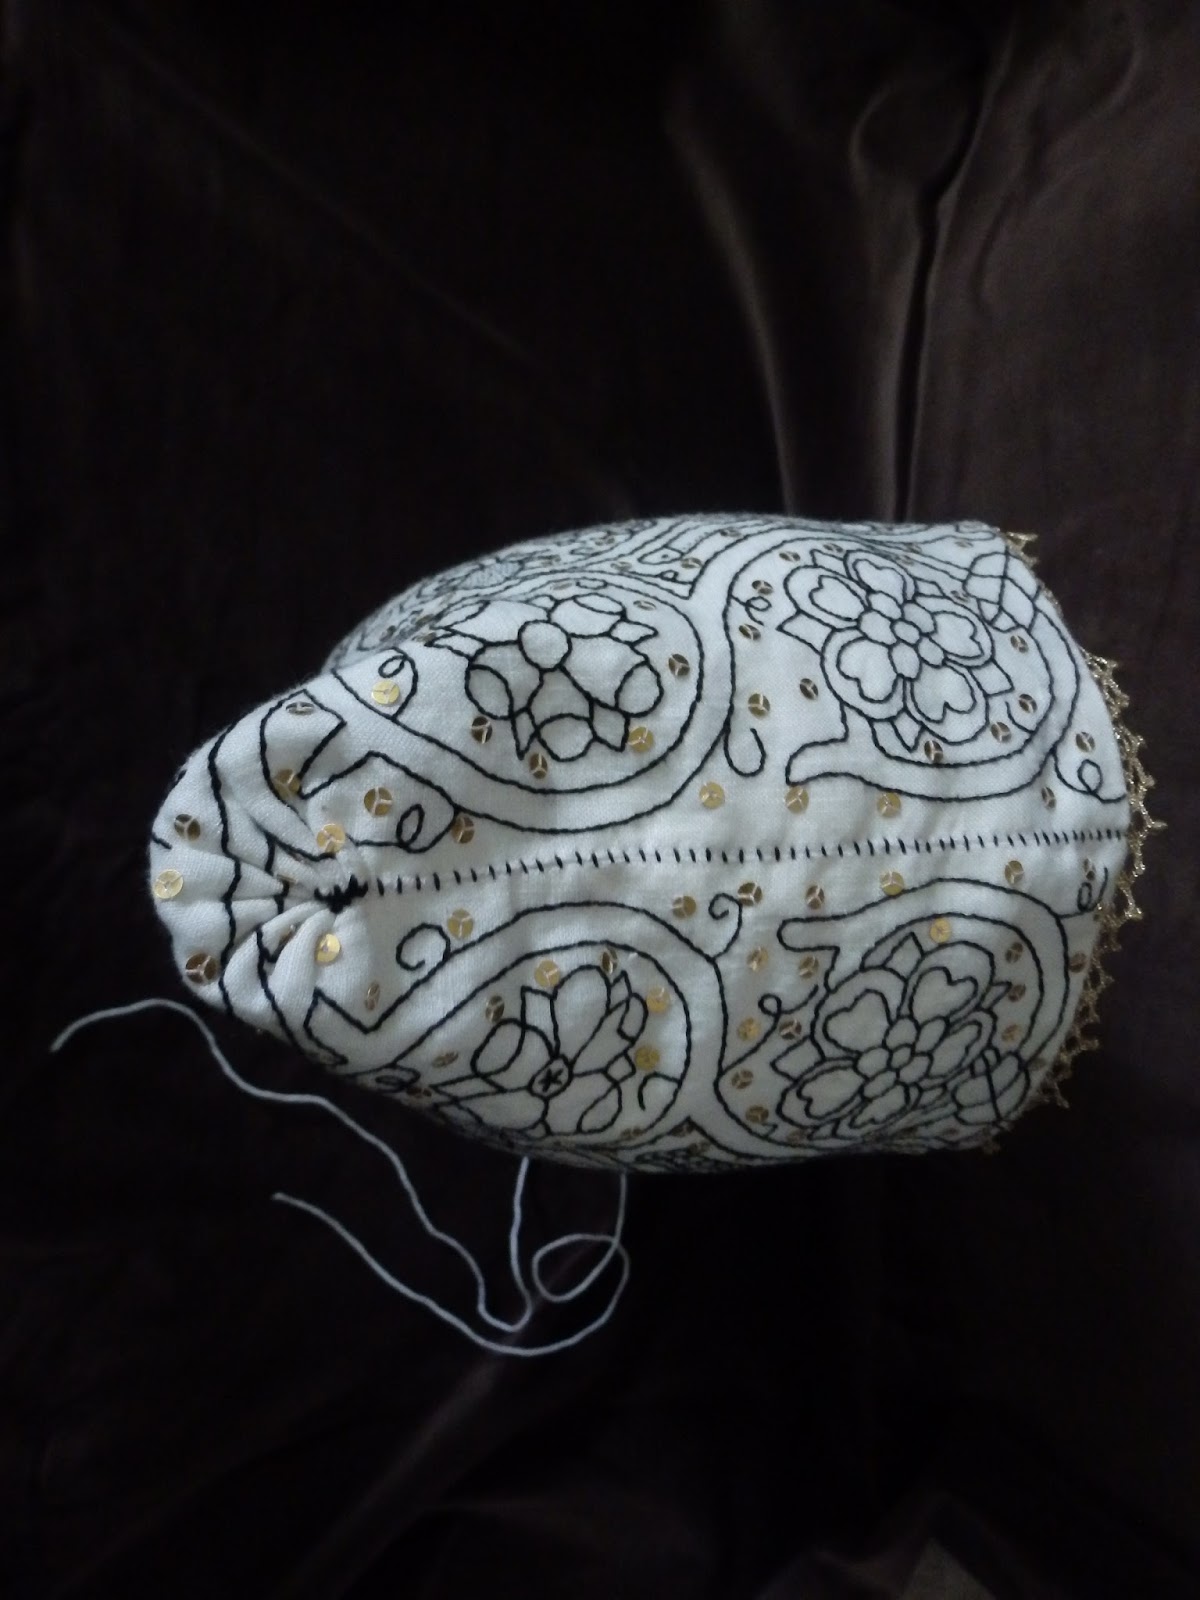
Spent a good part of the day adding spangles to an embroidered caul at an SCA demo, but also managed to finish off the split stitch championship patches.


Thursday, May 4, 2017

Day 6 - 100 Days of A&S - Cartridge Pleating a Renaissance Skirt

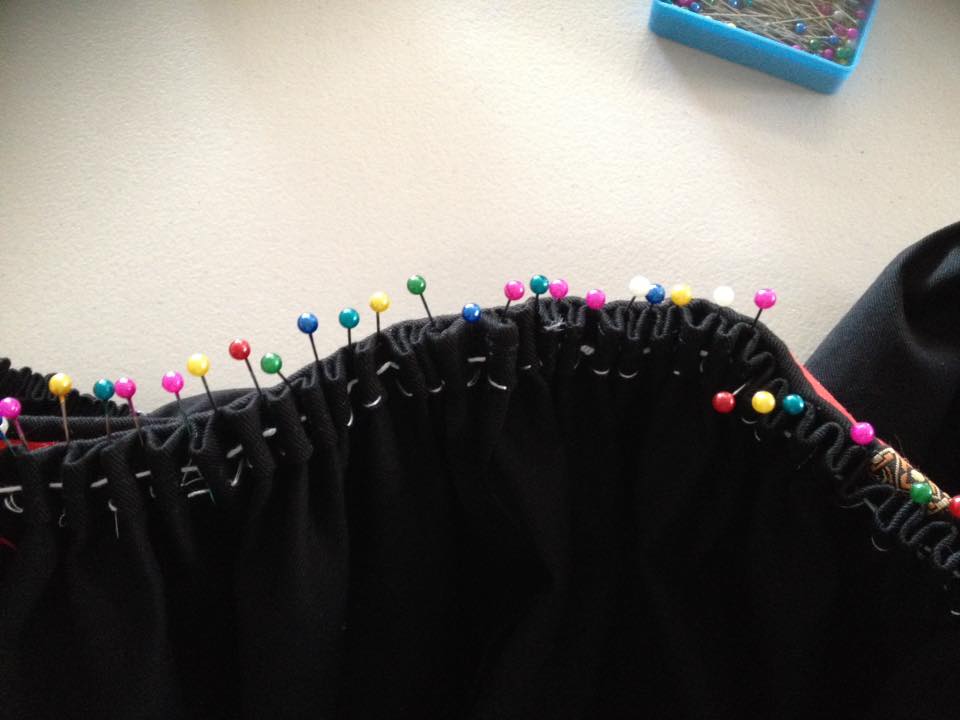
Today I spent my time setting cartridge pleats. I made bigger pleats than normal, setting them at about 1cm apart. (Sometimes I do 0.5cm.) I cheated and drew the pleats up with a single thread of crochet cotton because I wanted the job to go faster. The 'proper' way to do it is to use 2 parallel rows of very strong cord/thread, and draw your pleats up. The big risk with the single crochet cotton is that it will shred and break and you will have to start all over again. Luckily, that didn't happen to me today.


Chalking out the 1cm markings


Adding the crochet cotton 'draw thread' (the smaller white thread is a tacking stitch to secure the top hem of the skirt panel during pleating and not related to the cartridge pleating process.)


Pleats ready for adjustment


The skirt panel ready to sew to the bodice. I divide my skirt into quarters and divide my bodice into quarters. Then I tack the points together and adjust the pleats evenly in each quarter section. It makes the job much easier and results in nice even pleat adjustment.

Wednesday, May 3, 2017

A&S 100 Challenge - Day 5 - Eyelets


Today I am tackling eyelets on an unfinished front-lacing gown. I struggle with eyelets because I have a lot of pain in my hands and fingers. I tend to put buttonholes off because they hurt so much - so I always have plenty to do.


Why does only the last eyelet ever turn out the way you want it?!

Monday, May 1, 2017

A&S 100 Challenge - Day 3 (Flat felling seams on body linens)

Flat felling seams today. My hands are protesting yesterday's fingerloop braiding experiment, so I'm keeping it simple!

This is one out of a pile of chemises/smocks waiting to be hemmed and made up.

A&S 100 Challenge - Day 2 (Finger Loop Braiding)


Today's challenge was to attempt fingerloop braiding for the first time.
It was interesting; I understand the process and the terminology much better now. I don't think my stiff, sore fingers are dexterous enough to ever be comfortable doing fingerlooping, but I will keep practicing until I can get the tension right on a simple braid.


Saturday, April 29, 2017

SCA A&S 100 Challenge - Day 1

Some SCA friends have proposed an A&S Challenge in the style of the armoured combatant Century Drill Challenge (100 blows for 100 days). The aim is to work on A&S projects for (at least ten minutes a day) for 100 days.

The point of the challenge is to build habit and consistency, reduce the number of Unfinished Objects (UFOs) we all have, and (hopefully,) generate enthusiasm.

I have such a large pile of ongoing projects at hand at any given time that it is unusual for me to go a day without doing ten minutes of A&S work. I am hoping that the Challenge will help me to keep better records of what I am doing and blog more often. I prefer to blog items when they are finally complete because it all seems a little disjointed - especially at the beginning of a project and because I jump from unfinished project to unfinished project. But maybe getting into the habit of blogging as an ongoing process will mean more things get blogged.

Today I worked on some split stitch Championship patches for friends in my SCA group. I got two washed and blocked. They just need backing. Another two are still in the hoop.


Wednesday, April 19, 2017

Elizabethan Coif Presentation

Last year I was honoured to be accepted as a volunteer to create an embroidered coif for the Queen. The item was to be a gift for the outgoing Queen on behalf of the Worshipful Company of Broiderers (the SCA Lochac embroidery guild).

The lovely Megan supplied me with a coif pattern to suit Queen Branwen. This is very important when designing a coif, as not all styles suit all faces, and the amount/thickness of hair a lady has also affects how the coif will sit. Megan used an existing coif as a pattern so that we would know the new coif would be the correct style and shape, and then sent me the pattern so I could start.

Once I had the correct basic shape, I could settle down to create the design. I chose the traditional coiling foliage design which is so common in Elizabethan coifs. I prefer to design original patterns, but use motifs taken from extant pieces and Elizabethan portraits. Roses were an essential inclusion for a Queen. I used flower and insect motifs.

Some extant pieces can be found on my earlier post: http://broidermebethan.blogspot.com.au/2014/11/elizabethan-whitework-coif.html
and
http://broidermebethan.blogspot.com.au/2013/05/new-world-elizabethan-coif.html

Once I had sketched the design, I traced the pattern and design onto tracing paper with a permanent marker. Using tracing paper or greaseproof paper allows the light to shine through, and the permanent marker makes the design easier to see. The design can be traced using a light box or by taping the foundation fabric over the pattern on a large glass window or door.

In period, ink was often used to mark designs onto white foundation fabric. I used 100% linen for this piece, and chose to use a modern alternative to ink: the Frixion pen. This type of pen irons away, is widely available where I live, comes in a range of colours and is available as a pen or marker. Very convenient for the modern embroiderer, and much more forgiving of unsteady hands than dip pen and ink.

I began the embroidery in silk, but was unhappy with the way it was working out, so I unpicked the stitching and began again with cotton floss (DMC 310). Silk is a more authentic option (as it was used in period) but the cotton worked better for this project as well as being more affordable and easily available.


A variety of period stitches were used including stem stitch and double running stitch. I like combining different stitches on this type of project. It makes the finished product texturally more interesting, makes working the embroidery more interesting, and is also entirely period. I used a double thread for the main motifs, and I used a hoop because it is more portable than a frame.


Once all the stitching was complete, I ironed the design to remove any traces of the Frixion pen. Then I gently hand washed the piece in wool wash, rinsed, dried and ironed it again.


The next step was sewing down pressed metal spangles. I used three stitches of single thread to secure the spangles, and knotted each one off after securing. Once the spangles were sewn on, I ironed the coif again and cut it out from the foundation fabric.

I edged the coif panel with zigzag stitch for extra strength. This is a modern option and one I personally prefer to add because I am quite hard on my clothes. I have whipped the edges by hand in the past, but time was of the essence on this particular project, so I didn't feel guilty about using a modern 'cheat'. I cut a linen lining and sewed the two panels together. This lining hides the spangle threads and protects the embroidery from hair oils and pins.


The cord channel was hand sewn as was the top seam which runs over the top of the head. Only the first two thirds of the seam was sewn up; the last third was gathered with very small stitches to produce tiny cartridge pleats. The pleats were drawn up to gather the back of the coif into a circle and the pleats were secured with buttonhole bars. My earlier coif article below shows an extant example of how the back of the coif is gathered:
http://broidermebethan.blogspot.com.au/2012/01/article-on-red-striped-coif.html

This pleating rounds off the back of the coif and makes a space for the hair underneath. I added a single thread decorative stitch in embroidery floss to ornament the seam.


I did a small whip stitch around the edge of the coif to stop the lining moving about. I threaded lucet cord (made by the talented Heather Carter) through the casing. I hand-stitched some commercially made gilt metal lace along the face edge.


The coif was presented on the weekend just gone and I heard that the recipient was very pleased with it.

Friday, April 14, 2017

Sunday, March 26, 2017

Bee Gonfalon #1

In 2015 I made a couple of banners for a friend who was being Laurelled. I had never made a banner before, so it was all a steep learning curve. The banners were going to be carried in a procession at body height.

I made the body of the banner out of strips of silk and satin. They were machine sewn together and pressed. When the shield shape was cut out, I appliqued it to the figured background fabric and couched black cord around the edge of the shield. The background fabric was quite flimsy, so I interlined it with calico for strength and to stop it warping.

Then I embroidered the bees of the Lady's device. The bodies of the bees were appliqued onto calico, and the black bars and eyes were embroidered. Gold thread was couched down to highlight the wings.


I cut the bees out individually and used needle-applique to sew them to the base fabric.


When the bees were all couched down and complete, I added some iron-on gold embroidered highlights around the shield shape. I used commercially produced motifs because it was only a few days before the event and I was running out of time (and I still had a second banner to make.)


Next I machine sewed the front, interlining and lining pieces together and hand bound the edges with black bias binding. A rod pocket was hand sewn on, and the final thing to do was to make a bag to store and transport the banner safely.

The recipient was pleased and the event was really lovely; I felt very privileged to witness it.

Event venue with hand painted banners made by Mistress Sir Eva von Danzig and Viscountess Mistress Ingerith Ryzka


Monday, March 13, 2017

Friday, March 10, 2017

More Bead Necklaces and a Caul Pin


I finished off a couple more bead necklaces last week. And I also scored a pearl pin for $5 from a second-hand market; perfect for the front band of a plain caul. Win!


Friday, February 17, 2017

Beaded Necklaces

This week I strung some new necklaces. They are glass beads on tiger tail. I also did a couple of extras for use with mundane wear.

Cream glass beads

Green glass pearls

Red and green glass beads
And the mundane necklaces


Green glass beads with purchased pendant


Red glass beads with purchased glass pendant


Thursday, February 16, 2017