Sunday, May 20, 2018

Embroidered ferrets

It is change of season here, and the weather has gone from quite warm to suddenly very wintry. Naturally there has been a spike in coughs and colds and other illnesses, and I have been sick with various viral and bacterial infections for over a month. This coupled with a hand injury has made my usual slow progress even slower (although that hardly seems possible)! I have had a lot of projects to work on for other people. Here is one that I was working on for a friend.....

One of my friends was invited to join a peerage Order, and his partner asked me to help her with a new jupon for him. She designed it and provided the materials, and I just needed to embroider some stem stitch outlines for her.


I worked these cute little guys in three strands of DMC floss in a split stitch. Once I was finished, I gave them back to my friend and she cut them out, needle-turn appliqued them down and couched thread around the outside.

The finished product was a work of art and a real credit to her. It shows how relatively simple (although time-consuming) techniques can be combined to create very dramatic designs. It has also inspired me to start thinking about different ways of incorporating embroidery into clothing.

Photo credit: C. Lindner

Monday, April 23, 2018

Revamping a Second Hand Skirt


I recently picked up a second hand wench-style skirt to use as an underskirt. Although worn, it is good, heavy cotton drill and still has life left in it. I needed to take it up, so I added two tucks in the skirt. This is a great way to take up skirts that have already been hemmed, as you don't need to cut to re-hem, and the tucks help to hold the bottom of the skirt out. Skirt tucks can be seen in some full length late period portraits like these:
Portrait of Infantas Isabella Clara Eugenia and Catalina Micaela  1570
Image from: https://commons.wikimedia.org/wiki/File:Infantas_Isabella_Clara_Eugenia_and_Catalina_Micaela,_1570.jpg


Alonso Sánchez Coello's portrait of  The Infanta Isabel Clara Eugenia and Catalina Micaela, 1575
Image from: https://www.museodelprado.es/coleccion/obra-de-arte/las-infantas-isabel-clara-eugenia-y-catalina/739df39f-78e9-4261-af91-149b55547573 via Pinterest https://www.pinterest.com.au/pin/374150681512985632/
Portrait of a Moravian Woman- attributed to Pieter Pietersz the Younger
Image from: https://www.pinterest.com.au/pin/190769734187521657/

Detail of Portrait presumed to be Henrietta Maria of France by French School
Image from: https://www.pinterest.com.au/pin/491736853035824650/

It is also a great way to take up the hems on kid's gowns - a tuck can be released every time there is a growth spurt.

Portrait of an Unknown Girl by School of Bronzino
Image from: www.pinterest.com.au/pin/390546598927323514/

To add the tucks I marked out two lines on the inside of the skirt. (I then marked out two more for another potential set of tucks, just in case.) I moved line one up to meet line two (looping the fabric in front) and pinned in place. I then sewed the lines together with a relaxed whip stitch.
The lines for the tucks marked in chalk. The space between the lines dictates how big the tuck will be.


(One tuck didn't take the skirt up enough so I added another tuck using the same method.)

 The underskirt (outside) with the tucks completed

The inside of the underskirt, showing how the tucks lie 

The completed tucks hold the skirt out nicely


When the tucks were finished, I added some white ribbon around the hem as a trim.

The stitching lines holding down the white ribbon trim

 I'm pretty pleased with how the whole thing has turned out; the tucks make the skirt bell out nicely.

Wednesday, April 18, 2018

A Plan for A Suite of T- Tunics for a Friend

A friend needed a suite of under tunics and over-tunics so I offered to help. He provided the fabric and I offered to sew and decorate them. It has been a long process; not because the design was difficult or the fabric hard to work with, but because I have been having ongoing sewing machine issues for the last six months or so and my health worse than usual.

The recipient specifically requested traditional SCA-type t-tunics - no gores or gussets, and just  the simple t-shaped design that so many SCA participants start out with like the one shown in the image below.
Image from: https://www.pinterest.com.au/pin/570901690249020212/
He is a tall guy, so the waste of fabric usually associated with this style of tunic was not really a problem as the sleeves are wide and comfortable and I used the 'waste'side pieces to extend the length of the arms. Fittings and checks happened last year to make sure the design would fit and be comfortable and to meet the recipient's needs. My furry helper also inspected all the fabric (as usual) and deemed it acceptable.


I cut out about six tunics in a variety of fabrics provided by the recipient. There was quite a lot of piecing involved in the sleeve areas. I expect these garments to be heavily hand washed so I enclosed the seams to make them last longer and prevent fraying.

On a more historically accurate tunic (designed with gores) such as the one below
Tunic pattern from: https://www.pinterest.com.au/pin/460282024388882275/
I machine sew the seams and then turn each side of the seam fabric under and hand sew it down.
It is a time consuming process, but makes for neat seams and long-wearing garments. It is also easy because all the shapes are triangles and squares and rectangles with nice straight lines to work with. I couldn't bear to leave the edges zigzagged on these tunics, so I have been sewing the seam excess under. I find this sort of hand work calming, but it really is less so than normal when felling the curve of the seam under the arm. No nice straight lines here, so it is important to allow for the fabric to move and stretch a bit by stretching it as you go and not sewing the seam too tight or using too small stitches. I don't want the seam to rip when he puts his arms up, after all.

The neckline is a simple v-shape with a small hand-sewn rolled hem. The process is essentially what I did recently for the College Newcomer tunics as shown here http://broidermebethan.blogspot.com.au/2018/04/second-newcomers-tunic.html

On most of the tunics, I am at the fun part - decorating! The recipient is an understated guy and is not the type who likes to be in the spotlight, so I have gone for darker and more muted colours. There is not much in the way of good trim available locally, so I originally planned to embroider several of the tunics. A knuckle dislocation in March and subsequent rheumatic hot spot that won't settle have slowed things down even more, so on a couple of the tunics there will be purchased trim. The recipient had some that was gifted to him by a friend, so I will use that. I also found some online that seemed appropriate.

Several of the plain coloured tunics will have embroidery. I have a nice design of interlocking knots coming along veeeery slowly, and plans for another design incorporating the recipient's heraldry. There is a lovely wool waiting to be made up also (I'm saving that until last because I am always afraid to cut expensive fabric, even after all this time!), which would look great with a design based on one of the Mammen textile designs, below
Image from: https://www.pinterest.com.au/pin/335588609710150485/  
Of course, I will post pictures when they start to get finished. You know, I still find it nerve-wracking making items for other people, even after all this time. Male garments are especially stressful, because my experience is mainly with female late period clothing and accessories. I would like to branch out in future with more complicated male clothing, but the idea is very daunting especially as I really only have made t-tunics for men before.

Tuesday, April 17, 2018

SCA Swap and Sell Day

A friend of  mine recently organised a Swap and Sell day at my local A&S training. People brought along old garb, jewellery, half finished projects, unwanted feasting gear, fabric, leather, threads- anything pertaining to the SCA or useful in any way. Wow! What a fun day it turned out to be! People were excited to get a bargain or clear out old bits and pieces. New people and older players stood around chatting about future projects, ideas and failed attempts. Low prices encouraged people to buy resources for attempts at new skills without worrying about wasting too much money if the project didn't work out.  People tried on garb outside their comfort zone and were inspired to try something new. What a great way to get people inspired and talking about the arts and sciences. And get some bargains to boot!

Tuesday, April 3, 2018

Second Newcomer's Tunic

A second t-tunic for the College newcomers, based on the same basic pattern (below).
Image from: https://www.pinterest.com.au/pin/570901690249020212/
A pattern such as the one below would be more authentic and waste less fabric, but also take longer to make up, and time was something that was in short supply with this project as the tunics were needed for a newcomers event in a couple of days.
Tunic pattern from: https://www.pinterest.com.au/pin/460282024388882275/


This tunic was made at the same time and in the same way as the one that I posted about yesterday. The sleeves were pieced from scraps as the fabric was not wide enough to allow for sleeves and I wasn't sure that newcomers would be wearing undertunics, so longer sleeves were needed.

Wherever possible I enclosed the seams so that the tunic would last longer. The guide below explains the process:

Image from https://www.pinterest.com.au/pin/200410252144075736/


The neckline was finished with a handsewn rolled hem.

When finished, I saw a bit of a problem with the bright fabric- the garment was looking alarming like a soccer guernsey. I was on a very tight time deadline and I was pretty desperate. I decided to stencil or stamp a design.

 I had some woodblock stamps that I had never used, and gave them a try. I had trouble matching up the design and very quickly realised that I didn't have time to master a new skill with the deadline looming. Also there was a lot of potential for things to go disastrously wrong very quickly.


Next I drew a quatrefoil design on a piece of cardboard and  cut the design out with a craft knife. I used a removable pen to mark the design at measured intervals and painted it in with craft paint mixed with a fabric fixative to make it washable.


The design looked OK but needed a yellow dot in the centre to break the design up a bit.
I put quatrefoils on all the green bands (arms and hemline).


The finished tunic. The colours are not to my taste, but I worked with what I had available and the garment should last reasonably well and be easy to care for.

Monday, April 2, 2018

Sewing for Newcomers' Month


March was SCA Lochac Newcomers' Month, and as part of the festivities I went to my local College group to teach a basic garb making class. I had a big box of donated fabric scraps and some purchased fabric and unfortunately no attendees as everyone wanted to learn rapier. So I busied myself making some scraps into t-tunics for newcomers. I ran out of time and took some projects home, thinking it would be a quick job. Which it probably would have been if my sewing machine had not decided to break down! I have more to do at a later time when my machine is fixed.
Basic t-tunic pattern from https://www.pinterest.com.au/pin/570901690249020212/

The pattern above is the basic shape that I cut my fabric pieces into, although I had to piece the sleeves.

Putting all the pieces together

 The tunic was machine sewn with enclosed seams wherever possible for durability.

Hand sewing a narrow rolled hem for the neckline

The finished tunic ready to go back to the College

Friday, March 23, 2018

Stress Sewing A Chalice Cover

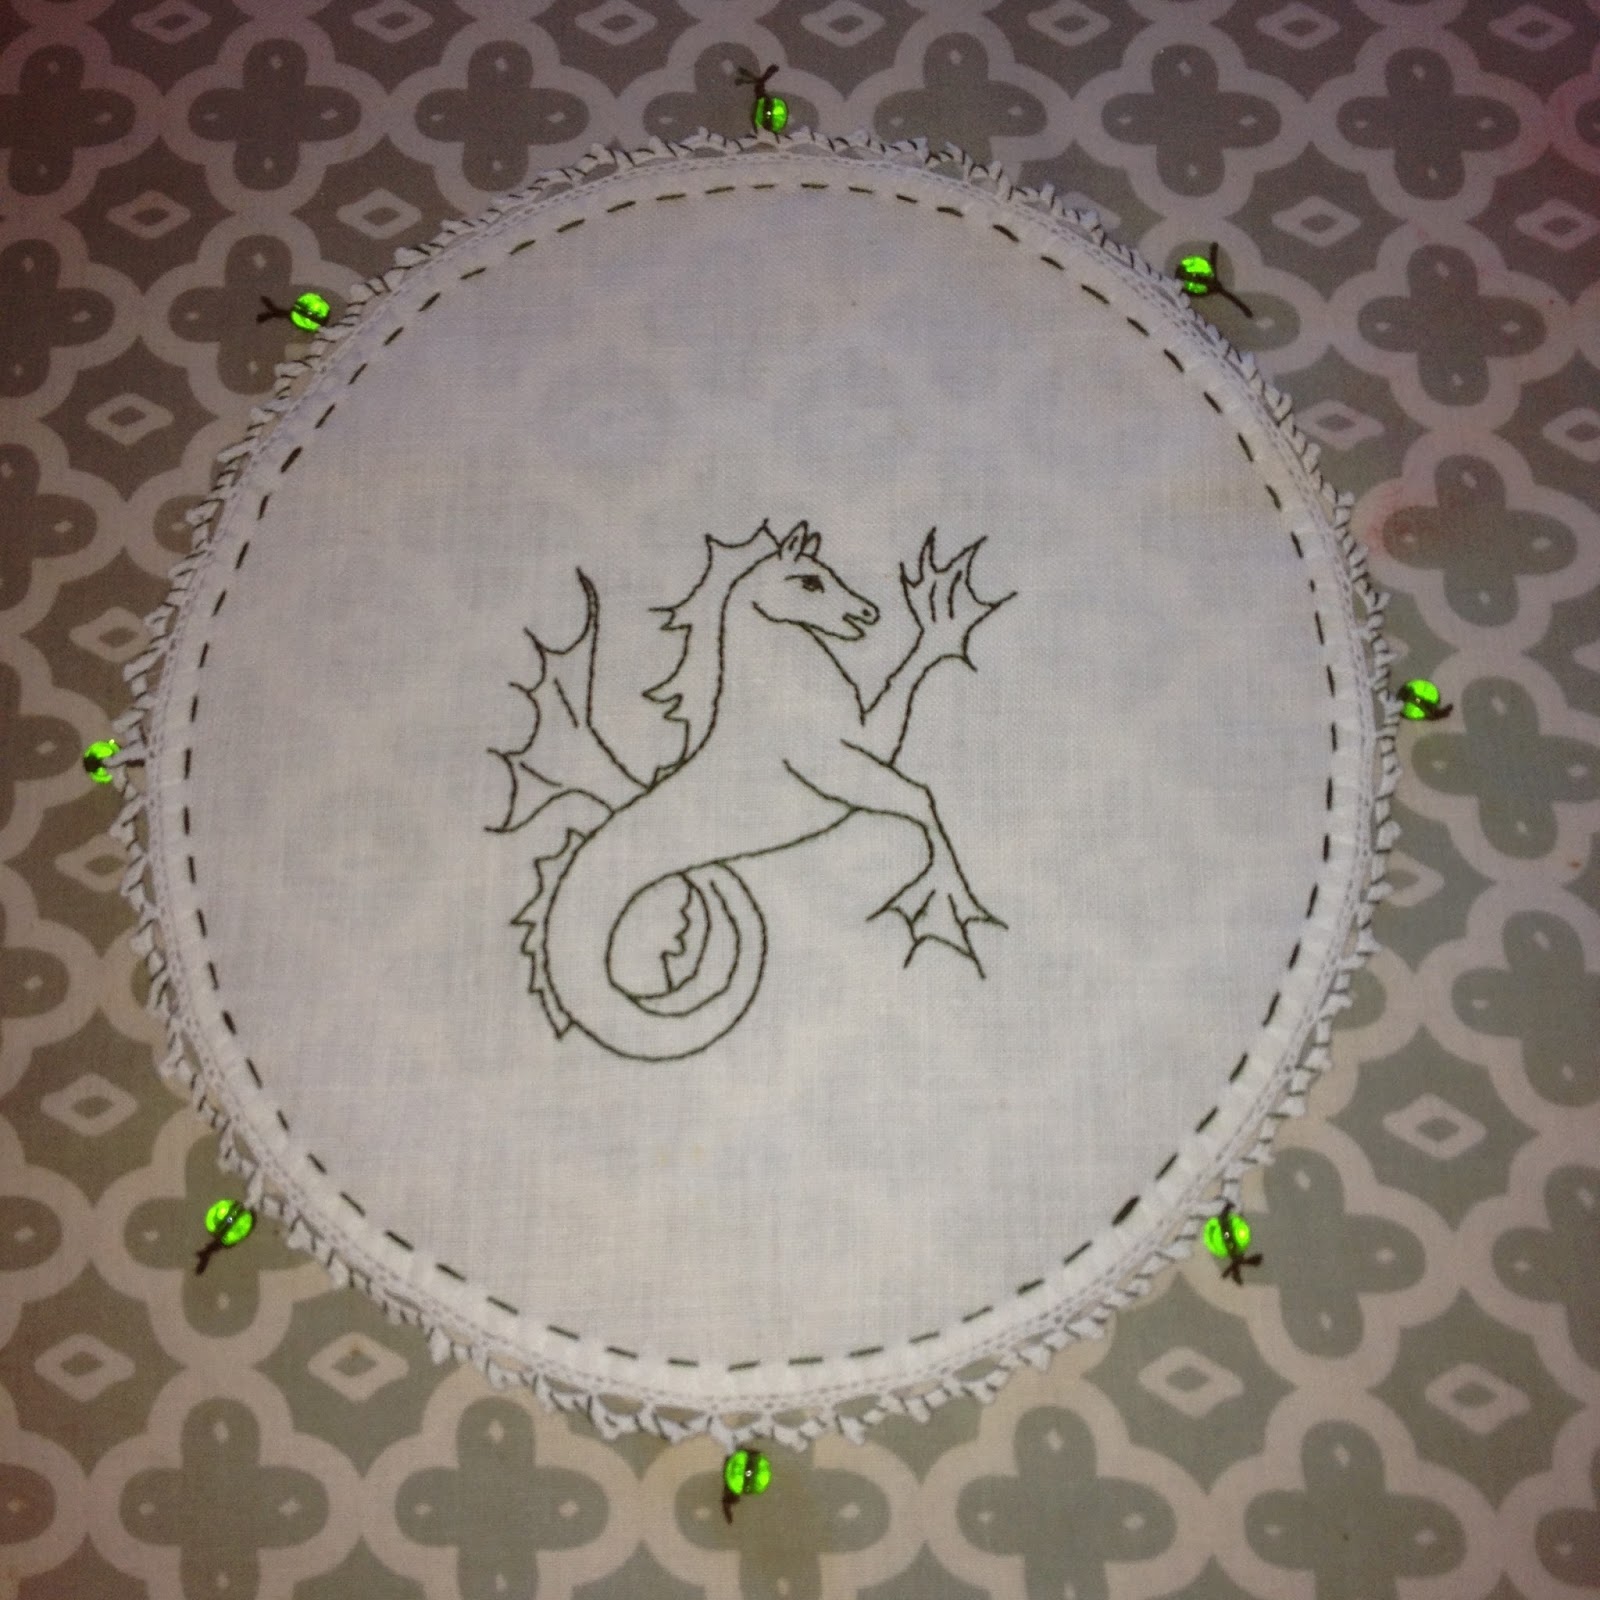
My furry little helper has been very ill lately. We had a public holiday here recently, and I was waiting to hear from the emergency vet on how she was responding to treatment. The hours were ticking by with no word. I was too agitated to work on anything for someone else, because my concentration was elsewhere. So I converted a vintage doily into a chalice cover for use at outdoor SCA events like tourneys. We have a real problem with European wasps here when it is warm, and a cover for my drink seemed like a good idea.

The original, vintage doily

I marked my heraldic design out by tracing it onto the linen doily with a removable pen, using a window as a light box.


The stitching is double running stitch with a double thread of DMC cotton floss. I'll admit that it is not terribly accurate stitching because my mind was elsewhere. I knotted the embroidery off on the back as this will be washed in the washing machine and needs to be sturdy.

When the main embroidery was done, I did a line of running stitch around the edge of the doily and also wove some floss around the needle lace edging.


Some beads were required to finish it off and add weight to the cover. I used some green glass beads and secured them with the embroidery floss.
My cover is very simple, but suits my needs. I had just finished pressing it when the crucial vet call came in, so the timing was good. Quick projects can sometimes be just what I need to get my motivation and enthusiasm for craftwork back.

Here are some SCA-period chalice covers (used in a religious context) in case you feel inspired to make something more complex:

Image from V&A Museum: http://collections.vam.ac.uk/item/O125784/chalice-veil-unknown/
Chalice veil - Place of origin: England (made)
Date: ca. 1560 to ca. 1600 (made)
Materials and Techniques: linen, silk embroidery
Museum number: 1415-1874
Gallery location: In Storage


Image from: LACMA https://collections.lacma.org/node/224478
Chalice Veil -England, circa 1600
Costumes; ensembles
Linen plain weave with silk embroidery, metallic-wrapped thread lace
22 1/2 × 22 3/4 in. (57.15 × 57.79 cm)


''Shepheard Buss'' Textile held in the V&A, Image from https://www.pinterest.com.au/malcm2557/shepheard-buss/

Place of origin: England (made)
Date: 1570-1600 (made)
Materials and Techniques: Embroidered linen in silk, bobbin lace
Museum number: T.219-1953
Gallery location: British Galleries, Room 58, case 6
http://collections.vam.ac.uk/item/O78790/shepheard-buss-picture-unknown/

Russian Chalice Veil. Image from Pinterest https://www.pinterest.se/pin/386887424219161266/
Chalice veil Date: 16th century. Culture: Russian. Medium: Metal, silk Dimensions: 18 1/2 in. (47 cm). Classifications: Textiles-Embroidered, Textiles-Ecclesiastical.: Brooklyn Museum Costume Collection at The Metropolitan Museum of Art. Accession Number: 2009.300.3453
Attribution not confirmed.