Elizabethan, Tudor and Renaissance inspired embroidery, clothing and accessories - historical costuming, embroidery and re-creation
Thursday, September 24, 2020
Saturday, September 19, 2020
Comfy purple tie-on sleeves
Last month I was chatting to a friend about how we might previously have thought that a global pandemic (and subsequent SCA shut-down) would be a great time to catch up on projects and get things done, and how surprised we were by how tired and unmotivated we were. We decided that we would try and motivate each other and challenged ourselves to complete a pair of sleeves each in a month.
The first step was the pattern. I had a nice comfy one that needed a bit of a tweak, but my friend didn't have a pattern. We had a fun Zoom session with me trying to help her draft a pattern by draping.
Next step was cutting out. I was lucky that I had some fabric set aside to make a set of sleeves. Two lots actually, which was lucky because I was tired when I cut the first pair out and I cut out two left sleeves. Ugh! I know better, but if I didn't do any cutting or sewing when tired, I would be getting even less done than I am now.
Take 2 and the sleeves were cut out along with a matching lining. I ran a machine zig-zag stitch around the edges and then sewed the seam.
Then I finger pressed the seams open and ran a little stab stitch along the inside to keep them open.
I lay the sleeve flat and pin the outer sleeve (fashion fabric) hem. It is important here to make sure that the inner lining is nice and smooth too with no bumps or folds. I use tiny stab stitch to sew it in place. Then I fold the lining hem under, leaving about 3 mm of the sleeve showing. I used to just marry the two edges together, but I was finding that the lining would often start to bubble out slightly after a bit of wear, especially if the lining was a different type or thickness of fabric.
This lot of eyelets is not the best that I have done, mainly because I haven't done any in so long and because I was rushing. But they work fine, and I got them done in a night. I actually wore the sleeves to a virtual online event. It was nice to be back in garb again and I was happy to have finished them. I like my 'comfy' sleeve pattern because it is not restrictive, unlike some of my tighter sleeves.
Tuesday, September 8, 2020
Spring Cleaning - Or Lack Thereof!
Thursday, September 3, 2020
Making the Purple patterned, Italian Style Caul
For this caul, I started out with a circle of pre-washed and ironed fabric. I prefer natural fabrics because they tend to breathe better than synthetics and are not as hot or as much of a fire risk. In period, this type of headwear would most likely have been silk, linen or possibly a fine wool or cloth of gold or silver. Budget is an issue for me, so sale cotton is my go-to. I prefer fabrics with a bit of body so that the hat won't look too limp. I love the way cotton velveteen sits when made up in this style. This particular fabric is a quilting cotton that I picked up on sale last year. The printed gold pattern adds a bit of stiffness.
| Cutting out a plain fabric with the same pattern |
How pouffy you want your caul to be
How big your head is
How much hair you have.
| This image gives you an idea of the size circle I prefer for my large head |
You also have an option to make your base fabric an ova shape rather than a rectangle. Doing an oval shape tends to result in a bit more fabric around the ear area which reminds me quite a lot of the cauls that sixteenth century German ladies are shown wearing.
At this point, you will need to add any decorations such as beads, ribbons, etc. I added a gold bead in the centre of each main motif,
If you are not adding extra decoration, give it the fabric a press. I usually run a zigzag stitch around the edge on the machine also, just to give it a bit more strength.
Next, run nice, even stitches all the way around your circle panel to allow you to gather it up into the headband. I actually do my gathering stitches in two separate lots to make it easier to get the gathers 'just right'. I usually mark the centre of the circle perimeter at top and bottom and run my threads between those points. On this particular caul I decided to try something different and to not gather the section on the top of my head in front of where my jewelled billiments sit, to reduce the pouf level at that point. Don't make your stitches too big or your gathers will be correspondingly large and the hat will not sit nicely. I prefer smaller gathers.
You will also need to sew the headband part. If you have cut a single piece, you'll need to sew the ends together so it is a joined piece like a ring of fabric. Then fold it in half and fold the seam allowances under, pressing or finger-pressing as you go. (Some people make the band a little shorter than they need and pop a piece of elastic in between the ends of the band. This is (obviously) not historically accurate. I don't find it necessary as I use clips to keep the caul on. I have also seen the ends of the band hemmed individually and ties or ribbons attached to tie it onto the head.)
Once your headband is sewn, gently pull up the gathering stitches until the circle (or oval) of fabric is the same size as the band. This is the part where you start adjusting the gathers so they look nice and even. Just gently move the gathers around until they look even and the bulk of fabric is evenly distributed.
Titian's La Shiavona (Portrait of a Lady) 1510 held by National Portrait Gallery UK. Image from: https://en.wikipedia.org/wiki/La_SchiavonaPortrait of a Woman by Vincenzo Catena c. 1520
Image from: https://www.italianways.com/the-venetian-portrait-painter-vincenzo-catena/
I've been tempted to make a caul that sits further back on my head like these, but I'm not sure how comfortable I would find it. I like having the bulk sit higher up on my head and not feel like it is pulling my head back.
Portrait of a Venetian Woman c. 1505 by Albrecht Durer
Image from: https://en.wikipedia.org/wiki/File:Albrecht_D%C3%BCrer_089b.jpg
Tuesday, September 1, 2020
Mamluk Counted Embroidery
I haven't done any counted embroidery since my early teens (I started cross-stitching at about age eleven) and I have already learned a lot. I have spent more time unpicking errors than actually stitching so far.
I have learned
* that I had a false appreciation of how good I actually am at counting
* the medication I was on has affected my eyesight more than I realised
* I shouldn't try and do counted work when I need to concentrate on something else
* my recollection of how much I dislike counted work was underrated 😃
Thursday, August 27, 2020
Mask Making
Monday, August 24, 2020
Applique Heraldic Banner for Indoor Use
This is an indoor banner. The base fabric is cotton and the ermines are made of gold felt surrounded by couched gold thread. The red and gold elements were sewn on by hand. The fringe trim is commercially produced.
Wednesday, August 5, 2020
Purple Italian-style Caul
Monday, June 22, 2020
Bead Necklaces
Wednesday, June 17, 2020
Giulia de' Medici - A Fascinating Life

Portrait of Maria Salviati de' Medici and Giulia de' Medici
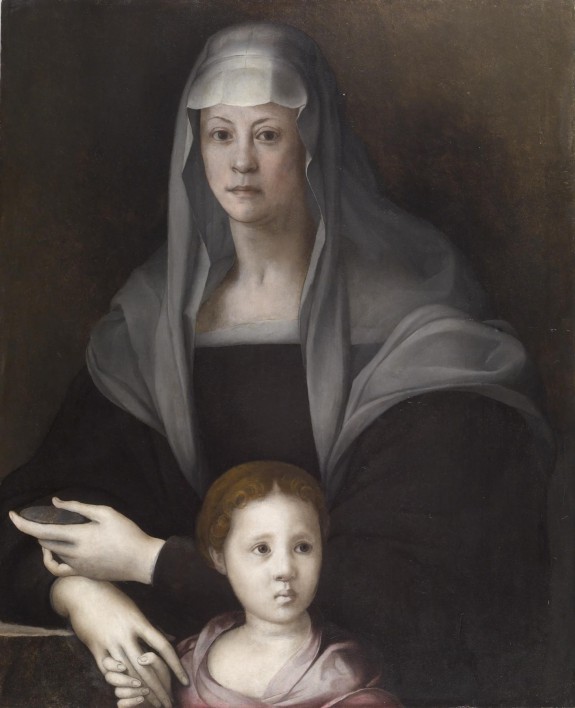
 by Pontormo c.1539
"Pontormo (Jacopo Carucci, but known by the name of his birthplace, the town of Pontorme) was esteemed by the Medici family, rulers of Florence, for his ability to capture the individuality of his sitters, while emphasizing their aristocratic demeanor. Maria Salviati, as in other contemporary portraits of her, wears the clothes of mourning for her deceased husband, the famous military leader Giovanni delle Bande Nere de' Medici (d. 1526). The little girl holding her hand here is Giulia, a Medici relative who was raised in Maria's household after the murder of the child's father, Duke Alessandro de' Medici (1511-1537). As Alessandro was born of a liaison between a Medici cardinal and an African slave, this formal portrait is the first of a child of African ancestry in European art. Giulia grew up with all the status of a Medici and married another aristocrat. Descendents of hers are alive today.
By the nineteenth century, as the painting changed hands, the identity of the figures was lost. Toward the end of the century the painting surfaced again, identified as Vittoria Colonna, a famous Renaissance poet, widow, and friend of Michelangelo. Good portraits of the poet are known today and the widow in the Walters' painting is not her! Presumably because of Colonna's ongoing fame (and the difficulty for a potential buyer to check on such things then), the dealer thought this name would make the painting easier to sell. The problem is that Colonna had no children; so probably to make the painting consistent with its new name, the child was painted out.
Although the painting was acquired by Henry Walters in 1902, little attention was paid to it until after Walters' collection was bequeathed to the city of Baltimore in 1931 and the Walters Art Gallery was established. Then in 1937 the painting was x-rayed and cleaned, revealing the presence of a child. For years the proposed identification of the child was as Maria Salviati's only child, Cosimo de' Medici (1519-1574), who went on to become Grand Duke of Tuscany. According to this theory, Cosimo, as a young adult, commissioned this image of his mother and himself to honor her attention to his upbringing after his father's death. The problem with this solution is that the child is clearly a girl with her hair in braids and a girl's clothing.
In the 1990s the scholar Gabrielle Langdon proposed that the child was actually Giulia. After her work came to our attention and considerable research was carried out to confirm this proposal, the identification was changed here at the Walters and the idea slowly began to take shape for a project that would eventually become the 2012 Walters' exhibtion "Revealing the African Presence in Renaissance Europe". The accompanying publication, edited by Joaneath Spicer, is available as a free ebook" (available here: https://thewalters.org/wp-content/uploads/revealing-the-african-presence-in-renaissance-europe.pdf)
DATE DESCRIPTION NARRATIVE
12/31/1969 Examination examined for condition
12/31/1969 Examination examined for exhibition
12/31/1969 Treatment cleaned; x-ray
2/05/1937 Examination examined for condition
2/05/1937 Treatment cradle removed; x-ray
9/10/1940 Treatment coated; loss compensation; other
1/01/1953 Examination examined for condition
12/21/1960 Treatment other; surface cleaned
12/21/1960 Treatment cleaned; coated
1/26/1971 Treatment re-housed
3/01/1986 Treatment loss compensation; coated
12/04/1986 Examination examined for condition
12/04/1986 Treatment examined for condition; other; varnish removed or reduced
12/04/1986 Treatment cradle removed; examined for condition; inpainted; other; varnish removed or reduced
8/01/1987 Treatment cleaned; coated; loss compensation; other
8/01/1987 Treatment coated; inpainted; other; varnish removed or reduced
11/01/2000 Loan Consideration examined for loan
11/12/2000 Loan Consideration examined for loan
11/12/2000 Examination cradle removed; examined for loan
11/12/2000 Examination examined for loan
10/15/2003 Examination examined for loan
10/20/2003 Loan Consideration examined for loan
10/24/2011 Examination examined for loan
Undercover Stories in Art. The Walters Art Gallery, Baltimore. 1980.
Going for Baroque. The Walters Art Gallery, Baltimore. 1995-1996.
Highlights from the Collection. The Walters Art Gallery, Baltimore. 1998-2001.
Virtue and Beauty: Leonardo's Ginevra de'Benci and Renaissance Portraits of Women. National Gallery of Art, Washington. 2001-2002.
The Legacy of Michelangelo. Palazzo Strozzi, Firenze; The Art Institute of Chicago, Chicago; The Detroit Institute of Arts, Detroit. 2002-2003.
Pontormo, Bronzino, and the Medici: The Transformation of the Renaissance Portrait. Philadelphia Museum of Art, Philadelphia. 2004-2005.
Revealing the African Presence in Renaissance Europe. The Walters Art Museum, Baltimore; Princeton University Art Museum, Princeton. 2012-2013.
Excursions through the Collection: Portraiture, Adornment, and the Natural World. 2019-2020.
Medici Collections; Riccardo Romolo Riccardi, Palazzo Gualfonda, Florence, prior to 1612 [inventory of 1612, Florence, Archivio di Stato, Carte Riccardi, fil. 258, c.21r-23r, as "un quadro di br.a uno e mezzo della Sig.ra D. Maria Medici con una puttina per mano di Jacopa da Pontormo"] until after 1814 [Florence, Archivio di Stato, Carte Riccardi, fil. 278, as "no 147 un quadro rappresenta un ritratto di donna con una bambina"] [mode of acquisition unknown]; Don Marcello Massarenti Collection, Rome, prior to 1881 [mode of acquisition unknown] [1881 catalogue: no. 79; 1897 catalogue: no. 381, as Sebastiano del Piombo]; Henry Walters, Baltimore, 1902, by purchase; Walters Art Museum, 1931, by bequest.
Acquired by Henry Walters with the Massarenti Collection, 1902
Wednesday, June 10, 2020
UFOs and Making Cauls
Friday, June 5, 2020
Hem Finishing - Brown Dress
Thursday, May 28, 2020
White Partlet (Complete)
Here is another project from my UnFinished Object (UFO) pile that I recently finished. It is a partlet made from a fabric that has square holes finished with machine embroidery. It reminded me of a close netting style. It is cut in the collarless Italian style that I like to wear with my 1530's-1550's gowns.
I cut the fabric out to my standard partlet pattern. I did a small zigzag stitch by machine along all the raw piece edges and then sewed the shoulder and side seams with a straight stitch on the machine. Then I turned all the edges under and sewed them down with tiny stitches by hand.
The next step was to do a hem by hand on all the raw edges. It was a lot more tedious than my normal partlet hemming because the fabric wanted to distort where the holes were, especially if any of the edges of the hole itself were exposed.
Not my best hemming work, but acceptable. One part that I am considering re-doing is the bit that sits near my collar bone. The hem size is consistent, but because of the way the holes are positioned, the hem sticks out a bit from under the holes. I'm not sure if it will be noticeable while wearing it or not.


