Showing posts with label Italian partlet. Show all posts

Friday, November 26, 2021

Partlet Embroidered with Acorns

This Italian style partlet is a piece that I finished in September. The design is adapted from a sixteenth century modelbuch pattern (which I will post later).

The embroidery is worked in split and double running stitches on a linen base fabric and the thread used was Madeira silk.

The partlet has machine sewn French seams on the side and shoulder seam, with all other stitching done by hand. The lace is commercially produced gilt lace.

The partlet style has closed side seams for ease of dressing without help and to ensure it sits flat under the bodice. An alternative and common style of partlet in period had ties at the side, as seen in this image:

Women on a Terrace Fresco by Alessandro Allori
Image from: http://www.museumsinflorence.com/musei/Pitti_apartments.html


This is the style of sixteenth century Italian partlet that my piece is based on:

Portrait of a Woman  by an Anonymous Painter circa 1550

from: http://starlightmasquerade.com/PortraitGallery/Ladder-Laced-Venetian/inspiration-pages/openbodice23.htm

Thursday, May 28, 2020

White Partlet (Complete)


Here is another project from my UnFinished Object (UFO) pile that I recently finished. It is a partlet made from a fabric that has square holes finished with machine embroidery. It reminded me of a close netting style. It is cut in the collarless Italian style that I like to wear with my 1530's-1550's gowns.
I cut the fabric out to my standard partlet pattern. I did a small zigzag stitch by machine along all the raw piece edges and then sewed the shoulder and side seams with a straight stitch on the machine. Then I turned all the edges under and sewed them down with tiny stitches by hand.
The next step was to do a hem by hand on all the raw edges. It was a lot more  tedious than my normal partlet hemming because the fabric wanted to distort where the holes were, especially if any of the edges of the hole itself were exposed.
Not my best hemming work, but acceptable. One part that I am considering re-doing is the bit that sits near my collar bone. The hem size is consistent, but because of the way the holes are positioned, the hem sticks out a bit from under the holes. I'm not sure if it will be noticeable while wearing it or not. 
I have two re-working options; unpick and re-sew, or add lace. I do have some lace that I purchased specifically for this partlet, but I am not sure it needs it. When it is time to finally get garbed up again, I will try it on with an Italian gown and decide then. Until that time, I will keep pottering along, trying to finish things, and keep trying to resist the urge to start new projects.
This meme popped up on my social media feed this week, and was too relatable!

Thursday, May 21, 2020

Partlet with Blue Knotted Embroidery (Complete)

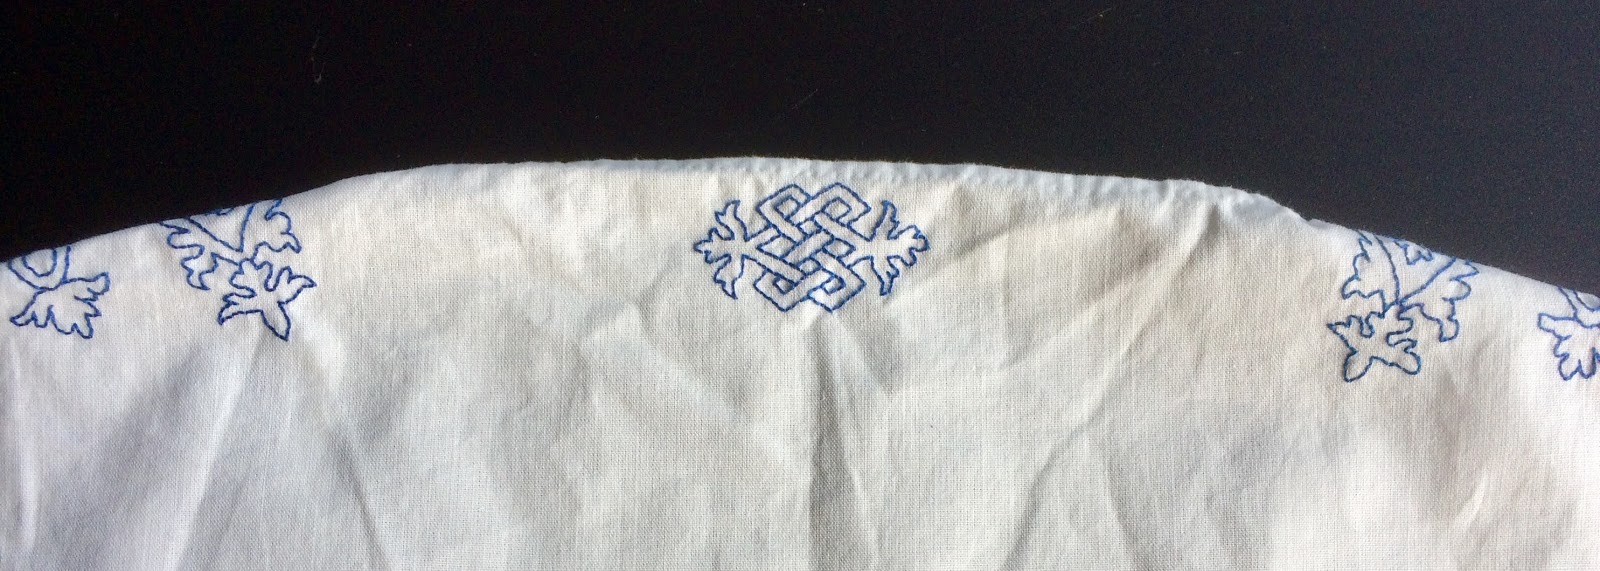
I managed to get the blue knotwork partlet finished this week. This is another project which was postponed because I was not happy with how it was working out. I originally hoped that I would be able to use it as part of my suite of projects for my Heraldic Challenge work (details below) but the frettes were not as prominent as I had hoped. I also used this project as an opportunity to practice my double running stitch (Holbein stitch) and it did not turn out as smoothly as I would have liked. More practice needed!

This pattern was taken from Giovanni Ostaus' 1567 "La Vera Perfettione del Disegno" at https://www.metmuseum.org/art/collection/search/662394
Cleaned image from: https://www.facebook.com/pg/modelbuchmuse/posts/?ref=page_internal 
As always, I am indebted to Baroness Praxilla at Modelbuch Muse. Her page makes finding patterns so easy!
I think I will do some more patterns from this modelbuch in the future.

This partlet is a wide-fronted collarless partlet which was popular in Italy in the sixteenth century. Here are some progress photos on the development of the project:
All visible seams handssewn. I edge my fabric pieces with the machine before hand hemming to provide a bit of extra strength, especially as I usually machine wash my underpinnings.
I use a relatively wide hem, about 6 or 7mm.

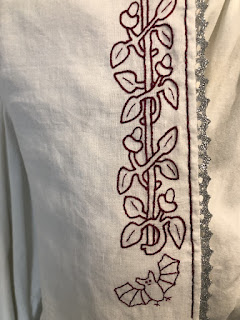
The border edging of the embroidery on this chemise (held in the Museo del Tessuto, Prato), inspired the decorative edging at the centre front hem. Image from oocities.org via Pinterest
 Similar decorative edging can be seen on this English coif c. 1610, held in the Glasgow museum. It is linen base fabric, embroidered in silk and gilt. Number 29.130
Image: collections.glasgowmuseums.com
I was unsure as to which lace to use. In the end I chose a silver lace that I had overdyed with a blue-black dye to tone down the shade of gilt.
The base fabric on this one is cotton. Linen would be a better alternative but is expensive and hard to find where I live, whereas cotton is readily available and more affordable. Linen is MUCH nicer to embroider and sew though! Similarly, thread is cotton DMC embroidery floss; a more affordable alternative to the much nicer silk thread that I would prefer to use.

Heraldic Display Pentathlon Challenge CHALLENGE 2019-2020
Participants are challenged to create 5 (or more) items from the list below. Challenge runs from now until the 1st May 2020 (or the closest available garbed event.) Displays will be set up throughout the year to showcase the work of participants. At the end of the Challenge, the populace will vote for their favourite items and tokens will be awarded. Heraldry can be your own, or you can make something for a friend, or Guild etc. Be creative and enrich our game with your displays.
Categories:
1. Banners, flags, pennants, standards and gonfalon etc.
2. Encampment equipment, furniture, tent screens etc.
3. Personal Adornment such as jewellery, favours, tabbards and clothing etc.
4. Equipment such as needlecases, napkins, crockery, water bottles etc.
5. Items for the Barony: any item(s) decorated with the Innilgard device to be donated to the Barony
This Challenge has been extended because face-to-face Lochac events have been suspended due to the Covid-19 crisis.

Tuesday, May 12, 2020

Complete - Heraldic Seahorse Embroidered Partlet

I finally got my heraldic seahorse partlet finished, after leaving it sitting in the Naughty Corner for quite some time. I have not been happy with how the pale lilac thread looked, and I really struggled to see it. I think the below average quality of the embroidery reflects this.
When the split and running stitch embroidery was finally complete, I was disappointed with how it all looked. I added a line of split stitch along the hemline, but it didn't look complete. I added some pale gold cotton bobbin style lace and then added a line of matching gold thread to tie in the new colour.

The seahorses actually look paler than in the photo, and I felt they needed an extra motif in gold thread to tie in the bobbin lace colour and to fill in the negative space. I added the little 'sun/seed' motif found so often in Elizabethan pattern books like Shorleyker's 'A Scholehouse For The Needle'.
I am pleased with the extra motifs and the partlet turned out better than I thought it would. I'm not sure that I will ever love it, but it was a good exercise in perseverance.


Wednesday, March 4, 2020

Partlet with Holly Embroidery - Update 4

I'm pretty happy with how the 'border' turned out. Something different from the other partlets in my wardrobe, anyway.

The next big decision to make was which lace to use. I still haven't found the time to learn to make bobbin lace, so I had to use commercially made lace from my stash. I wanted gold, but the bright gold really made it look to Christmas-y. Luckily I remembered a lighter gilt lace that I had tucked away.
I'm really pleased with how it looked once sewn on. I also added a line of small running stitches in single thread to finish off the hem area. 

Now that the pain of all those little berries is not as fresh in my mind, I am already thinking about other colour combinations that I could do! Hemming first.

Wednesday, February 26, 2020

Partlet with Holly Embroidery - Update 3

With the holly embroidery complete, I felt that there was too much negative space between the centre-front hem and the design, so Trevellyon came to the rescue again! I adapted the border design around the holly pattern in his book and worked it in red and green.


The central horizontal stitches are double running stitch and the border is worked in split stitch (both with two strands of DMC floss).


Monday, February 17, 2020

Partlet with Holly Berry Embroidery - Update 1

Here are the progress pics from week one of working on the holly berry partlet:


I like the way it looks with the green embroidery done and the un-embroidered berries showing in a lighter colour. I might consider doing another in lighter colours in the future.....

Monday, February 10, 2020

Partlet with Holly Berries

My first 'holly' project is going to be a partlet decorated with the holly design in one of Trevellyon's borders from his Miscellany. (I plan to register a heraldic badge that has holly on it, so there my be more holly themed items in the future.)

A page from Thomas Treveyllon's Miscellany from 1608
The base fabric is a lovely fine linen. The design was marked out with an iron-away Frixion marker. The berries are embroidered in two strands of red DMC 498 cotton, and the leaves and stems in two strands of green DMC 3818 cotton. I considered other colourways, but decided to go with realistic colours for this first project. In period, of course, silk would most likely have been used for this project. I have used cotton due to cost and availability issues.

The stems, leaves and berry outlines are being worked in split stitch, and the line across each berry is done in double running (Holbein) stitch.

When making partlets, I often do what is not recommended, and make up the garment first. I use a small hand-sewn hem on my Italian partlets, and I find having the centre front hem completed can be useful in ensuring that the design is perfectly aligned with the centre front edge of the partlet. If you decide to do it this way, you should be careful to ensure that the edges of the garment do not get stretched and warped by your hoop. I use a very small hoop and move it often, being careful not to stretch the linen base fabric.


Thursday, September 20, 2018

Repurposed Tatted Lace Partlet

One of the projects I have on the go at the moment is a bit of an experiment. I found a fabulous but tatty vintage lace runner at a thrift shop and snapped it up. It has a diamond pattern with little roses and I think it is tatted (which is out of period) but passes for neeedle lace.

The piece had a few rust stains, but with some careful laundering I managed to brighten it up. I cut the piece to use the two parts as the front panels of a collarless partlet. I managed to use the pretty edging on the central parts and avoid most of the remaining rust marks.

I made the back part of the parlet up in linen and hand hemmed it with a small hem. I pinned the tatted panels in place. I will trim the excess tatting on the outer edge (which will be hidden by my gown) and trim with binding. I have a couple of colour options waiting to be tested for the binding as matching the colour is difficult.

I have been pretty busy with projects for other people lately, so this one is sitting in the to-do pile, but I am looking forward to getting it finished as I really love the tatted piece and it makes me happy to think that some other ladies' hand work is getting a new lease on life and will be admired rather than languishing in a bin of ugly doilies.