Wishing you all a prosperous and peaceful holiday season!
Broider Me 'Bethan
Elizabethan, Tudor and Renaissance inspired embroidery, clothing and accessories - historical costuming, embroidery and re-creation
Friday, December 26, 2025
Thursday, December 11, 2025
Embroidered Order of Defence Heraldic Panels
Tuesday, December 2, 2025
Order of Defence Cloak Designs
I recently had the privilege of adding the devices of local members of the Order of Defence to the Lochac Order of Defence cloak.
The cloak was not created by me, but I embroidered five devices close to the one I previously added for Master William Blackwode in 2019. They were embroidered in black DMC cotton floss in a variety of stitches including split stitch, double running stitch and stem stitch.
This cloak is used on the field and it will be great to see it in action. Congratulations to the new Members of the Order!
The cloak ready to continue it's journey around Lochac.Saturday, November 15, 2025
New Goldwork Threads
After jet setting for more than four months (returned to India for incorrect postage and re-posted,) my gold work embroidery threads have finally arrived!
Monday, August 4, 2025
Heraldic Split Stitch Badge
I made another split stitch heraldic badge this year, for a friend. Instead of working the white split stitches in an oval shape around the tree, I drew a sort of wave pattern across the background and worked the split stitches in waves. I did this to make the sewing a bit more interesting, and to create a feeling of texture across the background.
I wouldn't do this again. I don't feel it was particularly effective in creating texture and it also didn't make the process of stitching it any more interesting. (It was worth trying though.)
This patch will be sewn onto a Championship cloak. It is a cotton calico base fabric with split stitches worked in DMC cotton floss.
Sunday, July 27, 2025
Thrift Flip Trinket Bags
I needed some little baggies to keep some metal girdles in so that they don't tangled up and damaged, so I was very happy when I found an embroidered fabric Christmas placemat that I liked the design of at the thrift store.
I cut it in half after washing and ironing it, folded down a little casing and sewed it in place, and then joined the conveniently pre-hemmed edges of each piece. Finally I sewed an organza ribbon in half and used it as ties for the baggies.
Quick, cheap, useful and ultimately ticking that oh-so-satisfying 'easily completed task box!
Wednesday, June 25, 2025
'Oldies but Goldies' Series - "Virtues" Chemise
Tuesday, June 3, 2025
Mer-folk Embroidered Band
I made this embroidered band last year thinking I might use it on the front of a chemise. I had a big SCA event recently, and I decided to use it as a decorative band on a stomacher to cover my pair of bodies. I actually ended up wearing a different stomacher to the event, but I am glad to have another one in my wardrobe.
I have admired the clothing in this Portrait of Lady Kytson by George Gower held by the Tate Gallery for a long time, and her chemise band is what inspired this piece. (Image from‘Lady Kytson‘, George Gower, 1573 | Tate) One day I'd love to have time to work a pair of sleeves like this too.
The base fabric is linen and the embroidery is worked in black DMC floss. The project was created entirely from stash items. I worked out my design and then marked it on tracing paper and traced it onto the fabric with crayola washable marker using a light board. Stitches used are split and double running stitch and knots.
I sewed the band onto a panel of stash cotton fabric, ironed it and bagged it out with another panel of cotton. 'Bagging out' means sewing your lining edge to your fashion fabric edge right sides together. Then you trim, grade or notch (if necessary) and turn right side out. The seam allowance ends up on the inside and you have a finished edge that needs no other treatment. You just need to handsew the opening shut. My understanding is that this is a modern method which is predominantly used with a sewing machine. It is a quick and easy way of sewing squares and rectangles together.
I feel like the top edge needs a little something extra; maybe some tufts or black needlelace similar to the smock/chemise in the portrait.
Tuesday, May 20, 2025
Fixing old clothes
It has been a hectic couple of months between health issues and lots of SCA projects. I have changed shape, and recently discovered that a lot of my garb doesn't fit or doesn't fit comfortably. Luckily I saved a lot of my old garb from fifteen or so years ago, so I have been rediscovering old clothes. It's interesting to see how my sewing and construction style has changed over that time too. Needless to say, a lot needs fixing/improving/tweaking. My local group is about to host Coronation, so I have a lot to fix in a short amount of time!
Friday, March 21, 2025
Making an Embroidered Meerkat Device
I had an earlier attempt at the design but was unhappy with the stitching and texture of the thread
Adding in the details of the 'weasels'
Blocking the panel
Adding tacked lines as a sewing guide
Stitching the ermines
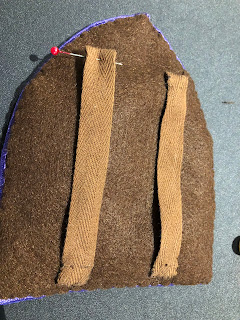
Backing the piece with felt and adding twill tape belt loops
I added a band of purple trim around the edge to finish it off
Wednesday, December 25, 2024
Tuesday, December 17, 2024
Another Embroidery Challenge
This year I ran another Embroidery Challenge within my local SCA group; pre-1600 embroidery with an open theme.
The aim of the Challenge was to provide opportunities to display work in a low anxiety, non-competitive environment and hopefully inspire others to get excited about embroidery, with everyone welcome to participate regardless of experience or skill level.
I like to make tokens to recognise those people who put the work in and take part. These are the tokens for the latest Challenge. We had a fair turn out, given the busy time of year.Friday, December 6, 2024
New shinies
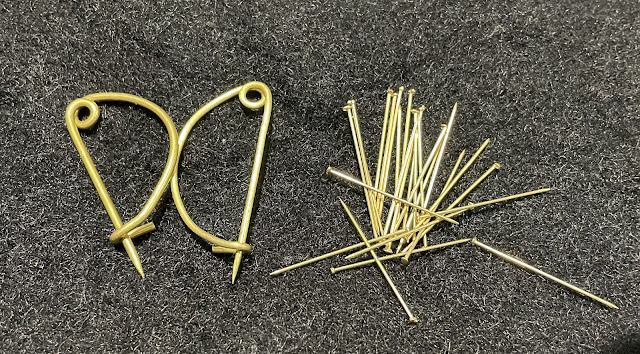
I recently bought some simple fibula for some ancient garb from my talented costumier friend Bhri. (I'm planning on making some hot weather friendly garb soon.)
I also got some pretty hand made pins for the period sewing kit that I use at demos.
Tuesday, November 12, 2024
Maroon Balzo
I recently finished this balzo. It was an easy make, but sewing all the little beads on took quite a long time.
Construction is relatively simple; make a long fabric tube big enough to go around your head and allow ease and add about an inch/2.5cm extra on each end (this is to allow for the end to be turned under).
Turn the end of one end of the tube under and pin it over the other end, creating a donut shape. Pin securely. Try it on to make sure it fits. Adjust if necessary, and hand sew the opening securely closed.
Next, you are going to use the donut as a pattern for the lid. There are hats like this which are just the donut shape, but I prefer the covered sort to protect from scalp sunburn.
Using a large piece of wrapping paper or old sheet etc, cut out the rough shape of the donut leaving about 5cm extra all the way around. We are aiming to cut out a lid shape.
Put the lid shape toile over the donut to make sure it will fit, and that there is enough fabric to turn a hem under. Make any adjustments necessary and then cut out your fashion fabric.
Hand sew the 'lid' onto the donut, turning a hem under as you go. You don't want it drum tight; there should be a little bit of ease as the lid will sit against the back of your head/hair.
Add trims as desired.
This particular balzo was inspired by this portrait below:
'Portrait of a Lady with a G*psy' by the Italian School, 15th CBut there are many similar ones to be seen in portraiture from the sixteenth century, including this one:
Vincenzo Pagani (1490-1568) - Annunciation (1532) - Palazzo Ducale Urbino - Galleria Nazionale delle Marche, image found via: //au.pinterest.com/pin/1337074878802655/
Wednesday, September 25, 2024
'Anguissola' Beaded Necklace
I recently had the opportunity to celebrate a dear friend (who is now my Apprentice Sister!)
I decided to make a necklace inspired by the girl on the left of this lovely portrait by Sofonisba Anguissola.
Wednesday, September 18, 2024
'Bunnies' Heraldic Device
I finished another heraldic device for the Baronial device banner a while ago. It has a felt base with applied felt on top.
I had a couple of tries at working the bunnies, with slips being my first idea. It was unsuccessful, and in the end I appliqued a bunny shaped felt base to add a bit of dimension, and then split stitched on top of it.The central chevron was stitched in place and then gilt thread appliqued over the edges. The pink dots are guidelines for where ermines need to be embroidered.I did the back legs of the bunny in a very pale grey to look a bit like shadow and add depth. I did a black outline for definition and added shiny black beads for eyes. I used smaller black beads for the centre parts of the ermines. They really catch the light.
Pinning and sewing another piece of felt on the back for extra stability (the banner gets rolled up).
The completed piece. I like how this one turned out.
Wednesday, August 21, 2024
Adjusting an old chemise
I had major surgery a few months back and my recovery has been hampered by lingering chest infections so I haven't been able to do any major projects. I've been focused on maintaining a minimum of ten minutes of A&S activity a day.
One thing I did manage to do this week was to shorten an old chemise. I think I made it back in the early 2000s, and I rarely wear it because it is quite heavy fabric. I originally made it almost ankle length, which is a bit unmanageable. Any time I wear it I think 'I must alter this' and then I put it off or forget.
It was only a very quick job because I hemmed it with the sewing machine, but I am really glad I managed to get this one small thing ticked off the to-do list after so long. Small wins!
The embroidery motif on this chemise is taken from Shorleyker's 'A Scholehouse for the Needle':


.JPG)


