Thursday, March 31, 2022

Red Tie-On Sleeves in the Italian Style

I finished another pair of sleeves this week. The majority of the sewing had been completed and it was just -you guessed it - eyelets needing to be done. On a positive note; I am getting faster at eyelets now, and hating them slightly less. (Good thing too, as no doubt have hundreds in my future!)

These sleeves were constructed in the same way as the others listed previously. I'm not sure what the fabric content is but they certainly have some metallic threads in them. They have a bit of a shine as the light moves over them. They are not a bright red, but are brighter in real life than the brown-red shade that they look like in the final pictures.

Whip stitching the lining wrist hem into place.

My trusty 'helper'


Sunday, March 13, 2022

Pale Blue Tie-on Sleeves in the Italian Style

Another pair of sleeves complete and out of the UFO pile! This pair is made from a light blue brocade type fabric that I found in a remnant bin at a thrift store and is based on the Italian tie-on style.


The camera has was washed the colour out a bit:

The sleeves were created in the same way as outlined in my previous post. 

As usual, the eyelets were what was holding me up.


I've embroidered an 'L' on the left sleeve because I always seem to be in a rush when it is time for events, and nothing wastes more time or adds more stress than struggling into a big dress only to find out you laced your sleeves on wrong - and then have to struggle back out of it, unlace them and then re-lace them on the correct sleeves. Ask me how I know, haha.


Monday, March 7, 2022

Italian Tie-On Sleeves Made From A Thrifted Green Sari Skirt

I finished a pair of sleeves that was sitting in my UnFinished Objects pile.

This pair has not been waiting to be finished as long as some others in the pile. (I only started them in 2021.) I picked up a pretty skirt made out of sari fabric at an op shop and thought it would made a nice pair of sleeves. The skirt was child size so there was some careful unpicking and placing to be done. 

I used my trusty pattern which makes a roomy and comfortable sleeve. Placement was key to try and get best use from the fabric and make sure the motifs were all going in the same direction.
Luckily, I have a great helper!
Edges were zigzag stitched on the machine and the seams ironed open and tacked down. Linings were given the same treatment.
The sleeve and lining was sewn wrong side out then I clipped the corners and turned the right sides out.
I whip stitched around the top of the sleeve head to stop the lining pulling to the outside over time as a bit of pressure is put on the sleeve head from the lacing.
I turned the hem under at the wrist and secured it with tiny stab stitches.
Then I folded the lining hem under and hand sewed it in place.
Finally, I added five eyelet holes at the top of each sleeve so it can be tied into place.
The finished sleeves. I am pleased with how these turned out. I only *just* had enough fabric to get sleeves out of the skirt. The gilt thread in the motif makes the sleeves look quite opulent. I don't expect that they will be the most durable sleeves ever, but they sure are pretty.


Saturday, February 19, 2022

Beading a Necklace

I have had a few health issues over the holiday break and have not been as productive as I would have liked. I have been working on very small and unexciting projects like mending.

One thing that I did get finished was the stringing of a pearl necklace. A dear friend made me a lovely pendant for my birthday, and I was very keen to wear it so I strung it up on tigertail wire straight away. Only to realise that I didn't have any silver crimps and needed to order more. Well, they finally arrived and so I could finish the necklace. 


Wednesday, February 9, 2022

Mending and Adjustments

 Hello friends! I hope this new year is finding you safe and well. 

I haven't posted in a while because my illness(es) flared up over Christmas and I have had a hard time getting back to normal. I have not been doing much of craft-related interest except for mending and alterations, and working on the Perpetual Pile of Sleeves. 

As you would probably know by know, I loathe a sewing do-over, and that is exactly what mending (and associated activities) feels like, so it is very easy to put the chore off and do more exciting projects. So I have been working to whittle down the list of things waiting to be fixed or adjusted - with varying degrees of success. It does seem like a Magic Pudding type situation, but I am plodding along.

Adjusting a slip

(For those of you who are not familiar, The Magic Pudding is an Australian children's book about - you guessed it - a magic pudding that you cut a piece from and it magically restores itself. Apparently much like my sewing to-do pile.)

The characters from The Magic Pudding. (Image from: https://www.sl.nsw.gov.au/exhibitions/magic-pudding-celebrating-100-years)

The Perpetual Pile of Sleeves is starting to look more manageable, as I have just kept at it; a little bit every day. 

Predictably, I have left all the eyelets til the end.


Friday, December 31, 2021

Happy New Year!

Thank you for all your support over the last year. Here's to a more precedented and uneventful, less challenging year in 2022. Stay safe everyone!


Wednesday, December 29, 2021

Trading Card - Pink Luttrell Dragon

 Here is another scribal trading card I painted earlier in the year. The painting is done on a commercially produced card with Winsor and Newton gouache. 


The dragon/monster is from the Luttrell Psalter - https://www.bl.uk/onlinegallery/ttp/luttrell/accessible/introduction.html


Thursday, December 23, 2021

Stay safe over the Holidays

Thank you all for following my blog this year. Stay safe over the Christmas period and I hope that you get time to spend on things that you enjoy.


Friday, December 10, 2021

Tie-On Sleeves of Red and Gold WIP

I am still trying to work through my UnFinished Object pile. I pulled these sleeves out this week; they have been unfinished since 2019 and I had completely forgotten about them! What a nice surprise to find them when I was looking for interfacing for a  mundane sewing project. The fabric is lovely and vibrant (the photo doesn't really do them justice).


The sleeves have been cut out and edged and have the cotton lining with them. They just need to be hand finished, hemmed and have eyelets put in to be wearable, so that is my next project to work on.

Monday, November 29, 2021

Experimenting with Needlelace Tassels

I made these tassels for a friend's event some months back. I have wanted to try to recreate the style of woven tassel heads I have seen in some extant Elizabethan pieces, and this was my first experiment.

  The tassels are created in by winding threads over the hands, as seen in this picture tutorial: : http://broidermebethan.blogspot.com/2017/05/a-century-challenge-simple-tassels.html

The tassels were made out of crochet cotton because I wanted a fairly robust tassel. Silk would look very nice, I think.

Once the tassels were made up, I took a length of crochet cotton and anchored it with a big knot inside the head of the tassel, bringing the thread up near the centre of the tassel head. I then worked a detached buttonhole stitch around and around the tassel head, anchoring it to itself with a discreet knot when I reached the bottom. I then hid the tail of the thread back inside the body of the tassel before trimming the length.

The final part of the exercise was to add the rings of blue and white buttonhole stitch around the base of the tassel head. 

I'm really pleased with how these turned out. I would like to experiment a bit more with this style of tassel and examine images of extant ones. I think I remember seeing tassel making in Jacqui Carey's Sweet Bag book, but, as is always the way, I did not have a copy to hand when I needed it, so I had to work from  vague memories and imagination.


A selection of sixteenth and seventeenth century French tassels from the Met Museum metmuseum.org

 via Pinterest https://www.pinterest.com.au/pin/292945150746851405/


Friday, November 26, 2021

Partlet Embroidered with Acorns

This Italian style partlet is a piece that I finished in September. The design is adapted from a sixteenth century modelbuch pattern (which I will post later).

The embroidery is worked in split and double running stitches on a linen base fabric and the thread used was Madeira silk.

The partlet has machine sewn French seams on the side and shoulder seam, with all other stitching done by hand. The lace is commercially produced gilt lace.

The partlet style has closed side seams for ease of dressing without help and to ensure it sits flat under the bodice. An alternative and common style of partlet in period had ties at the side, as seen in this image:

Women on a Terrace Fresco by Alessandro Allori
Image from: http://www.museumsinflorence.com/musei/Pitti_apartments.html


This is the style of sixteenth century Italian partlet that my piece is based on:

Portrait of a Woman  by an Anonymous Painter circa 1550

from: http://starlightmasquerade.com/PortraitGallery/Ladder-Laced-Venetian/inspiration-pages/openbodice23.htm

Friday, November 19, 2021

Roman Tunica 2016

Here is a post that has been waiting to be posted for *three years* because somehow I missed it.
Also, I don't particularly like the way this tunica looks on me, so I don't wear it often and only reach for it when it is really hot.

We have some very hot days here in South Australia, and a collegium class presented by my talented friend Mistress Ursula von Memingen back in 2016 inspired me to sew a Roman style tunica.

I decided on the style which is billowed out over the bust above a belt. Basically, the style is two rectangles, which when hemmed, are sewn into a cylinder which is long enough to allow for the top part to be pulled out loosely and for the arms to fit in.

This pattern layout gives the basic idea, although my measurements would be different
Image from: https://www.pinterest.com.au/pin/273171533621522685/

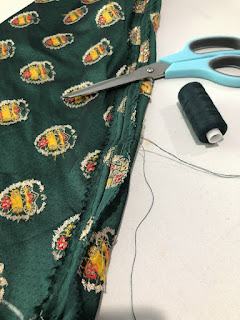
I had some light blue linen, which I hand sewed. The edges of the fabric all have a thin edge turned over and hand sewed down. I  tried on the cylinder on to gauge where the neck edge should be and where the arm holes should end. I used safety pins to mark the spot on each side of the neck where the join should start and where the armhole should finish. I then extended my arms so that I could mark the spots where I would gather the top of arm seam to form decorative little bobbles.

The next step was to take off the rectangles and sew them up by hand with a whip stitch, leaving holes for the arms. I didn't sew the top or arm/neck edge because the bobbles would hold this seam together. I did put a few anchoring stitches in first though, for extra strength.


A small hem doubles over twice.

The little bobbles are basically just small puffs of the fabric with thread wrapped around them to form a base or a shank. Use pins or safety pins to mark and check the position before you sew, and make sure both sides have the bobbles in the same place. You could alternatively use decorative buttons, or pins/fibulae.

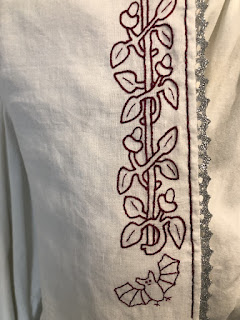
I bought some geometric trim to decorate the tunica, but I decided not to in the end. (I like it plain.)
Fresco Detail: The Dressing a Priestess or Bride,  Excavated in the palaestra of the Forum Baths at Herculaneum, 79 CE Image from: http://jeannepompadour.tumblr.com/post/66774756105/dressing-a-priestess-or-bridefound-in-the via Pinterest https://www.pinterest.com.au/pin/487585097132476822/


Me in the completed tunica and matching jewellery. I don't wear it much because I don't feel that it flatters my body type. A softer linen might have been more flattering and drape better.

Further reading on Roman Fashion: Croom, Alexandra 2010. Roman Clothing and Fashion ISBN: 9781848689770

Tuesday, November 16, 2021

Plodding along with UnFinished Objects

Lately, I have challenged myself to not forget the UnFinished Objects pile. Most of the UFOs are there because they involve tasks that I don't like (such as eyelets,) or because I am not excited or enthusiastic about them. So it is actually more of a challenge than it sounds. (Let's face it, many of us would rather tap into the excitement of new research and a new project than tackle the old, boring tasks.)

This week I have been working through internal sleeve treatments on this pile of sleeves. Some need to be felled, some just tacked open and flat. Nothing  too stressful, and easily done in front of the telly.

Monday, November 8, 2021

Tokens for a Challenge

Another little project got ticked off the list last week. I had been running an embroidery challenge in my local group following an introductory embroidery class I ran at a College event. The theme of the Challenge was 'Something New'. Participants could display their embroidered work, whether it was a new item, something in a new embroidery or stitch style, etc. They were encouraged to display their work at an event, and I made little tokens as a memento of the Challenge.

I have made tokens like this for all the embroidery challenges that I have run (in different colours), so several members of the group have quite a collection.

Friday, November 5, 2021

Sixteenth Century Style Woven Bead Buttons

A job that has been on the back-burner for many months is finishing off some late period woven buttons. The main part of the buttons were done, I just needed to add the decorative flossing and make the buttonhole bar 'shank' to go across the bottom of the buttons. (Some people prefer to omit the bar and use the long tail of thread that is left at the end to sew the button on, but I prefer a buttonhole bar as the button will be easier to remove if the buttons get re-used or if the garment needs a good soak.)

You can see the leftover thread 'tail' on the button on the right.
All the half-finished ones finished and ready to be part of an A&S display that I am organising for an upcoming SCA event.
Here is a link to a previous post that I made which shows how I make these buttons:
https://broidermebethan.blogspot.com/2014/01/woven-button-tutorial-back-stitched.html

I've used a range of thread types and a range of sizes of wooden and plastic bead bases.  A sturdy needle with a large eye really helps (it doesn't have to be sharp- a blunt tapestry needle is ideal). I have also found that a narrow circular rod file is very helpful in smoothing the edges inside the hole of some of the wooden beads, as rough wood will shred or weaken your thread.