Showing posts with label woven buttons. Show all posts

Friday, November 5, 2021

Sixteenth Century Style Woven Bead Buttons

A job that has been on the back-burner for many months is finishing off some late period woven buttons. The main part of the buttons were done, I just needed to add the decorative flossing and make the buttonhole bar 'shank' to go across the bottom of the buttons. (Some people prefer to omit the bar and use the long tail of thread that is left at the end to sew the button on, but I prefer a buttonhole bar as the button will be easier to remove if the buttons get re-used or if the garment needs a good soak.)

You can see the leftover thread 'tail' on the button on the right.
All the half-finished ones finished and ready to be part of an A&S display that I am organising for an upcoming SCA event.
Here is a link to a previous post that I made which shows how I make these buttons:
https://broidermebethan.blogspot.com/2014/01/woven-button-tutorial-back-stitched.html

I've used a range of thread types and a range of sizes of wooden and plastic bead bases.  A sturdy needle with a large eye really helps (it doesn't have to be sharp- a blunt tapestry needle is ideal). I have also found that a narrow circular rod file is very helpful in smoothing the edges inside the hole of some of the wooden beads, as rough wood will shred or weaken your thread.

Wednesday, January 20, 2021

Woven, wooden- base buttons

 December and January have been very busy. A small, portable project that I was working on in December was making some bound buttons (as per my photo tutorial here:  https://broidermebethan.blogspot.com/2014/01/woven-button-tutorial-back-stitched.html  ). I haven't put the final decorative decoration on; I will do them all at once.

It has been quite some time since I made this sort of button, and it took me a while to get back into the swing of it and get my speed up. A sturdy needle with a large eye really helps. I am using crochet cotton for these buttons. I've found that mercerised crochet cotton is the easiest to use if you can get it. I'd also like to try silk thread.


Monday, March 3, 2014

New Manizza/Muff


Muffs known as Manizzas in Italy and Snoskyns in England, were a handy way of keeping hands warm as well as a status symbol and sign of conspicuous consumption in the sixteenth century. The fur pelts, fine fabrics and craftsmanship all reflected that the wearer was someone who could afford luxury and was aware of fashion

Queen Elizabeth I had several muffs (also called countenances) and there is a record of Amyas Paulet purchasing a muff on her behalf in Paris in 1579 (Queen Elizabeth's Wardrobe Unlocked by Janet Arnold, p. 97). Ladies posed with manizzas or zibellini ('flea furs') are common in both Italian and English portraiture from the sixteenth century. Some of the portraits that I found inspiring can be seen on my earlier blog post about my earlier attempt at making a manizza or muff: http://broidermebethan.blogspot.com.au/2012/06/new-manizza-or-snoskyn.html

In January and February 2014, I was part of the Italian Renaissance Costuming Min-Challenge - "Fabulously Fashionable Fur (http://realmofvenus.renaissanceitaly.net/challenges/IRCMC-Jan2014.htm).
The weather here in South Australia was the hottest in recorded history, so it was not a good time to be sweating and working with fur. The competition's organiser Lady Bella graciously extended the challenge to allow for the weather. As usual, I went into the challenge with high hopes and huge plans. The more portraits I looked at, the more I wanted to make. I started with a muff because I had a small rabbit pelt that a friend had given me after finishing a pair of fur lined sleeves. (I do not support the fur industry in any way, but I do believe that if an animal is killed humanely for food then we should do our best not to waste anything. I have no issue with re-using or recycling vintage furs or the skins of animals slaughtered for food.)


All the materials that I used, I had in stash or had purchased for other projects. I made this muff quite small because the last muff that I made was quite a bit larger and can be a bit heavy and unwieldy. Also, I saw a gentlewoman at an SCA event last year with a small one hanging from her girdle, and I thought it looked very elegant.

My first step was to assemble materials and then make a rectangular paper pattern that would fit my hands and accommodate the pelt that I had.


The upholstery fabric that I had was a nice pattern but prone to thread separation. This would make it tricky to sew later on.

I am not a keen sewer, so my favourite part of any sewing process (apart from wearing the resulting pretty item!) is playing with trim and fabric options and dreaming of possibilities.


After trimming my fabric and pelt to size, I edged the fabric, pinned the fabric (wrong side out) and pelt (skin side out) together and sewed around the edges, leaving a small area unsewn for turning.


Once the pelt and fabric were sewn together, I had the tricky task of turning the 'bag' right side out.

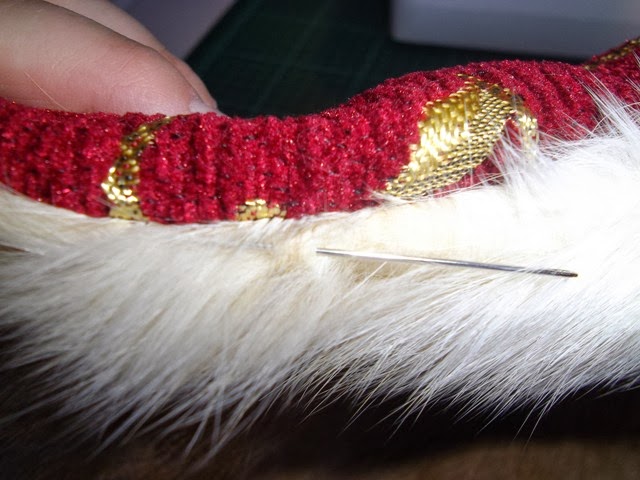
Once the manizza or muff was the right side out, I made sure that all the seams were pushed out and the hair pulled out of the seams before sewing on some maroon satin ribbon.


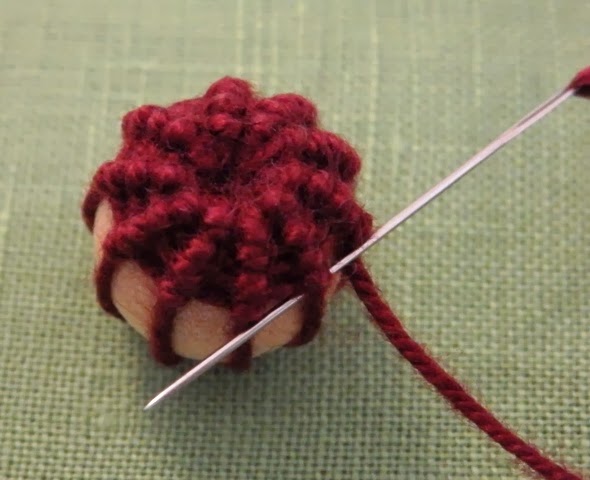
The next thing I decided to work on was the woven buttons. You can see the tutorial on how I did it here: http://broidermebethan.blogspot.com.au/2014/01/woven-button-tutorial-back-stitched.html
I added loops of gold DMC floss to the completed buttons and a decorative little knotted lump in the middle at the top. Next time I will use a bead, because I was not very happy with how this element worked out.
I made five of these buttons and stitched them to one side of the manizza.


I liked the way the ribbon looked by itself, but wanted to try out some trims. The plain gold upholstery trim was too much, but I had a small amount of maroon and gold trim that was purchased for the edge of a French hood. It looked pretty good on the ribbon, so I sewed it down in the centre of the satin ribbon.


I had some lovely little gold accents that I bought for a Tudor bodice from http://dragonsbloodcreations.com.au/
I thought that they looked nice, and would be a good way of hiding the join in the trim.


The last task was to make buttonhole loops for the button closures and to make an anchor point to hook my girdle chain to. I made a couple of loops of crochet cotton and then button hole stitched all around them before anchoring the thread and knotting off. This was a tedious task because the hairs from the fur kept getting stuck in the loops and pulling through with the thread. Also the fabric was quite loosely woven, so I had to be careful how hard I pulled the thread. Next time I will try lucet cord loops sewn into the seams because I found that the crochet cotton stretched quite a bit.


Once the loops were finished, I joined some lobster clasps and a key chain ring to a length of chain so I can hang the manizza from my girdle.


Although I didn't get all the other items that I had planned done (as usual!) I am satisfied with what I achieved in the challenge. I have a pretty accessory and I plan to make another for a friend at some later date.


I found these pages after I had finished my manizza, when I was looking for supporting pictures. I would recommend them to readers:
https://thepragmaticcostumer.wordpress.com/tag/album-amicorum/
http://webspace.webring.com/people/lo/oonaghsown/curves/muff_in_sixteenth_century_dress.htm
http://jeannedepompadour.blogspot.com.au/2012_03_01_archive.html
The ‘Portrait of Anna Radziwell’ 1583 shows what looks like a fur capelet. Hmmmm…. Ideas for the future!


Here is the link to see what the other entrants in the challenge have created:
http://realmofvenus.renaissanceitaly.net/challenges/IRCMC-Jan2014-Results.htm

Many thanks to Lady Bella  of Realm of Venus (http://realmofvenus.renaissanceitaly.net/) for organising this fun challenge.


Thursday, January 2, 2014

Woven button tutorial - back-stitched buttons


As you may have seen in my last post, I have been making woven buttons recently. This time I actually remembered to take photos of the process so that people could learn this excellent technique from the photos. I will always be grateful to Lady Ysmay de la Mor who taught me this technique many years ago at a collegium.

First, start with a wooden bead of the size you want your button to be. Some beads are very rough inside the hole and this can snag and break your thread, so I have a bead reamer or circular fine file on hand to smooth rough edges.

Cut off a long piece of thread. I usually use crochet cotton because it covers well, is durable and comes in a range of colours, but I have also used embroidery silk and embroidery cotton floss. For a small button, I usually cut off about a metre and a half of thread. This is usually way too much and gets lots of snags, but leaves me with no worries that I will run out of thread part way through and leaves lots of thread left over to do a buttonhole loop at the bottom.

Find a medium size needle. Too big is unwieldy and too small will stop you threading the eye with crochet cotton. I like tapestry needles and crewel needles. Tapestry needles are good; because they are blunt there is less chance that you will accidentally go through a thread spoke rather than under it as you weave. Thread your needle with your thread and take the thread through the bead. Tie it off around the bead, making a 'spoke'. Don't tie it off ridiculously tightly, remember that you need to be able to put your threaded needle under the spoke. Gently pull the end of the thread and wiggle the knot inside the hole in the bead where it won't be seen.


Once you have knotted off your thread, wiggle the knot down inside the bead where it won't be seen


Make at least another five 'spokes' evenly around the bead. You don't need to tie these off. I like to work eight or ten spokes for a small bead but have done more. Some people work clockwise or anticlockwise, it is a personal choice.

Making the spokes. You can have an odd or even number.

I personally like ten spokes for this size bead. Try and get them fairly evenly spread out around the bead.


Take the thread up through the centre of the bead and work a stitch from the very edge of the hole to the next spoke. Take the thread under the spoke, over the top, and back under. This is the back-stitch. It accentuates the spines or spokes, giving a decorative raised effect. (If we used an over-stitch here, the button would have flat sides.)


Make sure that you weave under the spoke threads and be careful not to pierce them with the needle


Keep repeating the process over and over, all the way around. Make sure that you keep the tension fairly even and ensure that the threads are laying nice and flat and covering well to ensure no gaps show through. If you do this, you should be able to cover a white bead with dark thread and not worry about any white showing through.

At the beginning, it looks like a lumpy mess. Have faith; the spines will become more apparent as you work down the bead.


The raised effect over the spines is starting to be very visible


As I weave my thread through, I keep a finger or two looped through the long part to stop it twisting up. This is mainly because I use such a long thread and the crochet cotton really wants to snag after it has been woven around a few times. I tried beeswax to make it behave, but then the thread didn't sit as nicely or cover as well, so now I just keep a finger in the loop to reduce snags.


More than three quarters complete!


All the weaving is complete 

After some time, your bead will be covered. If you want to add decorations, now is the time. You can thread a small bead onto the thread and anchor it in the centre of the hole in the wooden bead or add a knot in the centre, add decorative over-spokes in another colour, or (my personal favourite!) add a fluffy tassel or pom-pom in the centre hole of the wooden bead in the Elizabethan style.

A woven button with a bead added on the top


An Elizabethan style button with a very short pom-pom or tassel decoration on top


When the bead is fully covered, I usually take the thread back down through the centre of the bead to the bottom. I turn the bead over and secure my thread through one of the now fully covered and raised spokes. Then I take the thread directly across to the other side of the hole (making a small loop) and secure the thread there. Then I take it back to the original stitch and secure it there again. This is the base of the shank (or loop) to sew it down. (Some people I know use the left over thread end to sew the button on, but I really like to a button-hole loop so that I can cut the buttons off easily for laundering. I just use normal sewing thread and sew the buttonhole shank onto the garment.)

Two loops across the hole which are secured and will be stitched over with buttonhole stitch to make the shank 


Don't make the shank base too tight. It needs to have a little but of give- you will be buttonhole-stitching across it to make the shank. When you have done this, secure your thread, knot off and take your thread through to a place on the shank where it is not obvious, and cut off the leftover thread. Then sit back and enjoy your handiwork!

Working the shank


Working the buttonhole bar or shank at the bottom of the button

The buttonhole stitched shank almost finished


The finished button showing the buttonhole bar or shank to stitch it on to clothing with


Two completed buttons

Tuesday, December 24, 2013

Button Making


One of my holiday/New Year projects is to get a whole lot of woven buttons made.
1 down, LOTS to go....


Thursday, April 26, 2012

The brain-bending big button experiment

Apologies for taking so long to post. I still haven't decided on garb for my upcoming event, but I have decided that I need a new overgown this year, so that may be what I end up wearing over one of my existing gowns. I have some lovely purple linen that I got for $4 a metre, and I plan to trim with white to echo my device colours.

I also decided that I would like another muff. I have a lovely one made by a friend, but when I was cleaning up I found a small piece of fabric that I bought years ago specifically to be made into a muff. The fabric is a browny-grey colour with a black pattern. I bought some very large wooden buttons and decided to experiment with doing a huge version of a covered button.

The big bead being covered
The beads are approximately 3cm across and are stained brown. I  measured out approximately 4.5 metres of black crochet cotton to cover the bead. I reamed out the centre hole with a bead reamer to remove any burrs or splinters that might abrade the thread. Then I started to create the 'spider-web' base. A normal small button takes me between 45 minutes and an hour to cover- I am very slow and like a thickly woven button. The picture above shows the big button after a couple of hours! Keeping all that crochet thread from tangling as I wove it through was really tough and made my brain hurt!

The muff I had planned would need five big button closures. It didn't take much calculating for me to realise that I currently do not have the time or patience to spend so much time on a non-essential project such as this! I do plan to complete the muff, but will focus on my event garb first, and will probably use smaller un-covered buttons as closures.