Showing posts with label 1500s Italian fashion. Show all posts

Friday, March 31, 2023

Italian Style Green Gown for a Young Woman

I have been occupied for the last few weeks with a project for a friend. 

Lochac's big SCA event 'Rowany Festival' is coming up, and a young friend wanted to learn how to make an Italian style dress and make a new one in time for Festival. It was a great opportunity to pass on skills, but (as so often happens) there wasn't enough time to get much done during our designated time together. I have been working on the outfit when my health allows, and I can finally see the light at the end of the proverbial tunnel.

The dress is made from a hard wearing and washable cotton drill and lined in drill and calico. The light boning is removable as the wearer is still adjusting to boned garments. There is a pleat at the hem to allow for growth. Three seams are machine sewn, with all other sewing, including seam felling, being done by hand. The dress has commercially made trim applied. The pattern is based on an existing 16thC style dress that is comfortable for the wearer.


Some excellent images of 16th century working class dress can be found here:

Italy: Working Class Dress (1575-1600) - Sophie Stitches (weebly.com)

including this detail from the Nativity of Mary by Pietro Ronzelli which is in the style of the recipient's wardrobe-


Friday, November 1, 2013

Here is a picture of the completed corset-less tourney dress (minus the sleeves.)

(The sun was in my eyes!)
 
The dress is super-comfortable, but needs to be a little tighter in the bodice. The sleeves are complete, so I will post pictures of those with the dress soon.

Thursday, October 17, 2013

Purple Tourney Dress


I needed a new tourney dress, and wanted one that I could wear without a corset. (My health problems mean that often I can't wear very restrictive garments like a corset, and sometimes one just needs to be able to do more than a corset allows.) I decided that a short-waisted Italian style like those popular around 1500 would be ideal.

Die Verlobung English Title - The Betrothal
'The Betrothal' by an Unknown Artist c. 1490
from: http://www.oceansbridge.com/oil-paintings/product/93934/dieverlobungenglishtitlethebetrothal

Carpaccio Meeting of the Betrothed Couple and the Departure
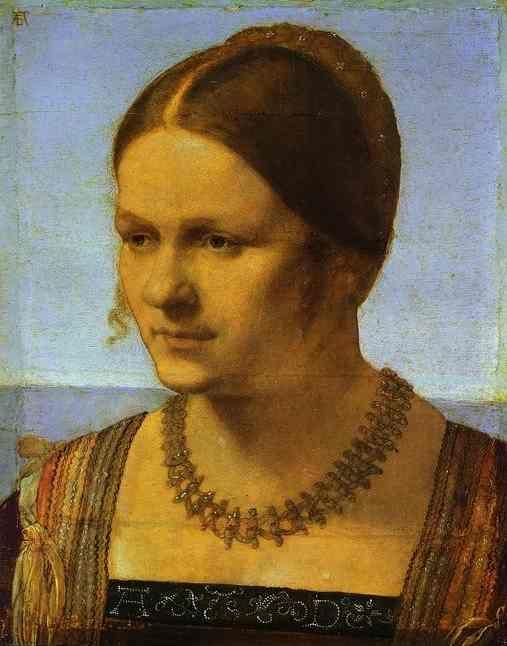
'The meeting of the betrothed couple' by Carpaccio c. 1495
from: http://www.oceansbridge.com/oil-paintings/product/54796/carpacciomeetingofthebetrothedcoupleandthedeparture


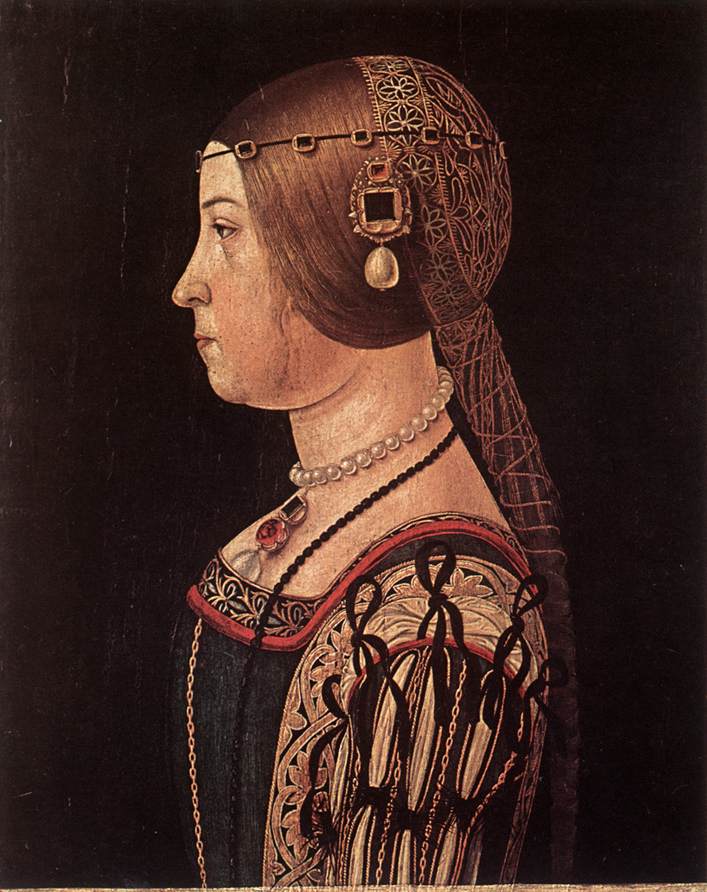
'Portrait of a Venetian Lady' in the style of Albrecht Durer
from: http://www.artnet.com/magazineus/features/jeromack/velazquez-rediscovered12-16-09_detail.asp?picnum=8


Detail of "The Legend of St Ursula' by Carpaccio, 1495-1500
from: http://tomclarkblog.blogspot.com.au/2013/01/john-ruskin-on-carpaccios-dream-of-st.html


Drawing of a Venetian Lady by Albrecht Durer 1495
from: http://www.uvm.edu/~hag/sca/16thital/durer-vene1495-1.jpg


I had some purple drill that would be ideal for the project. I adapted one of my existing Italian patterns, reducing the length and making it front-lacing for ease of dressing. I usually wear a pair of boned bodies under my gowns, but for this one I decided to bone the gown bodice itself.


I used a cotton canvas interlining and a new type of plastic heavy duty boning that I have not tried before. I machined casings in the interlining fabric and used fourteen plastic bones. The top edge was machine stitched, but I did the rest by hand.


I added a black feature panel at the front of the gown and edged it with black bias tape and hand dyed brown ric rac braid. I did a running stitch along the bias in a matching brown embroidery floss, and added detached button hole stitch ovals between the peaks of the ric rac braid. (I opted not to use the additional purple braid shown in the picture above.)


The skirt was pleated on and secured with a line of machine stitching for extra strength (as I have a habit of stepping on my skirts when carrying tourney furniture to the car.) I tacked the bodice together before hanging the gown up for the hem to drop. After it had hung for a few weeks, I secured the bottom edge of the bodice with hand stitching.

The next step was to add eyelets for lacing and lucet some cord to lace with. I added some hooks and eyes and a modesty placket. I finished the embroidery on the skirt trim and whip stitched the front edge closed. 


The skirt has a much smaller hem than usual. I will probably add a hem guard in the future for extra durability. I am also working on a set of tie-on sleeves.

The gown is very comfortable and easy to move in. I will post photos when it is totally finished.


Sunday, February 10, 2013

Portrait by Catena


Today I was excited to find this portrait (which I had never seen before) of a very high waisted Italian gown. The 'Portrait of a Young Woman' is by Catena (Vincenzo di Biagio) circa 1505.


from: http://theredlist.fr/wiki-2-351-861-414-398-426-view-cinquecento-profile-catena-vincenzo-di-biagio.html


Tuesday, October 2, 2012

Blue dress update

Not much has been happening on any of my projects due to being away and also health problems. The sleeves are a little closer to completion, but not much!


Saturday, September 22, 2012

Blue dress update

The blue dress is getting very close to completion. I have been playing with different sizes and colours of pearls to see how they will look along the front edge of the bodice, and working on the sleeves.


Testing how pearls will look along the front edge of the bodice.


Thursday, September 20, 2012

Blue dress update

Today I have some hand sewing to do on the sleeves that match the blue dress. I made some more bias binding which needs to be hand stitched into place.

The tie-on sleeve and lining waiting to be sewn

The sleeves will be tie-on and have gaps where the chemise will puff out. I have saved some blue fabric to do 'fancy' sleeves later.

I also bought some toupe clips to sew into my Juliet cap to help hold it in place.

Wednesday, September 19, 2012

Blue dress update


I managed to blunder my way through my first attempt at knife pleating, and I am quite happy with how it turned out. The knife pleats sit much more smoothly than cartridge pleats, and I am now a fan of knife pleating. I had forgotten how much sewing down pleats hurts the fingertips- no difference there between knife and cartridge pleats!


The knife pleats sewn in


I also finished the lacing holes. I am playing with different ways of lacing - here is X lacing. The ladder lacing also looks nice.


I now need to add some hooks and eyes in the gap in the skirt. I am considering adding a modesty placket as well. I will hang the dress for a few more days, then hem it.


I am also pleased to say that the dress fits. I made it a bit looser than I normally make my gowns, mainly because I normally wear a corset which smooths out the lumps and bumps. I won't be wearing a corset with this one, so I think the world doesn't need to see my back fat!

Saturday, September 15, 2012

Juliet cap

Over the last week or so, I have been working on a Juliet cap. It sits on the back of my head and is secured with clips. It is made of a mystery jacquard sample I had in my stash, lined with broadcloth, and edged with gold and cream cord. It is trimmed with pearls and gold braid.


The cap with trim and pearls added


With a jewel and hanging bead added at centre front.


Below are some images that inspired my design -


Portrait of a Young Woman by Neroccio de Landi (1490)  from terminartors.com 

Portrait of Barbara Pallvicino by Alessandro Araldi c. 1510 from en.wikipedia.org


1490 by Unknown Veronese artist from  oceansbridge.com 

Carpaccio's Meeting of the Betrothed Couple (detail)  1495  from   realmofvenus.renaissanceitaly.net 


Albrecht Durer's Portrait of a Woman c.1506


Friday, September 7, 2012

Blue dress update

I worked on the gold bias binding last night but have had a few hiccups with the joins being too thick. I think I have enough in one strip to trim the bodice, but will have to try again for a longer piece for sleeve trimming.

Thursday, September 6, 2012

Blue dress update

Here is what I have been up to over the last few days with the blue dress...


Overstitching the edges for extra strength. There is a layer of 'fashion fabric' (cotton), an interlining of strong calico and a lining of cotton duck.


The layers of the bodice tacked and  ready to be pinned and hand stitched together.


A completed edge showing stab and whip stitching.


Preparing to mark out the gold broadcloth to make bias trim (with my furry helper!)

The skirt panels are cut and waiting to be sewn. I still need to decide on what style of pleating; I am thinking knife pleats.