Sunday, April 5, 2015

More Roman Earrings


Over the last month or two, I have been making some more Roman earrings with a view to possibly selling some in the future.


Saturday, April 4, 2015

Making an Italian Chemise

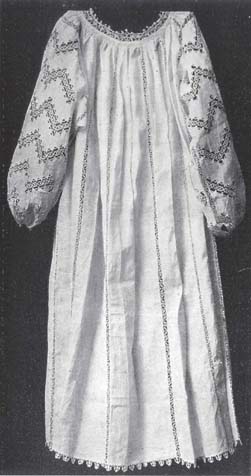
As part of the Italian Renaissance Costuming Challenge 5, I decided to make an Italian chemise (plus, I need some new ones.) I have always been hesitant to make chemises the 'period' way because I am terrible with underarm gussets and find them difficult to get my head around. I have been to a chemise making workshop before, but never actually constructed one. Previously I have used a commercial pattern with a scoop neck and inset sleeves for chemises like the type pictured below.


Image from: www.pinterest.com

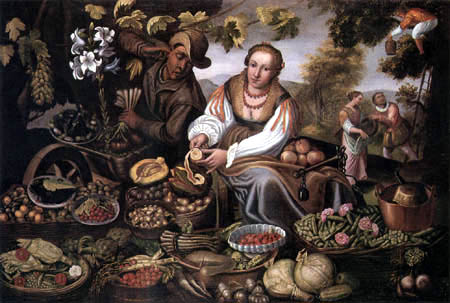
Extant chemises suggest that piecing together of square and rectangular panels was a popular method of construction. This makes sense, given that it is an economical way of using valuable fabric, and makes good use of the fabric selvages.

Chemise linen Italian chemise with a reticella, middle 16th century, Old Italian Lace; Ricci.
Mid-Sixteenth Century Chemise
Image from: http://www.kostym.cz/Anglicky/1_Originaly/02_Renesancni/I_02_07.htm


Linen smock with silk and metal thread embroidery. Italian, late 16th century. Held at the Metropolitan Museum of Art. #embroidery, #smock, #renaissance.
Late Sixteenth Century Italian Chemise
Image from: https://www.pinterest.com/pin/353251164495637334/


Woman's chemise. Italy, century. XVI, second half n.inv. 76.01.16. Museo del Tessuto
Italian Chemise from the second half of the Sixteenth Century
Image from: https://www.pinterest.com/pin/353251164495637214/


I raided my stash and found several pieces of cotton that I could use to make the chemise. The front and back pieces were large rectangles, and the two sleeve pieces were smaller rectangles.
To try and make the gussets easier, I made the underarm square larger and then cut it in the middle to make two triangles. This worked quite well but made an extra seam under the arm. I used a zigzag stitch to edge all the raw panels first to reduce fraying.The side seams on the body pieces were on the selvage anyway, so didn't need edging.
The underarm gusset


I sewed the panels together in this way:
Image fromhttp://www.festiveattyre.com/p/how-to-make-easy-italian-chemise.html
although I did make the back neckline higher than the front because I am terribly prone to sun damage due to my medication.

 I was hoping that I could finish the seams inside so that it would all be neat and tidy. Unfortunately, that was harder than it sounded. It is not too bad, but I think next time I would finish the edges on all the panels by hand and then whip stitch them together or use an ornamental joining stitch like a faggoting stitch.


I needed to take a little off the bottom to even up the bottom hemline, because I changed the height of the back panel to make it sit higher on my neck. I need to factor that in when I cut the panels for the next chemise.
My furry assistant always 'helps'when I am cutting out fabric


Once the panels were sewn together and tidied up, I ran a running stitch of about 5mm around the neckline to gather it up. I put ties at the front and back for ease of adjustment.

 I tried the chemise on and got someone to help me adjust the ties to get the neckline to sit where I wanted it.


Then I began the process of sewing the gathers into place with bias binding.


I went around and sewed the front of the binding down by hand, then went back and did the back (inside).

Even though I just used a cheap commercial bias binding, I was very pleased with how the neckline turned out.

I planned to make gathered sleeves for this chemise, as I always do. But when I tried the chemise on during the fitting of the neckline, I really liked the way the sleeves looked ungathered. I recently acquired a hemming foot for my sewing machine too, so I decided to play around with it.


It produced a really nice even hem, but it was a little lumpy at the join in the sleeve. I obviously need a lot more practice with it. In the end, I decided to sew the sleeve hem down by hand. 


I was disappointed to find that the fabric had a couple of little holes in it. They looked quite a lot like pinholes. Luckily one lot was on the back panel and the other was low down on the front where no-one would see them.


I darned the holes with sewing thread. If I could do it over, I would use embroidery thread.


I am extremely happy with the result of my first attempt. This style of chemise is much more comfortable than the commercial pattern styles that I have used in the past. It sits better and there is less pulling under the arms when wearing a corset. I will make this style of chemise again, and at some stage I would like to experiment with an Elizabethan style smock and a fully hand sewn Italian chemise.


The finished chemise. Please ignore the bra, jeans and sneakers; I wasn't sure how transparent the cotton would be in the sun!
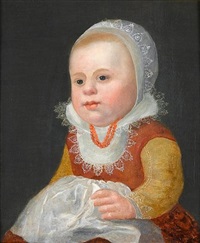

Wednesday, April 1, 2015

Italian Renaissance Costuming Challenge 5

Today is the first day of the Italian Renaissance Costuming Challenge for 2015. I have entered for the last couple of years, although I have never completed a full outfit in the allocated time (mainly due to my health issues.) That doesn't worry me at all. For me, the challenge is about developing my skills, and (hopefully) finishing a couple of items. I really enjoy seeing what the other participants do; it is a fabulous and fun way to learn new things and find new ways of seeing things.

I am at a point with my SCA garb where a lot of things are wearing out. I particularly need some new smocks and chemises, so this will be a priority during the challenge. I have lots of one and two metre pieces of fabric in my stash, so I am going to try and piece a chemise together from them. I also plan to make a new tourney dress and a coat.

More information on the challenge can be found at: http://realmofvenus.renaissanceitaly.net/challenges/IRCC2015/IRCC5-2015-Entrants.htm

Tuesday, March 31, 2015

Lucky red bead necklace

A recurring theme through many sixteenth century Italian Renaissance portraits is a red bead necklace. They are seen on middle/lower class women as well as noble ladies. Red coral was plentiful in Italy at the time, easy to shape, and visually appealing with its lustre and vibrant colour. Coral was used in jewellery for children because it was thought to protect them from danger and malicious influences. It is also seen in women's necklaces and as a horn-shaped charm (still worn by some Italian men to this day) and rosary/Paternoster bead sets. The colour red has traditional and ancient connections to blood and has been used in folk medicine as a healing agent over thousands of years and across many cultures.

Also, red beads look pretty, so I had to make myself a 'lucky' red bead necklace to go with my Italian garb!


The Fruit Seller, Vincenzo Campi. c. 1580
The Fruit Seller by Vincenzo Campi 1580
Image from: https://www.pinterest.com/pin/15340454950252510/

Vincenzo Campi - The fruit vendor
The FruitVendor by Vincenzo Campi
Image from: https://reproarte.com/en/choice-of-topics/category/food-and-drink/fruit/the-fruit-vendor-detail


Ghirlandaio's Portrait of a Girl
Image from: wikipaintings.org


Portrait of a Young Woman by Domenico Ghirlandaio
Image from: http://en.wikipedia.org/wiki/Domenico_Ghirlandaio


Madonna di Senigallia by Piero della Francesca (1470s)
Image fromhttp://upload.wikimedia.org/wikipedia/en/2/24/Madonna_di_Senigallia.jpg


Image from: http://milano.ilquotidianoitaliano.it/il-cibo-nellarte-mostra-brescia/


Contadina Paduana - Unknown Artist
Image from: http://www.starlightmasquerade.com/PortraitGallery/Ladder-Laced-Venetian/inspiration-pages/openbodice74.htm


Portrait of An African Slave Woman by Caracci
Image from: http://upload.wikimedia.org/wikipedia/commons/thumb/9/9e/Annibale_Carracci,_attrib.,_Portrait_of_an_African_Slave_Woman,_ca._1580s._Oil_on_canvas,_60_x_39_x_2_cm_(fragment_of_a_larger_painting.jpg/489px-Annibale_Carracci,_attrib.,_Portrait_of_an_African_Slave_Woman,_ca._1580s._Oil_on_canvas,_60_x_39_x_2_cm_(fragment_of_a_larger_painting.jpg


Portrait of a child - Sofonisba Anguissola
Portrait of a child by Sonofisiba Anguissola
http://www.wikigallery.org/wiki/painting_341196/Sofonisba-Anguissola/Portrait-of-a-child


portrait of a young girl, half-length, in a red dress with a white lace collar and cap by adriaen van der linde
Circle of Adriaen van der Linde
Portrait of a young girl, half-length, in a red dress with a white lace collar and cap
http://www.artnet.com/artists/adriaen-van-der-linde/past-auction-results


Two Sisters and Brother of the Artist
http://it.wikipedia.org/wiki/Sofonisba_Anguissola#mediaviewer/File:Sofonisba_Anguissola_001.jpg


Unknown artist Portrait of a Girl holding a Rose & a Basket of Cherries (1568)
Image fromhttp://bjws.blogspot.com.au/2014/02/17c-children-on-checkerboard-floors.html


http://bjws.blogspot.com.au/2014_02_24_archive.html
1590s Adriaen van der Linde (Dutch artist, 1560-1609) Portrait of a Young Girl, Adriaen van der Linde


http://bjws.blogspot.com.au/2014_02_24_archive.html
 1605 Artist van Zelven (Probably a German artist) Portrait of a Child with a Dog 


1625 Unknown Artist of the Dutch school, Girl with cherries & doll
http://bjws.blogspot.com.au/2014/02/17c-children-on-checkerboard-floors.html


File:Flemish School Portrait of a Young Boy 1625.jpg
Portrait of a Young Boy - Flemish school
http://en.wikipedia.org/wiki/File:Flemish_School_Portrait_of_a_Young_Boy_1625.jpg


CIRCLE OF ADRIAEN VAN DER LINDE (Brugge c.1560 - 1609 Bolsward) Portrait of a Young Girl Aged Two with Dog
http://www.isherwoodfineart.com/index.cfm/item/111-circle-of-adriaen-van-der-linde-brugge-c1560-1609-bolsward-portr/


My beads are not coral (which is protected) but are a ceramic alternative. They are approximately 10mm in diameter and have a high lustre. They are simply strung on tiger tail wire with a small red glass seed bead spacer between them to help to show off the lovely shape of the large beads.


Portrait of Sibilla Kessel, c. 1540, Barthel Bruyn the Elder, Cologne

Portrait of Sibilla Kessel, c. 1540, Barthel Bruyn the Elder, Cologne
https://www.pinterest.com/pin/427701295836430045/


CORNEILLE DE LYON Portrait of Gabrielle de Rochechouart c. 1574 by fionasfancies via Flickr I believe her jewelry is coral beads
cORNEILLE DE LYON Portrait of Gabrielle de Rochechouart c. 1574
https://www.pinterest.com/pin/296252481710557196/


References and Bibliography

* Wikipedia - http://en.wikipedia.org/wiki/Precious_coral
* http://glimmerdream.com/gemjourneys/coral/history
* http://rosaliegilbert.com/necklaces.html
*  This site has a great list of myths and stories about coral: https://enchantedgems.wordpress.com/category/coral/coral-lore/

Monday, March 30, 2015

Wool cloak embroidery


I recently have been involved in a project to decorate some wool cloaks for friends. Another friend made the cloaks up in this lovely brown wool, and I decorated them with simple geometric embroidery, with the designs based on the recipients' heraldic devices.


The left side shows the first stage of embroidery - mid-green crochet cotton. The right side shows the darker green bar being added in stem stitch.


Although it doesn't show up well in the photo, there is a small stitch in light green added to the points of the triangles.


This one has a simple geometric design worked in crochet cotton (stem stitch).


Because the cloaks were unlined, I used bias binding to cover the back of the embroidery.

Sunday, March 29, 2015

Fencing Tabbards

I haven't posted recently because I have been busy helping some friends to learn to sew and make some fencing tabbards. It has been a long but very successful project, with the finished articles looking great and my friends learning some new skills. I can't wait to see them in action on the field!


Thursday, March 5, 2015

Split Stitch Collar Panel Piece

Today I finished a split stitch panel designed for a shirt collar for a friend. It was a very rushed project, so I am not entirely satisfied with the quality of the stitching. The design is adapted from a pattern in a sixteenth century Modelbuch, and is worked is split stitch in DMC cotton floss on cotton-linen base fabric. The embroidery is knotted on the back for extra strength when it is machine washed. I think it will look very nice when made up.