Wednesday, August 21, 2024

Adjusting an old chemise

I had major surgery a few months back and my recovery has been hampered by lingering chest infections so I haven't been able to do any major projects. I've been focused on maintaining a minimum of ten minutes of A&S activity a day.

One thing I did manage to do this week was to shorten an old chemise. I think I made it back in the early 2000s, and I rarely wear it because it is quite heavy fabric. I originally made it almost ankle length, which is a bit unmanageable. Any time I wear it I think 'I must alter this' and then I put it off or forget. 

It was only a very quick job because I hemmed it with the sewing machine, but I am really glad I managed to get this one small thing ticked off the to-do list after so long. Small wins!


The embroidery motif on this chemise is taken from Shorleyker's 'A Scholehouse for the Needle':


Saturday, August 10, 2024

Crayola Washable Marker Experiment

For some years I have been using Frixion heat removable markers to transfer embroidery designs onto light coloured fabric with some success. I have also regularly used them in place of Tailors' Chalk. I've only had a couple of instances where the marker has stained the fabric. But I have heard that very cold temperatures can make the ink come back, and I put an embroidery in the freezer to confirm that it is true. So, I needed to find an alternative marker.

Crayola washable textas were recommended to me, so I purchased a pack and did a test run on a poly cotton blend fabric. All the inks washed out in a cold machine wash, so the next trial will be on linen.

The test panel before washing.

The test panel after a cold machine wash.
 

Sunday, July 21, 2024

Wolf Head Heraldic Device for Baronial Device Banners

You might remember that my Barony has a banner device project where the registered heraldic devices of the populace are recorded in order of registration or moving to the Barony. Well, I've recently been helping some friends by creating their devices for the banner project.
Some of the banners on display in a hall

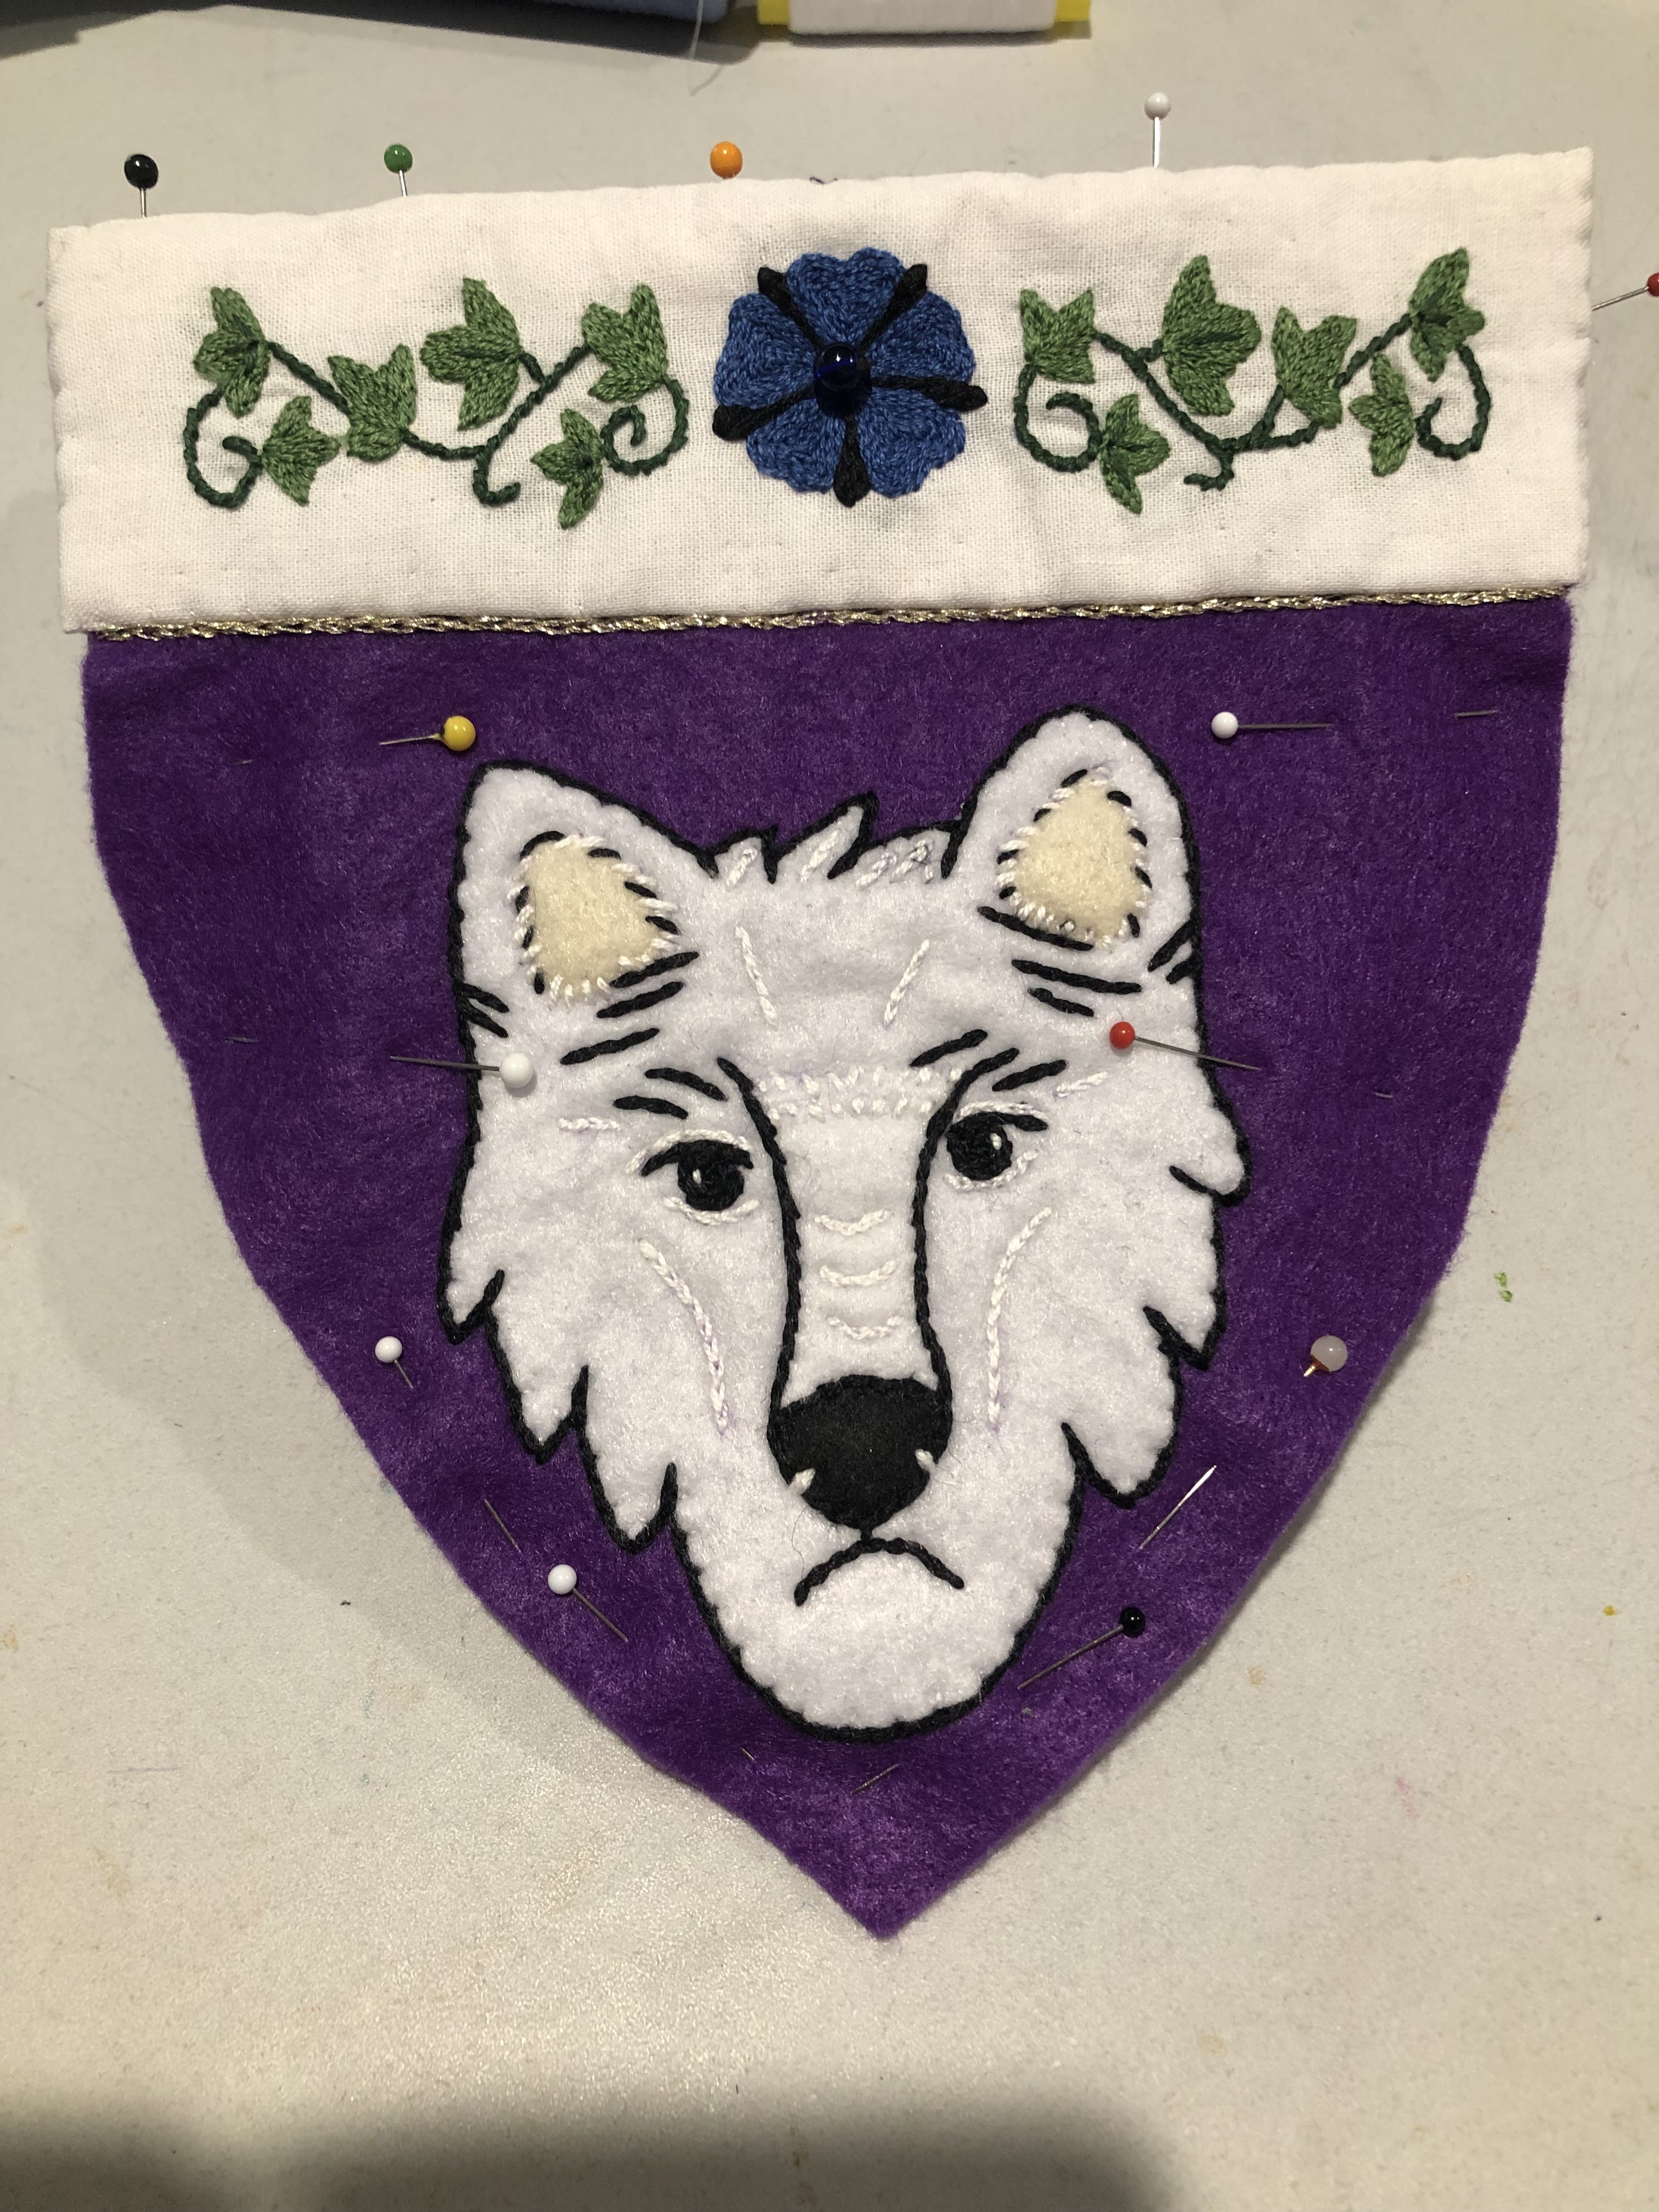
I finished this one recently and I was quite happy with how it turned out. It is blazoned as 'Purpure, a wolf's head cabossed and on a chief argent a rose azure between two ivy vines vert'. (And a big shout out to the people who keep the Lochac Roll of Arms updated and running - it is a fantastic resource for scribes and artisans!)  Kingdom of Lochac Roll of Arms - Home (sca.org)

I embroidered the rose and ivy with DMC cotton floss on a separate piece of white fabric using split and stem stitches after marking the design out with a Frixion marker. After ironing the finished piece, I cut the base fabric down and sewed it to a small piece of white felt which would become the chief part of the shield shape.


The wolf head was cut out of white felt and stitched onto a purple felt base. I added an extra piece of felt for the muzzle part, to add a bit of depth to the piece. The image on the Roll of Arms showed a smiling wolf, but the recipient preferred it drawn looking a little more fierce. 

A piece of black felt was added for the nose, and some cream felt for inside the ears.
Then I started embroidering on details in black and white cotton.
I added a few extra lines to add definition and visual interest.
Finally, I sewed the chief in place and used some gilt embroidery thread to define the purple and white backgrounds. I had a luscious deep blue bead that looked good inside the centre of the flower.
Decorating complete, the very last task was to sew another shield shape in felt to the back to add strength to the piece. (The banners get rolled up when not in use, so a backing layer is a good idea to stop fabric distortion.)
The completed piece is now sewn in it's proper place on the banner and looks good!
 

Monday, July 15, 2024

Lots of Scribal Work

 Scribal work and the creation of some heraldic pieces for other people has been keeping me busy lately.


Sunday, June 30, 2024

Seahorse Embroidered Napkin

I'm still plodding along with unfinished projects, and thankfully I have had less mistakes and muck-ups this week (although the chilly weather is making for slow handwork).

This simple embroidered napkin had been partially embroidered in purple floss, but I never recorded the colour number (a suprising mistake for me; since I know what I am like, and how prone I am to put a project down and come back to it months later). 

I wasn't happy with the stitching anyway, so I unpicked it and started again in this deep red floss.


The piece is worked in a hoop, and I used DMC cotton floss in split and double running stitches. 
I added a running stitch around the border of this thrifted napkin.
The sea-horse design is part of my personal heraldry.

It probably seems like I have oodles of these napkins (and I do have quite a few) but they are extremely handy at tournaments for covering plates of food to keep the flies and wasps away, as well as for wiping hands and covering up my camera and other mundanities.

I plan to add some decorative weights such as beads to the corners of some in the future so that they are more useful as dish covers on windy days (in the same vein as my chalice cover project shown here: Broider Me 'Bethan: March 2018 (broidermebethan.blogspot.com) ).


Sunday, June 23, 2024

Scribal Work

I've been plodding along with scribal assignments lately. I've had a bit of a rough patch where I've been making a lot of mistakes and things just haven't been working out the way they should. Sewing projects needing extra unpicking, spilt paint, dye lots that don't match, projects taking waaaay longer than they should - that sort of thing. I'm nearly at the end of my current batch of scribal assignments, and luckily I seem to be also at the end of the patch of bad crafting luck I've been having also.


Thursday, June 6, 2024

Two New Banners for Baronial Device Banner Project

A relatively recent project that I completed (and forgot to post about) was the creation of two new banners for my Barony's device banner project.

My Barony has a series of banners in Baronial colours that record the registered heraldry of the populace. It is a great chronological record of our members, and the banners are a really striking decoration at events.

Some of the banners at an event in 2017 (I think). There are two junior navy, two red, two white and now two navy banners.

I got involved in this project when I was quite new to the SCA and have made many of the devices over the years for people who did not have the skills or time.

In the last several years I have been responsible for managing the banner project, and we recently ran out of room on banner six. I created two new blank banners using almost ten metres of navy cotton fabric and cotton lining. They were edged in red bias binding. I copied the previous style and previous construction technique of hand sewing the bias on with a combination of running stitch and back stitch. That was quite a lot of hand sewing! I didn't mind it though, because I find hand sewing quite soothing when there isn't a deadline looming.


Sunday, May 5, 2024

Red Underskirt

I recently made a red underskirt as part of my outfit for the Riverhaven Costuming Challenge.


I chose to use cotton broadcloth due to budget constraints; linen or wool (even silk) would have been more appropriate, but much more costly.

I sewed rectangular panels together, leaving a gap at the centre sides open, which I hand hemmed. I also hand felled the side seams.


I added a tiny buttonhole bar at each side seam for extra strength.
Double felled side seams.

I pleated the front and back panels into separate waistbands by hand using cartridge pleats. Once the pleats were sewn in, I released the gathering stitches to allow a more relaxed pleat. I hand hemmed the bottom of the panels, and added decorative twill tape.

I used the same twill tape as ties for the skirt. The front and back ties are tied independently (as seen on petticoats in the Tudor Tailor book) to allow for greater adjustment.


I'm happy with how the garment turned out, but it is a little bit long. When I get time, I will add a kickpleat/hemtuck all the way around to take up some of the excess. I regularly do this with my gowns as it helps to hold the hem out and give the skirt some structure. It also can be seen as on some sixteenth century portraits.

Sunday, April 14, 2024

Cross and Pearl Necklace

I finished another quick project recently; a necklace to go with the outfit that I have been making for the River Haven Clothing Challenge.

I have had the silver and glass pendant for a few years. I strung it on tiger tail wire with small baroque pearls and glass beads harvested from a thrifted necklace. I have trouble with my hands/fingers, so the hook and bar closure is a lot easier for me to put on and off. Silver crimps secure the ends of the wire.


Monday, April 8, 2024

Broderie Anglaise Partlet

I found a broderie anglaise skirt at the Op Shop (Thrift Store) for $2 and thought how pretty it would be as a partlet. I wasn't sure if there would be enough fabric, but I thought that it was worth the risk for $2.

Now, I know that broderie anglaise is a more modern style of embroidered decoration, and that this was made by machine, but I thought it probably wouldn't be too obviously modern if trimmed as a partlet. After all, cutwork and pulled work were done in the sixteenth century. 

I used my trusty collarless partlet pattern and cut the pieces out. As usual, I french seamed the sides and shoulder seams, and hand finished them. I did a narrow zigzag around all the edges, but the cut outs in the embroidery meant that there were shaggy edges even after finishing. I was disheartened, and put the piece aside for (mumble, mumble,) an unspecified amount of time.

Then last year I started working on my WIPs and UFOs again and pulled the partlet out. I decided to use a faux silk (polyester) bias binding to trim the edges. I machined the outer seam and hand sewed everything else.

I liked the way the binding tidied up the edges, but it just looked too shiny in outside light. So I went through my stash looking for some lace that could go over the bias to tone down the shiny and add a bit more to the piece. When I found a suitable cotton lace, I hand sewed it on.

I toyed with the idea of embroidering along the front of the lace with embroidery floss but didn't like the way it looked. It feels like it needs a little something to elevate it a bit, but I'm not sure what. I have some gilt cord, but it is not especially durable and I throw my partlets in the washing machine after wearing. I'll stew on it a bit and see if anything jumps out at me next time I am rummaging through my stash.


Thursday, April 4, 2024

Renaissance Style Hairpiece

We are heading out of summer in Australia at the moment, and SCA events can be uncomfortable in Renaissance garb. I would normally dress my hair and skip the headcovering, but I cut my hair much shorter late last year. It seemed like a good idea to make a decision about what to do with the synthetic hair braid I purchased last year and which has been sitting around in it's packet since.

If my hair was longer, I would put it in a bun and hair tape it. So I decided to try and make a fake bun inspired by these ladies in Vincento Campi's 'Cucina', c. 1580s.

Vincenco Campi-Cucina - Vincenzo Campi - Wikipedia 

To start with, I re-braided the synthetic hair, tying the ends off securely with thread. Then I started to wind the fake hair into a 'wheel'. Using sewing pins to secure didn't work particularly well, so I sewed the hair into itself with brown thread as I went. When all the braid was in the wheel, I went back and sewed it all together, hiding the stitches as much as possible.


Next I wove some purple ribbon through with a blunt needle, which helped to secure the hairpiece even more. 
Finally I sewed in a comb and a couple of wig clips. The hairpiece stayed in my hair fairly securely. I am quite pleased with the result, but won't be wearing it any time soon because my hair is currently a more natural shade, and the synthetic hair does not match at all! (I imagine I will dye it again sooner or later though.) I might spend a bit more to get a more realistic braid next time.


While very satisfying, this project did eliminate my immediate hair woes. I decided on a style I wear mundanely, with hair rolled in front and with two braids pinned up at the back, secured a la The Borgias with a pretty clip. I used some stash velvet ribbon and a costume jewellery pendant. I measured enough ribbon (with hem) to cover a mundane barette. I found the halfway point on the ribbon, marked it with a pin and then centred the pendant on it horizontally, sewing it down with yellow thread. I then hot glued the ribbon hems down and hot glued the whole thing to the barette. Super fast and easy (and not at all period, although it is not inconceivable that this hairstyle could be achieved with the help of maids, hair tape and some pretty hairpins.) I don't like using hot glue (not authentic, it's messy, I'm bad at it, I always burn myself) but it is fast and satisfying. I'm happy with how this hair adventure turned out.


Saturday, March 16, 2024

Embroidery Challenge Tokens

 I have been continuing to work on WIPs and UFOs lately.

This week I managed to get some tokens finished for the most recent Embroidery Challenge participants.

This latest Embroidery Challenge has an open theme. It began late last year and finishes very soon. The aim is to encourage all skill levels of embroiderers to get involved, and hopefully inspire others in the Barony.

The tokens are glass beads and date pendants strung on tigertail wire and secured with a couple of jewellery crimps.

I have also been doing some scroll illumination, but of course, I can't share any of that until the scrolls have been presented.


Monday, February 19, 2024

UFO Pile of Shame and The 100 Day Project Inspiration

I've been spending some time lately trying to prioritise my works in progress (WIPs) and UFOs (UnFinished Objects) so that I can really get some finished this year. I am very good at starting projects- buoyed by the excitement of something new - but lack of energy, lack of time, and often lack of confidence make the project stall. It is amazing how quickly time flies, and suddenly something you put aside 'for a little while' has been sitting around for a year (or more). Covid certainly didn't help with any of that!

In a happy coincidence, I was reading a social media post by the Baroness of Politarchopolis and she mentioned #The100DayProject. #The100DayProject | online art community It is basically on online project to encourage people to be creative and commit to 100 days of creating. Very much the same as #100 Days of A&S which I loved being involved in, and which has set up really good habits of doing at least ten minutes a day on SCA A&S projects (and which I have pretty much continued with). This new project has given me a shot of motivation to spend the next 100 days focusing on UFOs and WIPs. Probably for only a short time every day as I am at a very low spot right now health wise, but every little bit helps.

I won't be posting day-by-day updates on what I have been doing because I think it will take a while to achieve anything as I will be working slowly (and it will be boring to readers). But I hope to at least have some Finished Article victory posts for you soon!

(Please imagine a tidy little pile of nicely folded UFOs here. In reality my UFO/WIP projects would probably take up half a dozen storage tubs and that is downright embarrassing.) I try to console myself with the thought that a lot of them are embroidery which takes a very long time to do.