Saturday, July 9, 2016

Seed Bead Necklace


Portrait of Giovanna Tornabuoni by Ghirlandaio
Image from: https://upload.wikimedia.org/wikipedia/commons/3/3b/Ghirlandaio-Giovanna_Tornabuoni_cropped.jpg


I made a necklace similar to this one with 2mm seed beads. I suspect that this type of necklace (which is seen widely in Italian portraiture of this time) is made from a knotted cord. I decided to make one in this style from beads. Usually I love beading, but this was a troublesome project (mainly due to the size of the beads.)


The completed necklace

Monday, July 4, 2016

Plans for a Quest

I found the Noble Pilgrimage to be so helpful, so beneficial, that I have decided to set myself a personal Quest. I think that I will set the time frame at three or six months, and then review my goals and change focus to keep things fresh and interesting.


Image from: https://medievalchristianityd.wikispaces.com/Roderick+Hulin+-+Pilgrimage

One aspect that I would like to include in the new Quest is learning new skills. There are many things that I have wanted to learn for a very long time, and they always seem to fall by the wayside as more pressing projects come up. Time to change this!

Another thing that I noticed when I was trying to make my recent garb from stash was that I have a terrible habit of starting projects (especially embroidery) and putting them aside and never finishing them. One way to help stay on track with these sort of projects might be to keep lists/notes of what needs to be done and mark down starting dates and progress.

I would also like to highlight a specific area that needs to be focused on. For instance, I need new body linens as mine are all wearing out. Prior to next winter, warmer layers might need to be a focus area. I would also like to have a couple more tourney dresses.

These focus points are in addition to the things that I learned that I need to spend more time on: grace, posture, cutting out mundane and slang speech, using titles, trying harder to talk to people I don't know very well/pointy hats. These tasks will be ongoing, I think.


So, on top of all the other things that need to be done, my Quest goals will be:
* Developing New Habits
* A New Skill
* Unfinished Projects
* Focus Area  - at this time it will be "body linens"
I might add in
* Projects for Others too, because I didn't realise how much time I spend on this until I did the Pilgrimage.

I will initially set the review point at three months, although I think that will probably be too short a time to achieve what I would like to (especially given that I am sick so much in winter and that my hands don't work very well. We'll see!)


Wednesday, June 29, 2016

Noble Pilrgimage - Final Update - June


Image source: https://europeanhistory.boisestate.edu/images/illustrations/pilgrimwoodcut.jpg

The Pilgrimage is close to coming to a close, so it is time to reflect on my journey so far.


Prowess:

* Learn a new skill - basic leather work
I have been using my cutlery bag, and  I have cut out two scroll bags which are waiting to be sewn up.


* Improve my illumination skills - practicing with new designs, painting scroll blanks and developing confidence by "doodling" . Several scrolls illuminated in the last two months, plus some original designs underway. Ongoing online challenge for my local group underway and big plans (with Warden Deputy) to get people excited about scribal work and allow them to experiment and develop their skills in a fun workshop environment. I am really enjoying my scribal work.


* Develop my sewing skills
Have finished two dresses (tourney and Court) during this challenge. Also made a new caul and completed an embroidered chemise worked to someone else's design. Made new sleeves. Feeling a lot more confident about sewing (although I doubt that I will ever love it.) Happy with the two new bodice patterns and sleeve pattern that I have developed. I now feel better equipped to deal with issues that come up during garment construction.


* Develop my embroidery skills
New chemise project for a friend complete-  it involved hand hemming and embroidery. Very satisfying. Lots of plans for new projects brewing!


Enter more A&S competitions
I have entered quite a few since this challenge started, and I now feel that I have the confidence to make it a regular thing. I felt very humbled to win the Innilgard A&S Championship which ran over the last year.

Try and blog more regularly
A little variable at the moment because sometimes the item needs to be presented before I can show photos and I always wonder if I am just talking rubbish that people are not interested in.


Franchise:

* Make badge banner and pole for outside events
- delayed as hot weather was making my silk paint set blotchily, banner is half done. Will be finished soon.
* Make a new hall banner
- complete


* Make a new bottle cover, napkin and cutlery pouch
- cutlery pouch complete
- many completed, final one almost finished. I plan to do a couple more for other members of my group.


* New tourney dress
Photo credit: A.Kenner

- complete (need to get a good photo!)


* New feast dress
- complete


* Make more accessories
- complete
Finished new girdle and necklace. Lots of plans for more as this is probably my favourite A&S activity apart from scribal work.


* Work on cutting out slang and mundane talk. Trying hard, but this will be a continual process.
* Try harder to speak nobly. Trying hard, but this will be a continual process.
Read ''The Bard's English'' - completed
* Work on moving more gracefully, and work on posture. Trying hard, but this will be a continual process, especially when I am tired.
* **Continue with existing projects and commitments - ongoing.  I got most of my projects completed in time for the big event. Still working on the WCoB presentation piece and doublet but I am very close. for a friend. Continuing to help with projects and teach. Continuing to administer LCG and organise records, and I am really seeing progress so feeling very positive.


Piety

Continue teaching classes ongoing
Continue with regular service projects: device banner, mouse pouches, award cords, Baronial projects, scribe work etc. (Ongoing)
A&S cloak complete (but I need to get a nice photo).

* Run an event (I have had to postpone this as this challenge has made me very aware of my physical weaknesses. Perhaps being involved in a stewarding team capacity is more appropriate.)
* Make Primus Agmen award pouches - did a Mouse Pouch instead and will do PAs now that the big event is over.

Learn the duties of a Lady in Waiting
I recently stepped up down Lady in Waiting to my Baroness. It was a huge step in many ways and I learned so much. I also learned just how much I need to learn. But it was a great opportunity and I gained confidence. I even offered to wait on Her Majesty at the recent Royal visit. My services were not required, but I did feel that being prepared to do it was a huge step for me and a big personal success.
Help people with individual projects
- embroidery project for a friend: complete
- jerkin for a friend- complete
-fencing doublet - almost done
Naturally there are new projects for more people lined up. This is a never ending job, but extremely satisfying.

Largesse

Continue teaching garb skills - ongoing
Make more effort to chat to newcomers at events and training. Trying hard. I have attended demos and make bigger efforts to make newcomers feel at home. A big achievement for me and I feel very happy with my successes
Try harder to make people feel relaxed, welcome and comfortable
Keeping an eye on newcomers and staying in touch electronically so that they know what to bring to events etc. I feel quite proud of myself for this as it is particularly and continually difficult.
Donate coffee and cake money to charity at least twice a month
- still making regular donations
Make largesse items for Gift Box
- still making jewelery and small items


Prudence 

* Re-read "Knowne World Handbook"
Read The Treasure of the City of Ladies
*  Re-read A&S Handbook 
* Read "At The Court of The Borgia" by Johann Burchard - continuing
Try to learn more about combat
- trying to learn more about rapier and heavy by chatting to fighters and paying more at training, reading social media posts and internet information on this area. Ongoing.
All this information is helping to shape my behaviour, and how I view the game we play.


Courtesy

* Work on shyness and awkwardness - this will be an ongoing consideration, I think.
* Make an effort to speak to people I don't know/well
* Introduce myself to strangers: working on this
* Learn to accept compliments graciously
* Learn to ask for help: I have done this a few times in the last month
* Stop avoiding Peers and Pointy Hats: improving
* Write more recommendations for worthy individuals - ongoing
Write a resume of SCA achievements to help develop confidence within the game
-  done! This started off  slowly and was difficult, but actually turned out to be a pleasant exercise because I decided to add in dates of events and so the resume has also become a sort of timeline. Working on it has been a nice trip down Memory Lane and has reminded me how much my game has improved over the last fifteen years. I would recommend this exercise!
Although ''Courtesy" is probably going to be an ongoing challenge for me, I really feel that I have made big improvements in this area. What I have learned and achieved has really made this Pilgrimage worthwhile and made me enjoy my SCA time more.


I have found that being accountable to the group of Pilgrims has worked really well for me, so I am going to set myself a new Quest at the end of the Pilgrimage. Hopefully that will help me to continue with small improvements and successes.

There are several ladies within the SCA who continuously inspire me with every aspect of the way they behave and present themselves. I am lucky that one of these ladies is in my local group, and she has (and will continue to be) a good reminder of the behaviour and style that I aspire to.

I would like to thank the organisers and Wardens for the opportunity to be part of the Pilgrimage. It has been a great motivator for me, and I have enjoyed being part of a wider group of Lochacians working towards similar goals. I did not think I would be as successful as I have been, and I feel that I have achieved my goals (often in trying circumstances.) The Pilgrimage has encouraged me to focus on the finer aspects of the SCA and reminded me of why I enjoy it so much. I feel inspired to continue on some sort of similar journey to help me to build on the successes that I have already achieved through the Pilgrimage.

Tuesday, June 28, 2016

Mouse Guard Pouch

A little project that I just managed to squeeze in and finish before the big event was a Mouse Pouch to offer to Their Majesties. In this Kingdom, kids may be invited to join the Mouse Guard, which is (of course,) a great honour. I managed to get one finished in time, and I was very happy that a special little member of our Barony was invited to join the Guard and presented with the pouch at the event.


The pouch is made of red linen blend (self-lined) with a white felt mouse and cotton lucet cord ties. The lucet cord was made by Heather- many thanks!

Some information on the Mouse Guard pouches from: http://broiderers.lochac.sca.org/projects/mouse
More information can be found at that site.

"The Mouse Guard was established in the reign of Corin Anderson and Keredwin the Mouse while Lochac was still a Principality and was retained by the new Kingdom. The award is given to those amongst those very young subjects that Their Majesties finds have been of help to others and otherwise worthy of recognition.

The token of the award is a pouch, bearing the reversed charge from the device of Her Excellency Mistress Keredwin the Mouse. The device (shown right) is "Gules crusily botony, a mouse sejant erect to sinister, tail nowed argent". The pouch bears the mouse charge facing the other way (to dexter) on a plain red field.

The Worshipful Company of Broiderers has been requested to help provide suitable pouches, so that these may given out in each reign."

Thursday, June 23, 2016

Largesse for a friend's event


An online friend is hosting a big event soon and needed some largesse, so I took the opportunity to make some as a surprise and send it along with a friend who was wayfaring.


Wednesday, June 22, 2016

Baronial Tablecloth Project


For the past year or so I have been involved in embroidering a panel for the Baronial tablecloth project. The majority of the work (as well as the design) has been done by Viscountess Ingerith Ryzka, but many hands in the barony helped. It was a delight to see the completed panels on display at the 30th Anniversary event.


and an unpinned panel
Photo credit: T. Lyons


Tuesday, June 21, 2016

Sigh of Relief

Well, the big event is over and my health issues held off long enough for me to attend. It was a great success, with my Barony providing beautiful food and a lovely display for our visitors. It was great to meet new friends like Mathias and Arabella, and catch up with old friends like Nicollette. Other old friends who could not attend were there in spirit. I was very proud of the work put in by my Barony, and inspired by the behaviour of the populace. There was so much grace and courtesy, it was beautiful to see. I was honoured (and awed) by the recognition of my peers, and proud of the achievements of the group. It was the sort of wonderful event that maintains your faith in the SCA and the game that we play, and inspires in mundane and SCA life.


Photo credit: R.Roach


Friday, June 17, 2016

Gifts for friends


While I was making largesse, I decided to make a couple of necklaces for my friends:


Both are glass and/or gemstone beads strung on tiger tail wire.

Thursday, June 16, 2016

Royal Largesse


I had a chance to finish off my largesse pile for the upcoming Royal visit,and I am very pleased with it. All glass or gemstone beads stung on tigertail wire.

Wednesday, June 15, 2016

Op Shop Score


Check out these delightful feast kit items I scored on a recent op shopping trip. Score!


Tuesday, June 14, 2016

Bling for Royal visit

I made this necklace to wear for the upcoming Royal visit. The beads are brass and glass, strung on tigertail. The ornament is from a deconstructed pair of earrings.


Monday, June 13, 2016

Busy times

Well, things have been hectic since I  last posted! Health and computer problems certainly haven't helped matters, and I have been busy with study and preparing for my Barony's big anniversary event - which is now less than a week away. I have mainly been desperately trying to get scribal work finished and working on projects for other people. Most of that is done now, so I have less than a week to sort my own garb out. Luckily, the tourney dress that I previously almost finished just needs to be hemmed and have hooks and eyes attached. Hopefully I will find time to finish the court gown that I was experimenting with as part of my Pilgrimage challenge.

I have also been making some largesse items. Here are a couple of necklaces that I made that have small mistakes - so will now end up in my jewellery box.


Sunday, June 5, 2016

Apologies

My apologies for the delay in posting - I have been experiencing technical difficulties!

Tuesday, May 10, 2016

Embroidered Caul


Since the projects that I am working on are not finished or have not been presented yet, I thought I would post a picture of a project I worked on with a friend back in 2012.

This is a caul; a circle of fabric that is pleated or gathered into a band and worn to cover the hair. I drew up the design and embroidered it in Madeira silks. Viscountess Ingerith Ryzka sewed on all the spangles and made up the caul.


Monday, May 9, 2016

Big coat hanger for SCA gowns

I have had real trouble finding coat hangers that will support my SCA gowns. I normally store them folded in pillowcases due to their weight, but it would be nice to have a strong hanger to prevent my (hated) pre-event ironing from being ruined. So this week I chopped up and sanded a rake handle, and added a hanger hook. I am very pleased with the result, it works well:


I got the idea from this image:

Image from: https://upload.wikimedia.org/wikipedia/commons/0/03/Tailor_Book_of_Trades.png

Tuesday, May 3, 2016

Making the Grey Campi Fishmonger Dress - Dress Diary

As part of my Noble Pilgrimage challenge, I decided to try new ways of making Renaissance style gowns. Often in the past I have sewn the bodices entirely by hand in a sort of 'sandwich' effect, and have also bagged out bodices. This dress was created by sewing the lining and interlining up by machine and then sewing the fashion fabric shell onto the interlining by hand. I decided to try this method as a way of reducing bulk in the bodice as I tend to get very hot in garb. The inside edges were tidied up by hand sewing a bias strip along the join of the grey outer fabric and the red denim interlining.

I am happy with the adjusted pattern of this bodice, and I like the simplicity of the inside of the bodice. It is neat but decorative. It did take quite a long time; at least as long as any other method, and sewing the bias on invisibly was tricky in places. It was a good way to develop my skills and to think outside the square in terms of the way I make my dress bodices. I also plan to make another bodice in this way but with a full lining hand sewn in, and another bodice which will have bound edges at the neck, front and armholes. It will be interesting to compare the different techniques and results. Whichever is the best choice for future projects, I consider this experiment a success because:
- a have a new, much needed tourney dress
- I feel much more confident about tackling new dress projects
- I like having more than one way of making a bodice, it stops things getting dull
- I've enjoyed thinking about different ways of making bodices
- I think I am starting to hate sewing slightly less!

'
Once the pattern was done, I cut out the fashion fabric, interlinings and lining. The grey cotton fashion fabric has a seam allowance to allow for the edges to be folded over the lining and sewn down. In period, silk, wool or linen would most likely have been used, but I have to use what I can afford.


I like to interline my bodices with cotton flannelette to reduce visible bone ridging. I would use wool if I could afford it. There are currently no extant examples of late period Italian gowns with boning, but I am large busted and I prefer the security of a bit of boning as well as the smoother lines that boning produces.


Boning channels marked out and getting ready to sew. Always sew your boning channels in the same direction (e.g. all top to bottom or all bottom to top) to prevent the fabric distorting.


The bones have been inserted, now to secure the fashion fabric layer. The red fabric is a nice strong cotton denim. If my budget stretched that far, I would prefer to use a stiff linen as it would appear to be closer to what they used for bodice stiffening in period.

I turned the bottom edge up and whipped it to the denim layers.

Bottom edge being sewn, neckline and armhole waiting to be sewn. The grey fabric was whipped to the red linings. Thimble essential for sewing so many layers of heavy fabric by hand!


I was unhappy that there was a bit of bunching where the strap joins the front of the bodice.


A bias strip was handsewn to cover the edge where the grey fabric was sewn down.

The finished bodice ready for trim. I took a break from the armholes because they were a little tricky to sew because the fabric was on the bias.


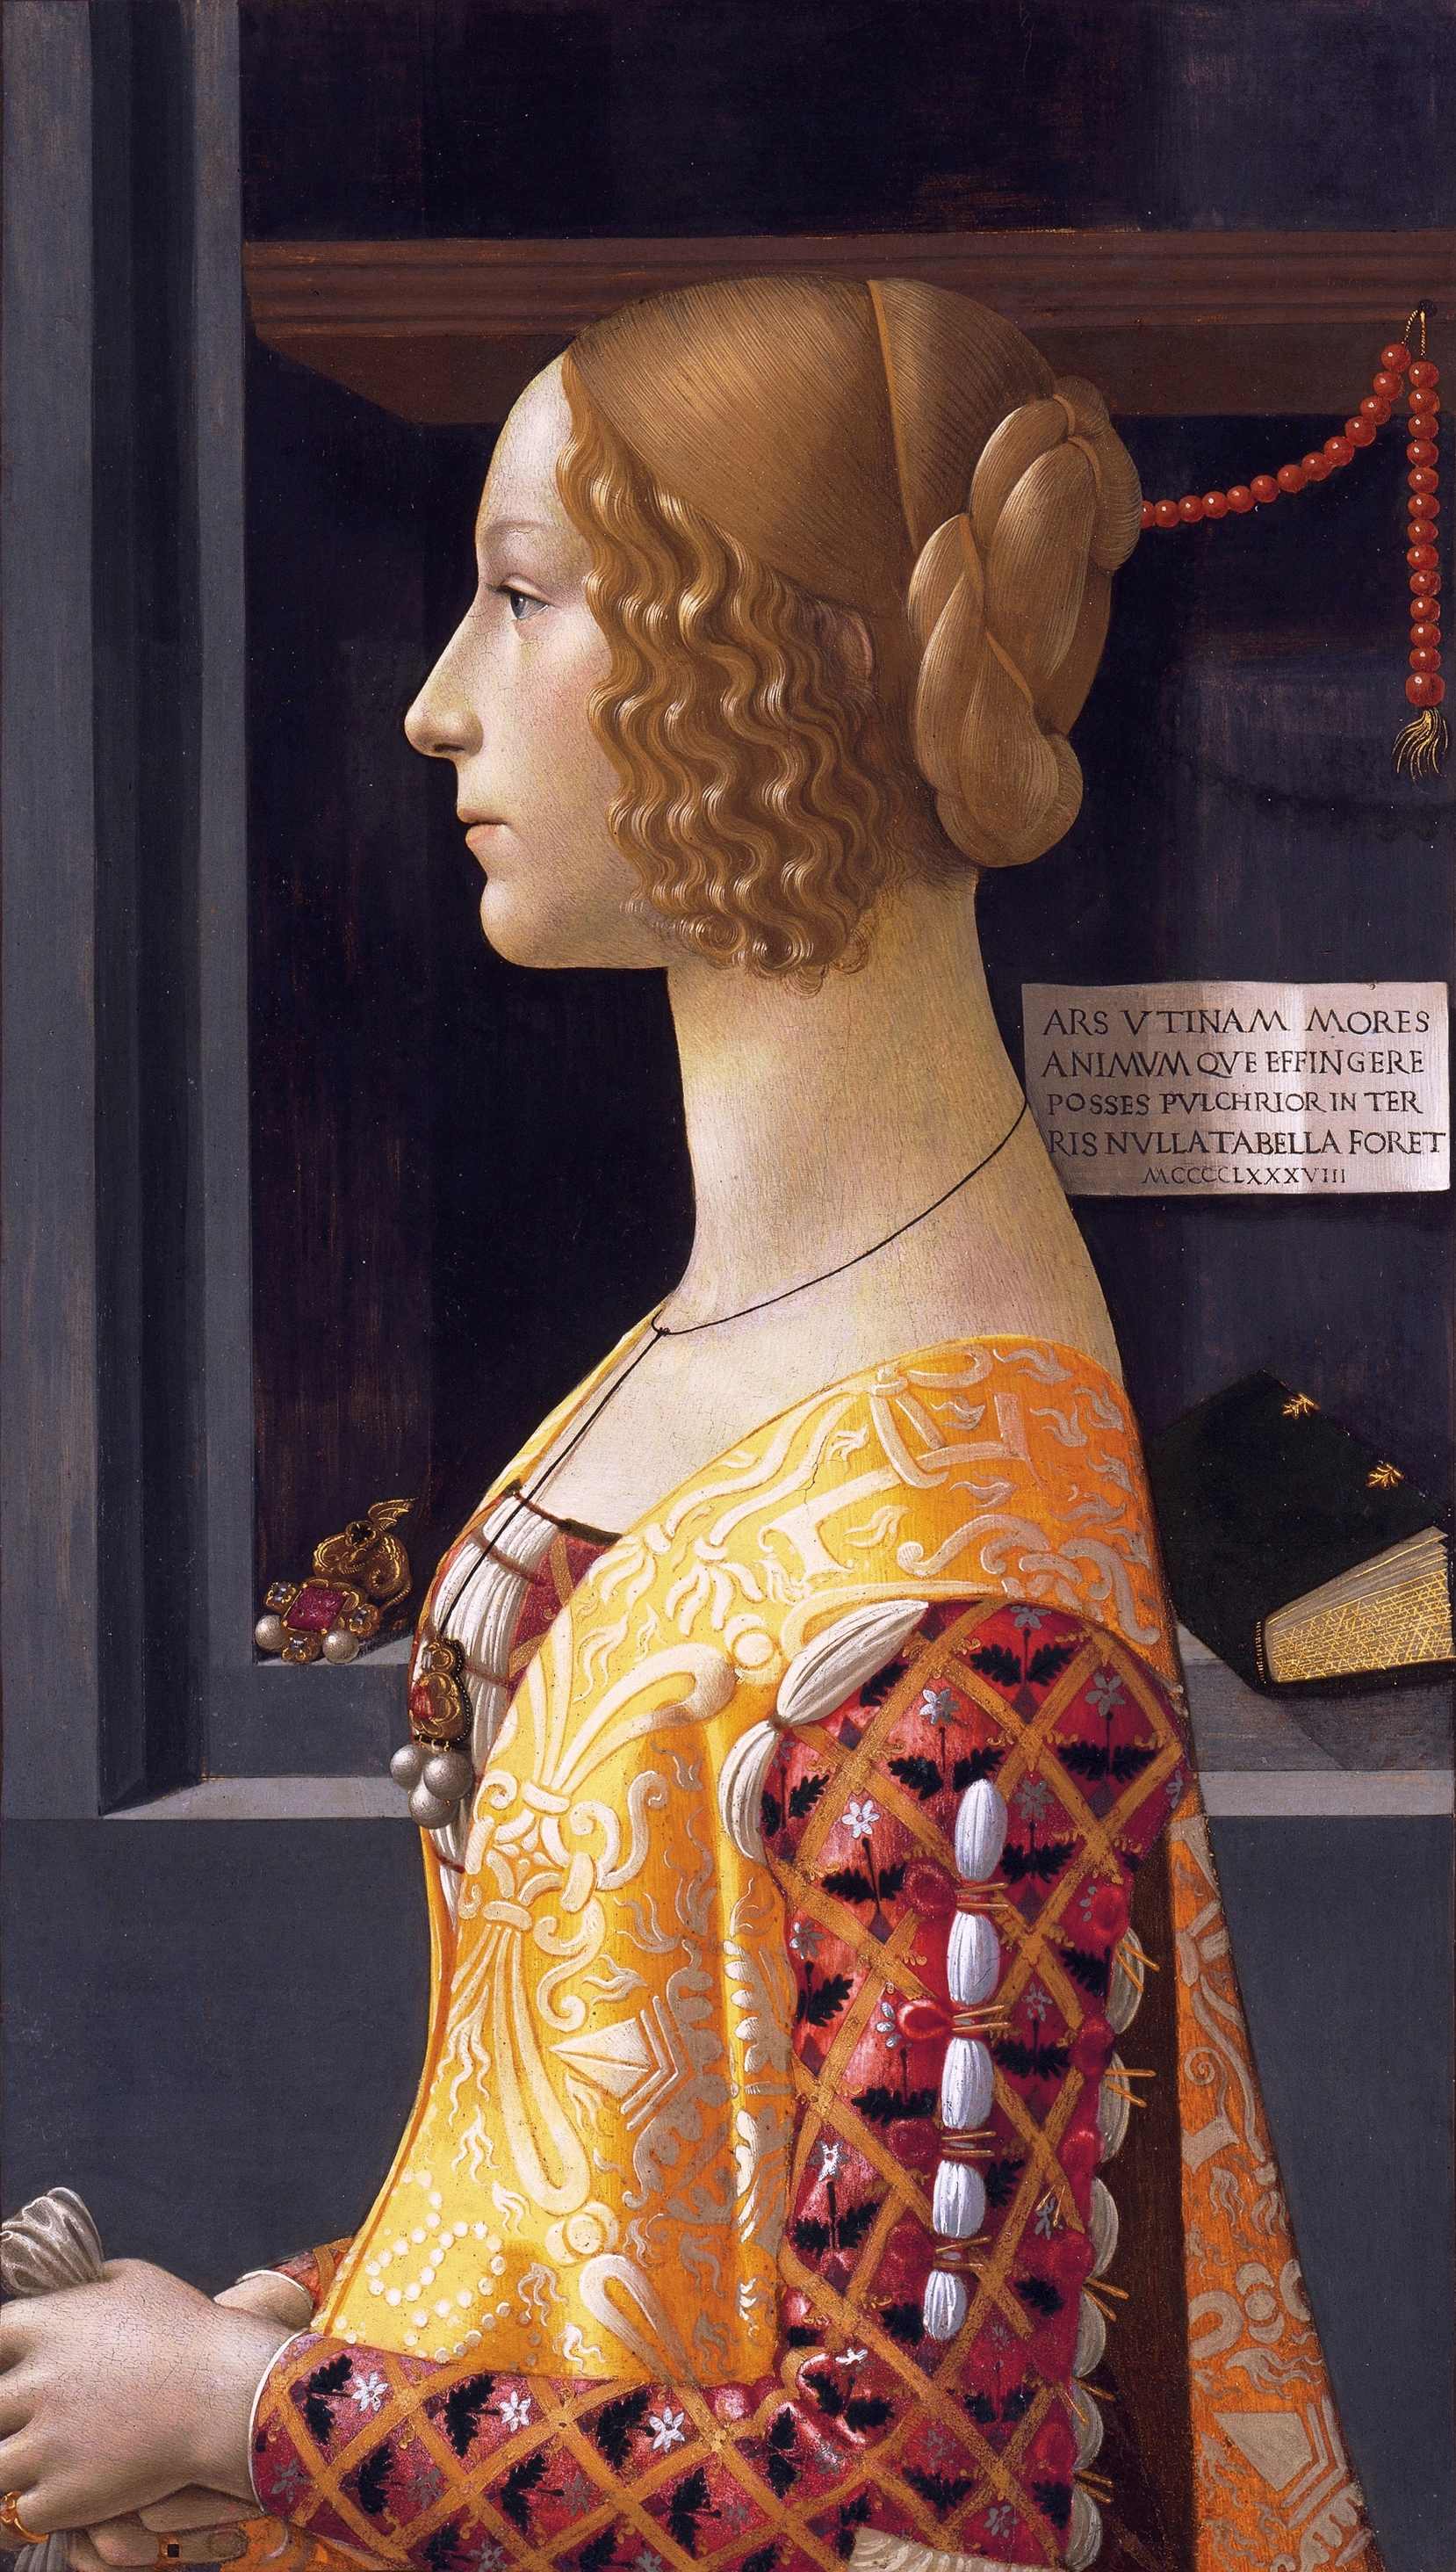
Looking at the inspiration portrait and deciding where to place the bias trim


Handsewing the bias trim in place


The inside of the bodice showing the bias covering the edges and the first lacing ring sewn on 

I couldn't resist and added some lacing rings before finishing the trim, just to break up the monotony


The inside of the bodice showing the boning ridges and the bias edging and lacing rings being attached. They are not as secure as eyelets, but very quick to sew on.

Sewing the binding around the armholes

Bodice almost complete


To pleat the skirt, I cheated and used crochet thread rather than my usual two parallel lines of thick cotton. I don't recommend this method; I was lucky that it worked but the thread could have very easily broken and wasted all my time. I just cheated because I was fed up withe project and decided to live dangerously. I folded down the top of the skirt and marked big gathers of about 5mm, then gathered them up. I usually do smaller pleats, but this is a lower class dress, so not as much fabric is in the skirt as would be in a higher class dress (so fewer pleats were needed).

I mark my skirt panels with a centre point and two quarter points, and do the same on the bodice. I pin the skirt panels to the bodice at these three points and then arrange the pleats evenly between the points. It is a really quick way to do cartridge pleating. I am a really slow sewer and I can pleat a 3-4m skirt onto a bodice in an evening using this method. Just make sure that you have pinned the fabric so that the 'good' side of the fabric matches the 'good' side of the bodice!


There is an un-pleated section at the front where the dress opens. I will pin the edges together here when I wear the dress. You could also use hooks and eyes. My weight varies a bit so I like the adjustability of pins.

The pleated skirt pinned to the bodice at the quarter and centre points.

 Try to space the pleats out evenly at this stage.

I use a very strong thread, usually three or four strands. Basically I whip through the point (or "vee") of the pleat and take it through the bodice. You want a nice strong stitch which connects well to the bodice without being visible. I do 2-3 stitches per point, depending on the size of the pleats. I have a tendency to step on my skirts when I get tired so I don't want to risk the stitching pulling through.

Then just continue....

On and On and On

Until all the skirt is securely attached. When you have finished and everything is knotted off securely, remove the gathering threads. I knot my threads off every ten centimetres or so- if my pleats did rip out, I hope the extra knots would stop the whole thing coming undone.

This dress still needs sleeves and hemming. It is hanging up at the moment to let the skirt drop.
I made the back neckline high to reduce my chance of sunburn in summer. I will cut it down a bit on the next dress as it is now too high and looks a little odd. Apart from that, I am happy with the dress. It is comfortable.


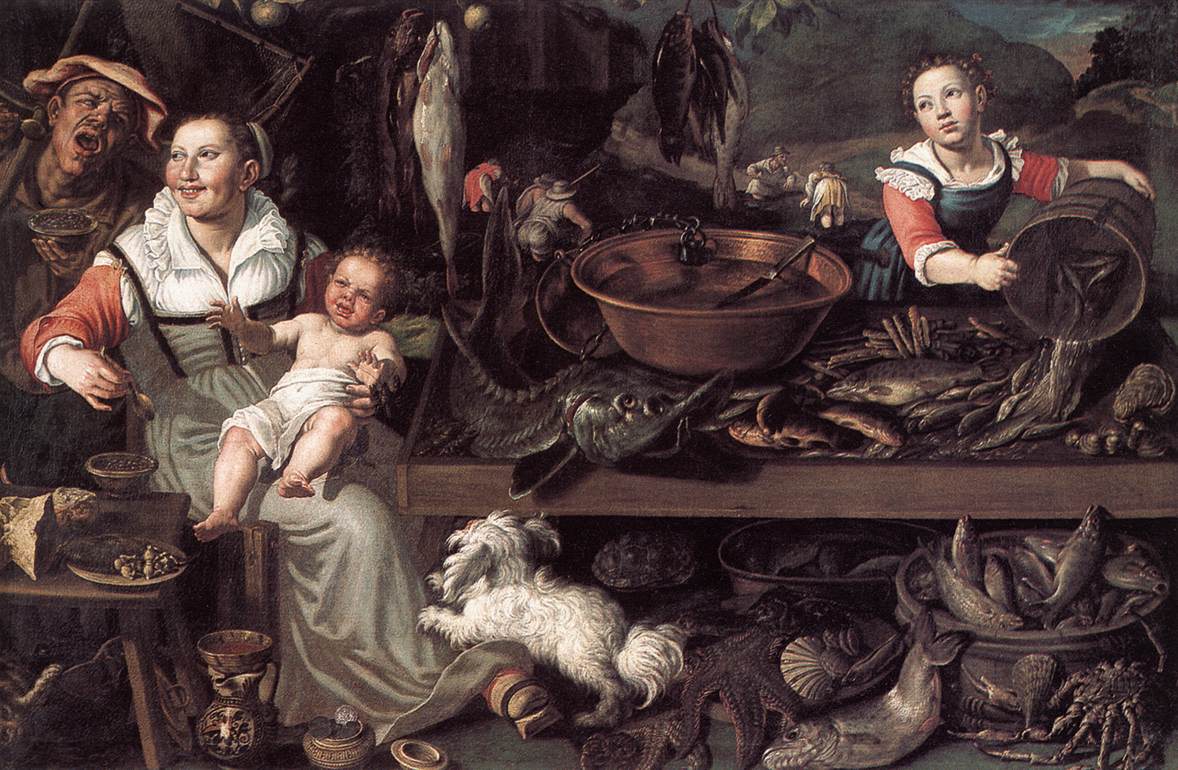
The inspiration for this dress: "Fishmongers" by Vincenzo Campi
Image fromhttp://www.wga.hu/art/c/campi/vincenzo/4fishmon.jpg