
Friday, April 25, 2014
Thursday, April 24, 2014
Pine Nut Candy - Pynade
I recently made a subteltie for a big event, and I wanted some toffee to accompany it. I have made pynade before, and it has been very popular.
Two Fifteenth-Century Cookery-Books gives the following recipe:
Pynade
Take Hony & gode pouder Gyngere, & Galyngale, & Canelle, Pouder pepir, & graynys of parys, & boyle y-fere; than take kyrnelys of Pynotys & caste ther-to; & take chyconys y-sothe, & hew hem in grece, & caste ther-to, & lat sethe y-fere; & then lat droppe ther-of on a knyf; & if it cleuyth & wexyth hard, it ys y-now; & then putte it on a chargere tyl it be cold, & mace lechys, & serue with other metys; & if thou wolt make it in spycery, then putte non chykonys ther-to.
There are other variations on this recipe in various Medieval and Renaissance cookbooks. Once sugar began to be regularly imported and was considered a sign of wealth and status, the level of sweetness in many foods (especially desserts) really increased. This recipe is one that will have your teeth curling from the sweetness, particularly if you experiment with substituting sugar for the honey.
My most recent redaction:
2 cups honey
1/4 teaspoon ginger
1/4 teaspoon cinnamon
1/4 teaspoon black pepper
200 grams pine nuts in 3 lots
1/4 teaspoon allspice
I mixed all the ingredients together in a saucepan and brought it all to a boil. I boiled it until it reached 300 degrees F on a candy thermometer. This can take a long time depending on the type of stovetop you have and also the type of honey and any water or impurities it may contain. As with any toffee-type sweet, the mixture is scaldingly hot and sticky, so be extremely careful when cooking and don't be tempted to step away from the pot for a moment. It can boil over in an instant and you will at the very least have a horribly hot and sticky mess to clean up and at the worst an extremely bad burn.
I used a generic honey blend this time and found that the colour was much more pale than the last couple of times I made this recipe. It was also much softer than the last couple of times I have made it. This may have been due to the type of honey I used, and also due to the fact that it was quite humid.
I added about half the pine nuts at the beginning of the process, and put the rest in in two batches. I did this because I wanted a bit of variety in the colour of the nuts and also how cooked they tasted. The result was pleasing, if a little bit too sticky. I dusted the toffee in castor sugar after breaking it up and then kept it in the fridge to reduce the stickiness. My family are not used to much medieval food, but they all enjoyed this candy.

I cut back a lot of the spices because several people with specific spice allergies were going to be attending the event. I personally like a more spiced candy because I think that the spices help to cut through the sweetness. Powdered galangal and grains of paradise are really hard to find where I live but I would have included them if I could have. I have also tried coriander root in the past, which added a pleasant element to the recipe.
You can vary the spices according to taste and what you have available. I have experimented with substituting sugar instead of honey and also used raw pine nuts and almonds (both peeled and with the skins on.) All these variations make the candy change in taste, texture and colour, but it is always popular with people who have a sweet tooth!
Two Fifteenth-Century Cookery-Books gives the following recipe:
Pynade
There are other variations on this recipe in various Medieval and Renaissance cookbooks. Once sugar began to be regularly imported and was considered a sign of wealth and status, the level of sweetness in many foods (especially desserts) really increased. This recipe is one that will have your teeth curling from the sweetness, particularly if you experiment with substituting sugar for the honey.
My most recent redaction:
2 cups honey
1/4 teaspoon ginger
1/4 teaspoon cinnamon
1/4 teaspoon black pepper
200 grams pine nuts in 3 lots
1/4 teaspoon allspice
I mixed all the ingredients together in a saucepan and brought it all to a boil. I boiled it until it reached 300 degrees F on a candy thermometer. This can take a long time depending on the type of stovetop you have and also the type of honey and any water or impurities it may contain. As with any toffee-type sweet, the mixture is scaldingly hot and sticky, so be extremely careful when cooking and don't be tempted to step away from the pot for a moment. It can boil over in an instant and you will at the very least have a horribly hot and sticky mess to clean up and at the worst an extremely bad burn.
 |
| The candy made with sugar instead of honey |
I used a generic honey blend this time and found that the colour was much more pale than the last couple of times I made this recipe. It was also much softer than the last couple of times I have made it. This may have been due to the type of honey I used, and also due to the fact that it was quite humid.
I added about half the pine nuts at the beginning of the process, and put the rest in in two batches. I did this because I wanted a bit of variety in the colour of the nuts and also how cooked they tasted. The result was pleasing, if a little bit too sticky. I dusted the toffee in castor sugar after breaking it up and then kept it in the fridge to reduce the stickiness. My family are not used to much medieval food, but they all enjoyed this candy.
 |
| The toffee cooling and drying on waxed paper |
I cut back a lot of the spices because several people with specific spice allergies were going to be attending the event. I personally like a more spiced candy because I think that the spices help to cut through the sweetness. Powdered galangal and grains of paradise are really hard to find where I live but I would have included them if I could have. I have also tried coriander root in the past, which added a pleasant element to the recipe.
You can vary the spices according to taste and what you have available. I have experimented with substituting sugar instead of honey and also used raw pine nuts and almonds (both peeled and with the skins on.) All these variations make the candy change in taste, texture and colour, but it is always popular with people who have a sweet tooth!
Friday, April 11, 2014
Michelle Carragher Embroidery Site
Beautiful embroidery from Michele Carragher; you may recognise her work from 'Elizabeth I' and 'Game of Thrones' -


More information at (and images from) http://www.michelecarragherembroidery.com/index.htm
Thursday, April 10, 2014
Necklaces
Here are some necklaces that I strung recently.
This is a necklace that I made for myself. I bought the silver and enamel pendant about twenty years ago at a 'going out of business' sale. I had never put it on a necklace and had honestly forgotten all about it until I found it a couple of weeks ago. I was delighted to realise that the seahorse to sinister and the silver and purple all match my SCA device. So I strung it on tiger tail with a mix of freshwater pearls and black glass beads.


This is a necklace that I made for myself. I bought the silver and enamel pendant about twenty years ago at a 'going out of business' sale. I had never put it on a necklace and had honestly forgotten all about it until I found it a couple of weeks ago. I was delighted to realise that the seahorse to sinister and the silver and purple all match my SCA device. So I strung it on tiger tail with a mix of freshwater pearls and black glass beads.
I made this necklace as a gift. The purchased onyx pendant is set in silver and the pearls are freshwater baroque pearls.
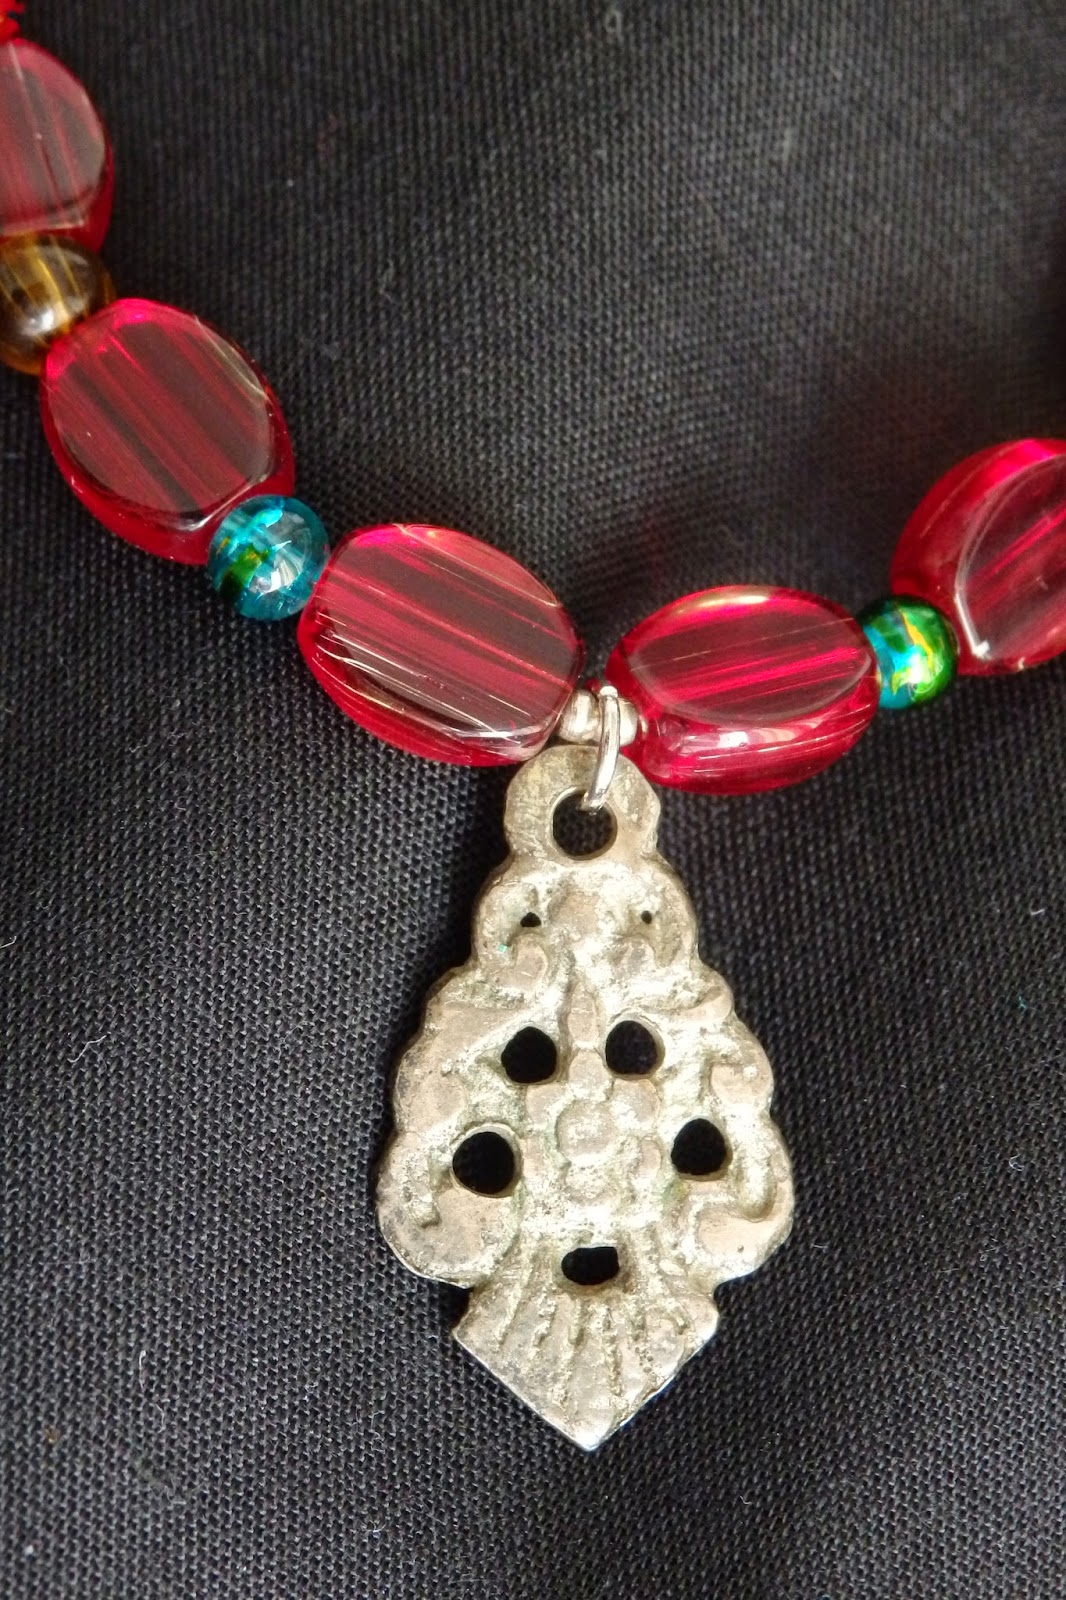
This necklace was also a gift. The beads are maroon glass, and foiled red and turquoise glass beads, and the metal pendant is an antiquity. It is a Byzantine pendant dug up on what was probably a trade route in Bulgaria.
A detailed view of the pendant:
Wednesday, March 26, 2014
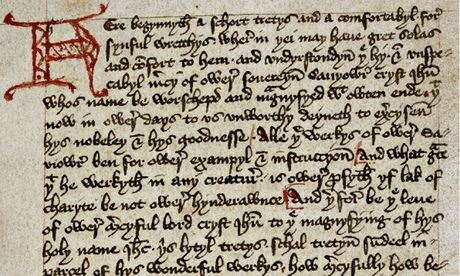
Margery Kempe Autobiography
Margery Kempe, the first
English autobiographer, goes online
The British Library digitises an original edition of the medieval mystic's account of her life
from: http://www.theguardian.com/books/2014/mar/20/margery-kempe-first-autobiographer-digitised-british-library
Monday, March 3, 2014
New Manizza/Muff
Muffs known as Manizzas in Italy and Snoskyns in England,
were a handy way of keeping hands warm as well as a status symbol and sign of
conspicuous consumption in the sixteenth century. The fur pelts, fine fabrics
and craftsmanship all reflected that the wearer was someone who could afford
luxury and was aware of fashion
Queen Elizabeth I had several muffs (also called countenances) and there is a record of Amyas Paulet purchasing a
muff on her behalf in Paris in 1579 (Queen Elizabeth's Wardrobe Unlocked by
Janet Arnold, p. 97). Ladies posed with manizzas or zibellini ('flea furs') are common in both Italian and English portraiture from the sixteenth century. Some of the portraits that I found inspiring can be seen on
my earlier blog post about my earlier attempt at making a manizza or muff: http://broidermebethan.blogspot.com.au/2012/06/new-manizza-or-snoskyn.html
In January and February 2014, I was part of the Italian Renaissance Costuming Min-Challenge - "Fabulously Fashionable Fur (http://realmofvenus.renaissanceitaly.net/challenges/IRCMC-Jan2014.htm).
The weather here in South Australia was the hottest in recorded history, so it was not a good time to be sweating and working with fur. The competition's organiser Lady Bella graciously extended the challenge to allow for the weather. As usual, I went into the challenge with high hopes and huge plans. The more portraits I looked at, the more I wanted to make. I started with a muff because I had a small rabbit pelt that a friend had given me after finishing a pair of fur lined sleeves. (I do not support the fur industry in any way, but I do believe that if an animal is killed humanely for food then we should do our best not to waste anything. I have no issue with re-using or recycling vintage furs or the skins of animals slaughtered for food.)

All the materials that I used, I had in stash or had purchased for other projects. I made this muff quite small because the last muff that I made was quite a bit larger and can be a bit heavy and unwieldy. Also, I saw a gentlewoman at an SCA event last year with a small one hanging from her girdle, and I thought it looked very elegant.
My first step was to assemble materials and then make a rectangular paper pattern that would fit my hands and accommodate the pelt that I had.

The upholstery fabric that I had was a nice pattern but prone to thread separation. This would make it tricky to sew later on.
I am not a keen sewer, so my favourite part of any sewing process (apart from wearing the resulting pretty item!) is playing with trim and fabric options and dreaming of possibilities.

After trimming my fabric and pelt to size, I edged the fabric, pinned the fabric (wrong side out) and pelt (skin side out) together and sewed around the edges, leaving a small area unsewn for turning.

Once the pelt and fabric were sewn together, I had the tricky task of turning the 'bag' right side out.

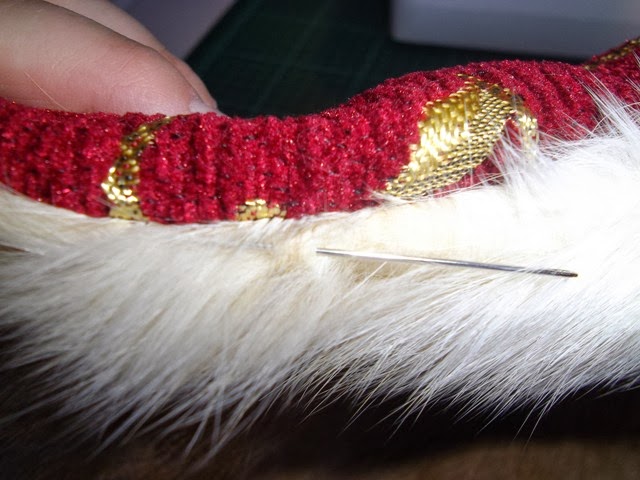
Once the manizza or muff was the right side out, I made sure that all the seams were pushed out and the hair pulled out of the seams before sewing on some maroon satin ribbon.

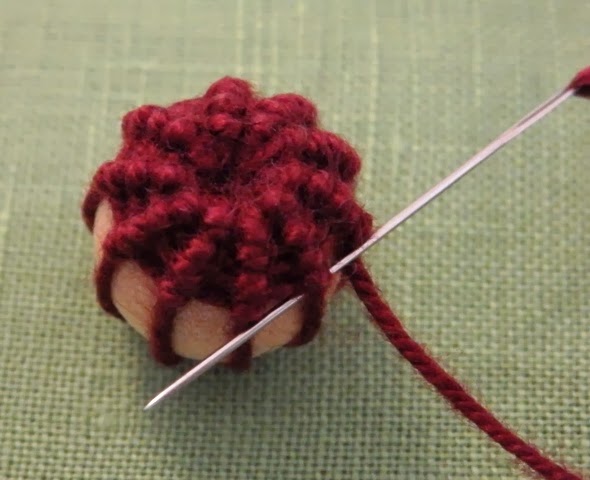
The next thing I decided to work on was the woven buttons. You can see the tutorial on how I did it here: http://broidermebethan.blogspot.com.au/2014/01/woven-button-tutorial-back-stitched.html
I added loops of gold DMC floss to the completed buttons and a decorative little knotted lump in the middle at the top. Next time I will use a bead, because I was not very happy with how this element worked out.
I made five of these buttons and stitched them to one side of the manizza.
I liked the way the ribbon looked by itself, but wanted to try out some trims. The plain gold upholstery trim was too much, but I had a small amount of maroon and gold trim that was purchased for the edge of a French hood. It looked pretty good on the ribbon, so I sewed it down in the centre of the satin ribbon.


I had some lovely little gold accents that I bought for a Tudor bodice from http://dragonsbloodcreations.com.au/
I thought that they looked nice, and would be a good way of hiding the join in the trim.


The last task was to make buttonhole loops for the button closures and to make an anchor point to hook my girdle chain to. I made a couple of loops of crochet cotton and then button hole stitched all around them before anchoring the thread and knotting off. This was a tedious task because the hairs from the fur kept getting stuck in the loops and pulling through with the thread. Also the fabric was quite loosely woven, so I had to be careful how hard I pulled the thread. Next time I will try lucet cord loops sewn into the seams because I found that the crochet cotton stretched quite a bit.


Once the loops were finished, I joined some lobster clasps and a key chain ring to a length of chain so I can hang the manizza from my girdle.

Although I didn't get all the other items that I had planned done (as usual!) I am satisfied with what I achieved in the challenge. I have a pretty accessory and I plan to make another for a friend at some later date.


I found these pages after I had finished my manizza, when I
was looking for supporting pictures. I would recommend them to readers:
https://thepragmaticcostumer.wordpress.com/tag/album-amicorum/
http://webspace.webring.com/people/lo/oonaghsown/curves/muff_in_sixteenth_century_dress.htm
http://jeannedepompadour.blogspot.com.au/2012_03_01_archive.html
The ‘Portrait of Anna Radziwell’ 1583 shows what looks like
a fur capelet. Hmmmm…. Ideas for the future!
Here is the link to see what the other entrants in the challenge have created:
http://realmofvenus.renaissanceitaly.net/challenges/IRCMC-Jan2014-Results.htm
Many thanks to Lady Bella of Realm of Venus (http://realmofvenus.renaissanceitaly.net/) for organising this fun challenge.
Friday, February 28, 2014
Creating Historical Clothes (book)
I've been quite busy with mundane life and also working on those gifts that I have mentioned previously, and I forgot to share what I got for Christmas-

Although I can only do basic sewing, and very basic pattern alterations, this book has already come in handy and would be excellent for proficient costumers.
Tuesday, February 25, 2014
'Nankeen' Regency Boots
Another delectable new offering from American Duchess

Available from: http://www.american-duchess.com/shoes-18th-century/nankeen-fabric-regency-boots
Saturday, February 15, 2014
New pic of loose gown
Wow, just saw a portrait of a lady in a loose gown that I would love to have:
Portrait of Teth Douma van Oenema by Master of the Portraits of the Exiles
from: https://upload.wikimedia.org/wikipedia/commons/6/62/Master_of_the_Portraits_of_the_Exiles_Teth_Douma_van_Oenema.jpg
Friday, January 31, 2014
Another new girdle
All my glass bead girdles are very heavy, so I decided to make a light-weight one. I already had some black wooden beads and some large bronze seed beads left over from another project. Then I found a bulk pack of bronze filigree spacer beads on special, so my colour combination was decided. Finally, I found some left-over pieces of black tiger tail wire in my beading box as well, so I was very happy.

Usually I play around with different combinations and patterns of beads before starting to string a girdle, but this time I knew what I wanted. I felt that three black wooden beads and then a bronze filigree bead would be ideal. The bronze seed beads would go in between each large bead.
![]()

I usually start at the ''dangly'' end of the girdle when stringing, and this time was no exception. I had two pieces of tiger tail which I threaded with three bronze crimps and a small bronze hook clasp. The hook clasp is at the bottom and allows the pomander or decorative element at the bottom to be changed to suit the garment or occasion. Once the crimps were closed, I started stringing the beads. The first part of the girdle was fiddly because the filigree beads had very small holes and the two pieces of tiger tail was a bit too much for them. I ended up using a bead reamer to enlarge the holes slightly.
I was a little unsure what to do when I got to the junction part of the girdle as I did not have any more triangular bead findings. I didn't want to have to purchase anything specially for this project, so I raided my stash for usable items. I found these three options for the central bead/finding where the two pieces of tiger tail separate to go around the waist. I tried all three, but thought the agate bead looked the best.

Usually I play around with different combinations and patterns of beads before starting to string a girdle, but this time I knew what I wanted. I felt that three black wooden beads and then a bronze filigree bead would be ideal. The bronze seed beads would go in between each large bead.
I usually start at the ''dangly'' end of the girdle when stringing, and this time was no exception. I had two pieces of tiger tail which I threaded with three bronze crimps and a small bronze hook clasp. The hook clasp is at the bottom and allows the pomander or decorative element at the bottom to be changed to suit the garment or occasion. Once the crimps were closed, I started stringing the beads. The first part of the girdle was fiddly because the filigree beads had very small holes and the two pieces of tiger tail was a bit too much for them. I ended up using a bead reamer to enlarge the holes slightly.
.jpg) |
| This diagram shows the way I string my girdles. The bottom 'dangly' part of the girdle has two strings of tiger tail wire which separate at a central bead or finding to become the two 'arms' of the belt. |
I was a little unsure what to do when I got to the junction part of the girdle as I did not have any more triangular bead findings. I didn't want to have to purchase anything specially for this project, so I raided my stash for usable items. I found these three options for the central bead/finding where the two pieces of tiger tail separate to go around the waist. I tried all three, but thought the agate bead looked the best.
Once the agate bead was strung and the two pieces of tiger tail separated, it was standard stringing again. When each waist piece was done, it was finished with a clasp or a piece of chain to allow adjustments in size.
I happened to have a bronze filigree heart charm that I salvaged years ago from a cheap necklace, and I added this to the bottom of the girdle. I hung the girdle up for a few days to get the kinks out of the tiger wire.
This was a quick and easy project and I am very happy with the result.
Friday, January 24, 2014
What I Am Reading At The Moment
Recently, someone asked me to post about what books I am reading at the moment.
Currently, I am reading the following
The Savage Garden - Mark Mills

Text and image from: http://en.wikipedia.org/wiki/The_Savage_Garden
The Shakespeare Secret - J. L. Carrell

Mary Boleyn The Great and Infamous Whore - Alison Weir

The Samurai and the Courtesan - Lesley Downer

"1868: In the Floating World of Japan’s exotic pleasure quarters, sex is for sale and the only forbidden fruit is love. Hana is just seventeen when her husband leaves for war, leaving her alone and very vulnerable. When enemy soldiers attack her house she flees for her life across the shattered city of Tokyo and takes refuge in the Yoshiwara, its famous pleasure quarter. There she is forced to train as a courtesan."
Text and image from: http://www.lesleydowner.com/books/the-courtesan-and-the-samurai/
And I always refer to these Tudor Tailor books at least once or twice a week:


Images from and more information available from: http://www.tudortailor.com/
Currently, I am reading the following
The Savage Garden - Mark Mills
"The Savage Garden is the second novel written by British author Mark Mills. Set in 1958, the story tells of Cambridge student Adam Strickland and his trip to Tuscany, Italy; which started off as a chance to study the old, Italian renaissance architecture of a garden owned by the aristocratic Docci family and results in Adam solving two murders: one from the 16th century and one just after World War II. His discoveries shake the entire lineage of the Docci clan including his love interest Antonella's life."
The Shakespeare Secret - J. L. Carrell
"A modern serial killer - hunting an ancient secret. A woman is left to die as the rebuilt Globe theatre burns. Another woman is drowned like Ophelia, skirts swirling in the water. A professor has his throat slashed open on the steps of Washington’s Capitol building. A deadly serial killer is on the loose, modelling his murders on Shakespeare’s plays. But why is he killing? And how can he be stopped? A gripping, shocking page turner, The Shakespeare Secret masterfully combines modern murder and startling true revelations from the life of Shakespeare. It has been acclaimed as one of the most compulsively readable thrillers of recent years."
Text and image from: http://books.google.com.au/books/about/The_Shakespeare_Secret.html?id=h1kQq6cCFdwC&redir_esc=y
Mary Boleyn The Great and Infamous Whore - Alison Weir
A full length biography of Anne's sister and Henry's mistress.
More information available at http://alisonweir.org.uk/
The Samurai and the Courtesan - Lesley Downer
"1868: In the Floating World of Japan’s exotic pleasure quarters, sex is for sale and the only forbidden fruit is love. Hana is just seventeen when her husband leaves for war, leaving her alone and very vulnerable. When enemy soldiers attack her house she flees for her life across the shattered city of Tokyo and takes refuge in the Yoshiwara, its famous pleasure quarter. There she is forced to train as a courtesan."
Text and image from: http://www.lesleydowner.com/books/the-courtesan-and-the-samurai/
And I always refer to these Tudor Tailor books at least once or twice a week:
Images from and more information available from: http://www.tudortailor.com/
Subscribe to:
Posts (Atom)