I hope I haven't posted this one before; this is an Elizabethan coif that I made a few years ago for a competition. The theme was 'the New World'.
Here is the doco for the coif:
Background
After cutting my waist-length hair
short in November 2008, I realised that I needed to reassess my hair coverings
for SCA events. I normally wear sixteenth century Italian and Elizabethan style
clothing and I found that I didn’t have enough hair for my normal cauls to fit
securely. After receiving a copy of Janet Arnold’s Patterns of Fashion 4 (POF4)
I attempted a red monochrome coif in mid 2009. I found it attractive and
comfortable to wear, so decided to make a warmer, black monochrome coif which
would suit more of my garb.
Pattern, Materials and Techniques
Making the first
coif pattern for the garment was a case of trial and error. I played around
with paper patterns in the approximate shape of the unjoined extant coifs
reproduced below. There is some variety in the shape of extant coifs, probably
due to personal preference on the part of the wearer. I don’t like having headwear
obscure my peripheral vision, so the ear ‘flaps’ on my coif are quite small.
This
coif from c.1600 in the V&A
Museum (p. 44, Geddes
et al.) indicate the general coif pattern. I made my ear pieces slightly
less prominent.
This
coif from c. 1610 in the Burrell Collection (Plate 54, POF4), inspired
the enclosed scrolling stems on my coif.
After adjusting the original coif
pattern slightly, choosing an embroidery design was the next challenge. I have
wanted a coif with plant and animal designs for some time, so when the ‘
New World’ theme was announced, I thought it was a great
challenge. I noticed that there is great variety in the animals stitched in
period, so tried to make all my animals look different from each other. I
depicted the following new world animals: toucan, beaver, chameleon, jay,
turkey, snake and alligator. I have never tried to completely reproduce an
extant piece of embroidery, preferring instead to change small details to make
a piece completely ‘my own’ and allow my own creativity to shine through. I was
particularly inspired by the tent stitched slips of new world animals shown
together on a panel at Traquair House c. 1600 (Synge, 2001, p. 73), shown
below. (Note the turkey and chameleon. The matching panel shows jay, toucan,
alligator and beaver).
Many of the flower motifs I have
used have been adapted from patterns in Shorleyker ‘A Scholehouse for the
Needle’ (1597), a page of which is reproduced below.
There are many extant coifs from the
mid-late sixteenth to early seventeenth centuries in museums and private
collections, and POF4 has a great range of examples to look at for inspiration.
After the discovery and colonisation
of the ‘New World’ and in particular the acquisition of ‘Virginia’, Elizabethan curiosity about the
place and its people and natural wonders was rife. During the reign of Queen
Elizabeth I in England,
book production and quality improved greatly. Embroidery motifs were copied
from embroidery pattern books as well as herbals, bestiaries, emblem books, and
tales from Greek and Latin writers (Geddes et al, 1976, p. 29).
Modelbuchs of the time and Herbals
such as ‘The New Herball’ of William Turner (1568), the ‘New Herball’ of Henry
Lyte (1578), ‘Animalium Quadrepedum’ by Nicholas de Bruyn (1594) , and
Topsell’s ‘History of Four footed Beasts’ (1606), all show new world influences
in depictions of the natural world. Vecellio’s
Costume book (1590) and Christopher Weiditz’s ‘Trachtenbuch’ give the curious
public pictoral indications of the dress of some of the inhabitants of the New World. Thomas Johnson’s ‘A Booke of Beasts, Birds,
Flowers and Fruit’ of 1630 has some great representations of creatures from the
Americas.
The tent stitch slips mentioned above indicate that some people were inspired
to record new world influences in their embroidery.
This
plate from Thomas Johnson’s A Booke of
Beasts, Birds, Flowers and Fruit (1630) shows a turkey and a monkey.
Although most of the examples I have
shown here date from around 1600, coifs were in use at least a decade earlier
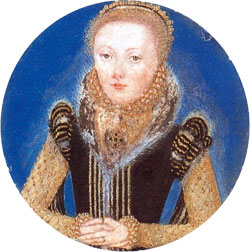
than that. The picture by William Peake the Elder, 1590 (below) shows
Lady Catherine Constable wearing a linen coif and forehead cloth (POF4,
Plate 51A), and a variety of plates in ‘the Tudor Tailor’ show similar
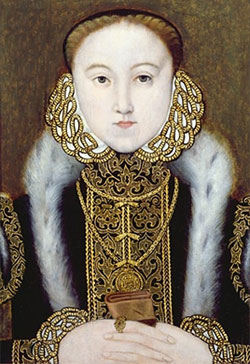
garments. Plate 6, A portrait of an Unknown Woman 1568 (p. 10) shows a
lady wearing a distinctly coif like garment. Coifs could be worn under another
item of headwear (as below), or used to cover the hair on informal occasions,
such as when inside the house.
I chose a black monochrome colour
scheme because it will match other embroidered items in my wardrobe. In the
sixteenth century, black monochrome work was extremely common and popular
(giving rise to the name ‘blackwork’ for monochrome embroidery), but red
monochrome embroidery was popular in both Italy
and England
in the sixteenth century, with many extant examples still in existence. Examples
of blue, green, gold, and purple-worked smocks, shirts, chemises and coifs from
England and Italy are all
shown in POF4 and can be found in most museums that have clothing collections. A
variety of embroidery styles is shown on these garments, but geometric and
freestyle monochrome and polychrome styles are both found.
I used black cotton floss rather
than silk purely due to financial restrictions, and I used a linen-cotton blend
shirt fabric for the coif itself. (Extant coifs are worked on linen but I
usually can’t afford linen.) Most extant coifs are unlined, but I chose to line
my coif with cotton flannelette for extra warmth.
I used stem stitch and double
running stitch for the majority of the embroidery. These stitch types are very
common in freehand monochrome embroidery and can be seen on most extant
examples.
This linen panel, known as ‘the Shepheard
Buss’, dates to around 1600. Worked in black silks, it appears to include
double running, stem, blanket and seeding stitches (V&A Museum, Geddes et
al, p. 42.)
I used gilt spangles of 4.0mm
diameter from the Thread Studio, which appear to be slightly smaller than those
used on the extant garment. Although pressed metal spangles or ‘ooes’ were used
in period, I am not sure what these modern alternatives are made of. I suspect
that they are a metal alloy blend as they are light, don’t seem to tarnish,
don’t snap and don’t melt under the iron.
I have seen examples of spangles being sewn on with four stitches, but the majority of garments seem to have spangles stitched
with three so I used three. The extant garment appears to have spangles sewn on
with one thread, but I used a doubled cotton thread because it is likely that
my coif will be machine washed, and durability is very important to me.
I knotted off the thread after each
spangle was secured, but did not cut the thread so the back of the work would
be tidier. I originally planned to use heavier metal spangles with a more
yellow look to them, but found that the central holes had been roughly punched
out, leaving sharp edges that might rub through the linen. I was very
disappointed not to have enough time to flatten these spangles out and use them
because I think they would have looked more dramatic on the coif.
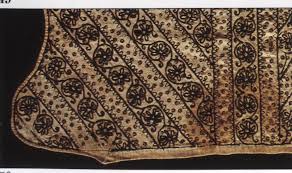 This extant coif (POF,
Plate 50) in the Burrell Collection, Glasgow that dates from around 1610
shows running stitch, stem stitch and panels of moderate spangling.
This extant coif (POF,
Plate 50) in the Burrell Collection, Glasgow that dates from around 1610
shows running stitch, stem stitch and panels of moderate spangling.
Both heavily and lightly spangled
extant coifs and other garments still exist. The Carew Pole nightcap (which is
worked with green silk feather motifs) and the coif below are examples of
fairly heavily spangled garments, which inspired me to spangle my coif quite
liberally.
A spangled
sixteenth century polychrome coif (Synge, unknown page) unusually
showing spangles sewn with four stitches instead of three!
Although ink was often used in
period to mark out embroidery designs, I am not confident enough about my draftsmanship
to risk using ink, so I traced the design in modern water soluble ink. I taped
my sketched design to a window and used the pane as a natural light box. The
salamander design below, dating from around 1600, demonstrates how ink was used
to mark out designs for the embroiderer to follow (V&A Collection,
T.88-1925, Arnold {QEWU} p. 272) (and also that animal designs were used on
linen garments.)
In period, many embroiderers seemed
to avoid knots and work their thread ends back into the embroidery. I have
knotted my threads and then worked the thread ends back into the work, again
for durability and security when the garment is machine washed.
This red and gold
worked coif from about 1610 shares similar attributes to mine; a flowing
foliate design, no edging lace is used, small spangles are heavily used,
and the embroiderer seems to have anchored their stitches in places with knots.
(POF4, plates 53-A.)
I lined the coif with the flannelette
before sewing the garment up. With my previous coif, I planned to line it after
it was finished, but I found it very difficult to get the lining to match the
outer piece. This time, I joined the lining and outer pieces together first and
whip stitched the edges with natural cotton thread (linen was probably used in
period, but is very expensive now) and a casing was made along the lower edge
for the lucet cord. The hand made cord was provided by my friend Heather Carter
and was made on a wooden lucet. The lucet cord is long enough to allow the coif
to be tied over my head as in the example below. The side edges were ornamented
with diagonal stitches in black cotton. Originally I did larger stitches along
the sides, but pulled them out and put smaller ones in because I thought the
smaller stitches looked nicer. Of the coifs I have looked at, some were
decorated on the edges, and some were not. Because I didn’t want to use lace on
this coif, I chose to decorate the edges.

This
extant piece shows the cord tied over the hair (Plate 51, POF4; Linen
coif embroidered in silk from around 1600 from the Museum
of Costume and Textiles, Nottingham.)
I joined the top seam with a small
diagonal stitch in white cotton, and then tried to replicate the cartridge
pleats seen on the coif in Plate 52B of POF4. My pleat stitches must have been
larger than those on the original because my coif has fewer pleats.
I secured the pleats with small
stitches in white cotton. I then did a three armed gathering cross like the one
just visible in pale green thread on Plate 52B (POF4). I used a triple securing
stitch in embroidery floss, which I then buttonholed over for strength. I did
the same on the smaller side arms. The extant piece seems to have a five armed
knot, but the function is the same.
Plate 52B, POF4 shows a detailed
picture of the top seam of a polychrome coif from around 1610, held in the Museum of Fine Arts
in Boston.
Even though my pleats are larger, when I put
it on, the pleats on the back of my coif do sit like this (POF4, Plate 52),
detail previous page.
Reflective Notes
The coif fits, and I am quite happy
with the finished product, although there are several things I would do
differently if I could do it again. I would leave more time for the spangling,
and use the heavier, more gold spangles. I am glad I didn’t do any seeding on the
coif- I like the clean lines. I may make a matching forehead cloth for the coif
as I have some left over linen blend fabric.
References
Arnold, J.
1988, Queen Elizabeth’s Wardrobe Unlock’d, W S Maney and Son Ltd, London.
Arnold, J;
Tiramani, J; and Levey, S. 2008, Patterns of Fashion 4, Pan Macmillan
Ltd, London.
Geddes, E
and McNeill, M. 1976, Blackwork Embroidery, Dover
Publications, New York.
Mikhaila, N and Malcom-Davies, J.
2006, The Tudor Tailor, B T Batsford Ltd, London.
Orsi Landini, R and
Niccoli, B. 2005, La Moda a
Firenze 1540-1580, Pagliai Polistampa, Florence.
Synge, L.
1982, Antique Needlework, Blandford
Press, New York.
Synge, L.
2001, The Art of Embroidery, Antique Collectors Club, UK.
Vecellio,
C. 1977, Vecellio’s Renaissance Costume Book, Dover Publications, New York.
Weiditz, C.
1994, Authentic Everyday Dress of the Renaissance, Dover
Publications, New York.
Bibliography
Like many
needlework enthusiasts, I have a collection of books that I like to look
through to get general inspiration for a project. Here are a few that I looked
through before starting this one:
- Compleat Anachronist 115: Wrought
with flowers of Black Silk, Prudence Catesby
- Compleat Anachronist 31: An
introduction to Blackwork, Shoshonnah Jehanne ferch Emrys
- The Encyclopedia of Embroidery
Techniques,
Pauline Brown (1994, Simon and Schuster,
Australia).
- Dress at the Court of King
Henry VIII,
Maria Hayward (2007, Maney Publishing,
UK).
Credits
- Thankyou to Heather Carter for
the lucet cord.
- I also utilised the resources
at the addresses below for information on stitches used in period, and these were suggested by THL Katerina
da Brescia in her article “WIP – Tuscan Camicia of the 16th
Century” as published in the WCoB Newsletter, Twelfth Night 2008: