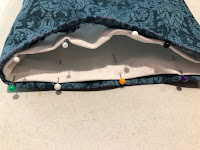
I used my existing sleeve pattern and cut the blue fabric and cotton lining. I machine zig zag stitched the edges and then sewed up the seam that runs down the back of the arm on both the blue fashion fabric and the lining. I stab stitched the arm back sleeve open on lining and fashion layers.
I put the right sides of the lining and fashion fabric tubes together (with a lot of double checking to make sure I was sewing the correct pieces) and machine stitched around the top of the armscye. I then clipped the curves to make sure the top of the sleeve would sit nicely and not be bulky, and then I turned it all right side out. I whip stitched around the top edge of the sleeve to make sure that the lining didn't roll out at any stage. I embroidered an 'L' inside the left sleeve to make dressing in a hurry easier.
I marked 1.5cm seam allowance on the fashion fabric and turned the hem under at the wrist and stab stitched it down. (I also stab stitched my finger a couple of times.)
I turned the lining hem up inside the sleeve slightly more (around 1.75cm) and whip stitched that into place. There were a couple of spots where I clipped a little triangle where the fabric was a bit tight and pulling. I used to sew the hem and lining together in one step, but I found that often the lining and fashion fabric would stretch at different rates and sometimes the lining would start to poke out a bit, so now I hem the two layers seperately.
The final step after pressing the hem with an iron was to mark and sew five eyelets in each sleeve head. I opened the fabric up with an awl, went around the hole with a double running stitch and then enclosed the hole with a ring of satin stitch.
I think this fabric might be digitally printed. I have never worked with fabric like this before. I noticed that a part of the design seems to have lifted where a pin stuck it.


No comments:
Post a Comment