Monday, November 18, 2019

A Woolen Tunic with Short Sleeves

Back in June when I made the long sleeve woolen tunic for a friend, I also made a short-sleeved one. The wool was lovely to work with; no fraying and beautiful to hand sew. I used the same 'pattern' as the previous tunic - basically just rectangles, squares and triangles. The main body is two rectangles. The sleeves are four rectangles. There is an underarm gusset which is a square, and triangles of fabric are added into the 'skirt' to add fullness.

I don't know the artist of this particular pattern but it is a good indicator of how the layout of my tunic looked. I didn't use a faced neckline because the wool was quite bulky, but the rest of the layout is very similar. I measured the wearer's body and added a little extra for ease of movement plus seam allowances.
I sewed the long seams by machine.
Once the seams were sewn, I whipped the seams open and down.
I added a supportive placket around the collar split so that the pressure of normal wearing wouldn't end up ripping the split at the front.
The rest of the neckline was turned down with a small hand-sewn hem to reduce bulk.


I left this tunic plain so that the recipient could sew trim on if he wanted. I have yet to get a photo of him wearing it, but it looks nice on.


Friday, November 15, 2019

Heraldic Favour

Another project that I completed recently was a heraldic favour. It is a simple sash with a representation of my device embroidered on it.
 I marked the design out by tracing it with frixion marker.
I embroidered the design with split and satin stitch. I tried to add some texture to the satin stitch. I added a shiny black bead for the eye.
 I sewed the panel into a sash and added some gold braid at the bottom.
I made the pin by adding a hat pin to a purchased heraldic seahorse pendant.

Wednesday, November 13, 2019

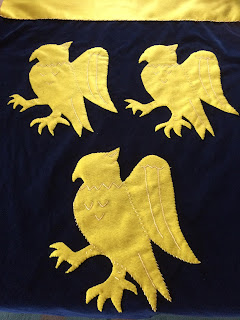
Indoor Heraldic Banner

As well as a silk banner, I made an indoor heraldic banner for  my friend.

I used velveteen as the base material and cotton broadcloth for the backing. I usually pre-rinse my fabric in hot water and dry and iron it before starting a project.

I enlarged the owl shapes and cut them out of felt (which I also used for the band across the top). I like using wool felt because it is easily available and doesn't fray.

I whip stitched the felt down and then embroidered over the edges. I couched a piece of gold cord across the edge of the band across the top.


 I embroidered on the details of the owls.

 I gave the owls multi-layered felt eyes to give a sense of depth.


Once all the details were done, I put the backing fabric and the embroidered velveteen panel face to face and machine sewed around most of the edges. I left a small section un-sewn. I clipped the corners to reduce bulk and then turned the banner right side out, pulling it through the un-sewn section. This technique is called 'bagging out' and is useful for sewing banners. It is important to make sure that the inside seams are sitting nicely; I run a bone turner or blunt knitting needle along the seams on the inside.

The final steps involved hand-sewing the smalls section shut and then turning a section of the top down and towards the back to make a hanging rod pocket. I whipped the section down, making sure my stitches did not show through on the front of the banner.

Finally, I sewed a section of creamy gold onto the bottom of the banner to finish it off.

Good starting points for researching medieval banners include:
https://en.wikipedia.org/wiki/Heraldic_flag
http://www.larsdatter.com/banners.htm
https://www.southerntailors.com/blog/the-origin-and-evolution-of-the-gonfalon/
https://www.theheraldrysociety.com/articles/heraldry-in-italy-during-the-middle-ages-and-renaissance/
https://www.southerntailors.com/blog/the-origin-and-evolution-of-the-gonfalon/